

Building a custom IoT dashboard
I recently implemented an end to end IoT dashboard to demonstrate the capabilities of a new embedded connectivity product that I was working on. I could have gone with SAAS and ready made solutions, but where is the fun in that??
I have tried to capture all the implementation details in the writeup below.
Objective
The objective here is quiet simple - collect data from the device peripherals and display it in a glossy web frontend dashboard in near real-time. The system is to be developed as a proof of concept and “capability demo” only and need not be a production ready rugged system.
The primary components of the system are
- messaging server
- dashboard
- Application firmware
Each device will be configured with a thingID that will be used to pair the dashboard and device and the complete server side installation will be rolled into a Docker that would enable anyone to spwan their own dashboard by just running a script.
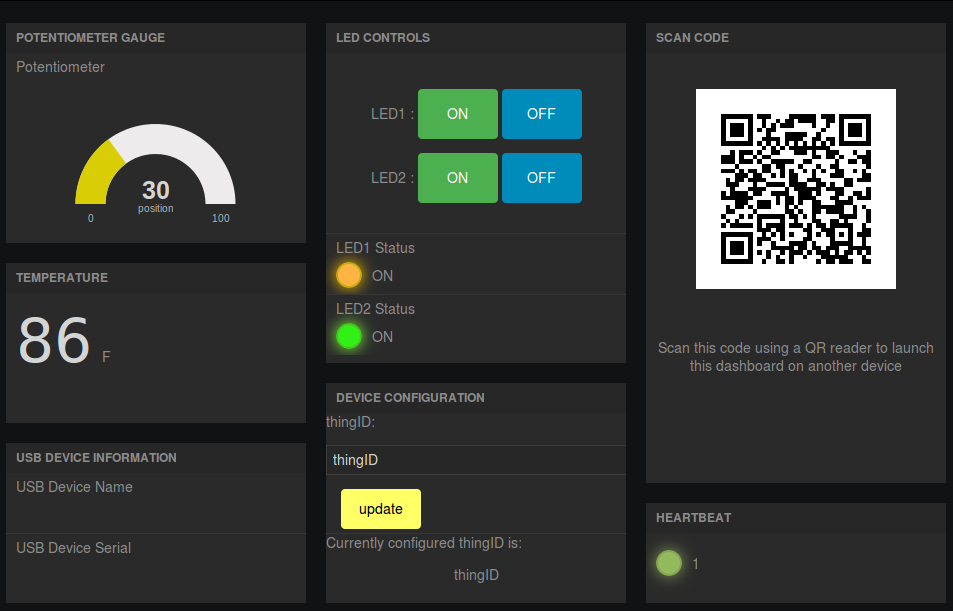
The final dashboard looks like this:
Messaging Server
In the traditional embedded systems development framework that I was operating from, the tribes advice was to go for a HTTP server with “API” to poll for peripheral data from a web page. The very idea made me sick and I decided to go rouge with the “unconventional” path.
For a “scalable” system that meets my objectives and perform reliably at the same time, I decided to experiment with the much hyped “MQTT” protocol. At the same time , I did not want to implement the full MQTT client stack on my embedded device firmware stack since a dedicated team was working on it in parallel. So, I derived inspiration from dweet messaging SAAS and decided to roll my custom service with a similar simple API fingerprint.
Since I was not planning to build a production grade system, I decided to build my APIs on shell scripts and a simple C program.
messaging core
For the messaging backend, I used “mosquitto” and slightly customized it. It comes prepackaged for Ubuntu and has a simple commandline based client implementation (mosquitto-clients) to send MQTT messages.
Mosquitto server comes with native support for Websockets. It can be enabled by adding the following lines to the configuration file at /etc/mosquitto/mosquitto.conf
listener 443
protocol websockets
I used port 443 so that it can pass through most firewall settings. I also enabled some logging and default settings using the following configurations in the same file.
allow_anonymous true

autosave_interval 1800
persistence_file m2.db
connection_messages true
log_timestamp true


listener 1883
These settings enables the core backend of my messaging server. Now, I need to build an HTTP API around it.
building messaging APIs
All messages passed along the MQTT path for communicating with the the Dashboard will be in JSON. This design decision was made to accommodate :
- Mobile application communication
- Simple Javascript based parsing at the Dashboard side.
There will be two APIs built as CGI scripts on an Apache server running on the messaging server.
The listen API is a simple shell script that uses the mosquitto_sub command line utility that comes with mosquitto.
Once the server is configured properly, with the following API, a “long living” http connection can be opened and it will receive JSON messages sent to a thingID:
http://<serverIP>/api/listen/to/<thingID>
The CGI script copied to <cgi path>/api/listen/to ( script named to ) is:
#!/bin/bash

echo "Content-Type: application/json"
echo -e "Connection: keep-alive\n\n"

path=($(echo $REQUEST_URI | tr "/" "\n"))
thingID=${path[-1]}
mosquitto_sub -t $thingID -q 1
When this script is called from the CGI framework, it parses the thingID out of the URL query string and starts a connection on Port 80 to send all messages published to the thingID topic.
The following curl command can be used to test this implementation:
curl -i http://<server ip>/api/listen/to/<thingID>
The server sneds back an acknowledgement in the form below and closes the connection.
{
	"with": {
		"topic": "thingID",
		"created": "Sat Oct  8 07:27:34 2016",
		"content": {
			"key1": "value1",
			"key2": "value2"
		},
		"session": "127.0.0.1:59406-157a3309ae0"
	}
}
Here the session ID is the remote IP + remote port + epoch time down to the millisecond.
It is not a good practice to rely on a long living HTTP connection for reliable message transfer. There are numerous reliability and load balancing issues associated with this. However , this method was used here since it is not a production grade system design.
The API to send messages is a bit more complicated. Though at the heart it uses mosquitto_pub CLI utility, there is a lot of preprocessing that has to be done to extract the information out of the query in the URI
Once setup properly, the following HTTP API (GET request) can be used to send a MQTT message using the server:
http://<server ip>/api/mdtweet/for/<thingID>?key1=value1&key2=value2
This will trigger a MQTT message on the thingID topic with a json payload which has the key and values that are in the URI query string. This will also return a json with the values sent in the message along with some timestamp and serializing information for tracking and debugging.
The “send” API was implemented in C code with no dependency on external libraries (link to source) . So, to compile and install it, just issue the following command:
gcc sendMessage.c -o <cgi api path>/for
This will compile and “install” the send API with the name for in the CGI API directory.
CGI configurations
For the APIs to function as intended, the CGI framework of Apache had to be configured
Following configuration had to be done in /etc/conf-available/serve-cgi-bin.conf and ./conf-enabled/serve-cgi-bin.conf to enable CGI scripts to execute from /var/www/api folder.
 <IfDefine ENABLE_USR_LIB_CGI_BIN>
 ScriptAlias /api/ /var/www/api/
 <Directory "/var/www/api">
 AllowOverride None
 Options +ExecCGI -MultiViews +SymLinksIfOwnerMatch
 Require all granted
 </Directory>
 </IfDefine>
Finally, to enable CGI module in Apache, do: sudo a2enmod cgi and restart the Apache service.
Since we are going with the suboptimal approach of using a long living HTTP connection, the server will be configured to accept infinitely long living HTTP keep-alive tunnels. to achieve this, keepalive timeout and max request in /etc/apache2/apache2.conf was increased. The number of ‘keep-alive’ requests that the server can accept was also increased to a large number (1000). However, this is not mandatory and this will in fact cause huge resource utilisation issues in a production environment.
 MaxKeepAliveRequests 1000
 MaxKeepAliveTimeout 60
Dashboard
A large portion of the IoT ecosystem revolves around glossy web based dashboards. I decided to implement mine using freeboard. However, the hosted version of freeboard was lacking many of the features that I wanted in my implementation. Support for MQTT based messages was the biggest loophole taht made me decide that I want to host my own version of the dashboard.
The major features that I ended up implementing in my custom roll of the dashboard are
- MQTT based messaging
- Automatic setup of server IP on page load
- Auto re-configuration of MQTT client on thingID change
- dynamic QR code generation
- URI query based automatic configuration of thingID
- Custom light indicators
MQTT on freeboard
Though MQTT is not in the list of messaging protocols supported by freeboard off the shelf, the cool guys who developed it has put in well documented hooks to add new messaging plugins. AL S-M has developed a wrapper around Eclipse Paho JavaScript Client that plugins into freeboard.
I decided to place my paho JS files on my server itself and placed them at plugins/mqtt/mqttws31.min.js. This information has to be updated in the plugin file placed at plugins\mqtt\paho.mqtt.plugin.js.
"external_scripts" : [
        "plugins/mqtt/mqttws31.min.js",
		]
This file in turn needs to be referred from the index.html file to be loaded upon init. Look for the comment instructing to place plugins and add the plugin path:
// *** Load more plugins here ***
"plugins/mqtt/paho.mqtt.plugin.min.js"
Once this is done, freeboard comes up with a dropdown option to select MQTT as one of the data sources in the design view. In my case, design/edit view would be disabled by default since the only parameter that needs run time configuration is the thingID and I will have a text box to enter that. Since my messaging server and dashboard HTTP server will be rolled into a single server instance (again, a suboptimal approach for a production system), I wanted to fetch the server IP name/IP from the launch URL and automatically configure the MQTT client.
Automatic setup of server IP on page load
As described in the MQTT server configurations, my MQTT websocket runs on port 443 since I wanted to comply with firewall installations. ( This is the worst way to achieve this + I am not running https :frowning: )
In paho.mqtt.plugin.js settings object, change the following to achieve this:
default_valueofservertowindow.location.hostnamedefault_valueofportto443default_valueofuse_ssltofalsedefault_valueofjson_datatotrue
With these configurations, the MQTT server and settings configured for the client will be automatically loaded upon page load. However, the topic to listen to has to correspond to the thingID configured in the dashboard.
Dynamic re-configuration of MQTT client
The thingID is entered into the dashboard using an html textbox with an onClickhooked to update a global variable by name “thingID”. This variable can be used to reconfigure the MQTT client and this is also plugged into the same update onClick()
dsSettings = freeboard.getDatasourceSettings("devStat");
dsSettings.topic = thingID; freeboard.setDatasourceSettings("devStat", dsSettings);
refreshPanels() { /*will be called bu onConnect of paho backend*/
if (true == updateCalled) {
    thingID = document.getElementById("thingID").value;
    enableLedButtons();

/*DOM changes*/

    message = new Paho.MQTT.Message(JSON.stringify({StatREQ:"True"}));
    message.destinationName = thingID; pahoClient.send(message);
}
paho.mqtt.plugin.js also needs to be edited to read the server IP from the URL as well as to call onConnect() on reconnect. To do this, onDispose function has to be edited by adding the following code just before the call to Paho.MQTT.Client.
currentSettings.server=window.location.hostname;
function onConnect() {
    console.log("Connected to server");
    pahoClient.subscribe(currentSettings.topic);
    if (typeof refreshPanels === "function") {
      refreshPanels();
    }
pahoClient is a global variable that I defined in paho.mqtt.plugin.js to hold the client object and all calls to client has been replaced by pahoClient
dynamic QR code generation
Freeboard has a good responsive design that makes it an excellent candidate to develop a dashboard that can be used to monitor and control my IoT devices from a Mobile phone as well. Though there was a companion Mobile App, I did not want everyone to have to install an App. Cross platform experience as well can be maintained uniformly using a web based solution.
However, having to enter the server IP and then having to configure the thingID every time seemed a bit unattractive. So, I decided to go with the generation of a QR code that can be scanned using the smart phone to instantly launch a “pre-provisioned” dashboard. As of today, Android and Windows phones can do this directly from the default camera app whereas iPhone requires a third party app.
To implement this, I had to make two modifications
- hack
index.htmlto fetch and configure thethingIDfrom the URL query string - include a mechanism to dynamically generate QR code when
thingIDchanges.
The later will be discussed here and former will be discussed in the next section.
To generate a QR code using javascript , I used jquery-qrcode from jeromeetienne. I created a pane for the QR code in my dashboard and made the updateThingID() function call updateQrCode() with the new thingID as the parameter. This will in turn call jQuery('#qrcodeTable').qrcode() that would redraw the QR code .
However the QR code drawn by this library doesnot have a margin and when the dark background of the default freeboard theme would “corrupt” the outer boundaries of the QR code. To avoid this, I had to modify jquery-qrcode.js to achieve this.
qrcode.js has two mechanisms to generate a QR “image”. We can choose either a table based approach where the QR code is generated as a table with the square cells filled according to the QR code , or a canvas based drawing. Since I am using many features throughout my dashboard that would restrict it to be used only with a modern browser, I decided to go with the with the canvas approach.
To achieve a margin around the drawing generated within the canvas, I modified the createCanvas function element by adding the following code after the default code that sets the width and height.
canvas.width	= options.width;
canvas.height	= options.height;
canvas.setAttribute('style', "left: 50%;margin-left:"+options.marginLeft+"px; top: 50%;margin-top:"+options.marginTop+"px;");
This code would let me pass the margin width as parameters from the code that I call to create the QR code.
Query based thingID configuration
To make it possible to elegantly utilize the QR code as well as to have an appeal during demos, I wanted to implement a mechanism to provision the dashboard based on a thingID passed on as a query string. This would let me configure my demo , set it up and ask someone to scan the code , and a copy of the dashboard would be instantly available in their mobile phone. Asking them to type a URI and then configure the thingID would fade the charm of this glossy dashboard.
Freeboard’s default index.html has a mechanism to pass on the dashboard jsons name as a query string parameter. I hacked this portion to fetch the thingID call the updateThingID() function to update the MQTT client, and the QR code in the dashboard.
I added an else condition to the hashpattern checking code in the index file as below.
var hashpattern = window.location.hash.match(/(&|#)source=([^&]+)/);
				if (hashpattern !== null) {
				$.getJSON(hashpattern[2], function(data) {
						freeboard.loadDashboard(data, function() {
								freeboard.setEditing(false);
								});
						});
				}
				else{
				$.getJSON("dashboard.json", function(data) {
						freeboard.loadDashboard(data, function() {
								freeboard.setEditing(false);
								var thing=getParameterByName("thingID");
								if(thing){
								document.getElementById("thingID").value = thing;
								updateThingID();
								}
								});
						});

				}
this would load my dashboard code (json) named dashboard.json and check for a query string named thing that would contain the thingID that needs to be configured in the dashboard.
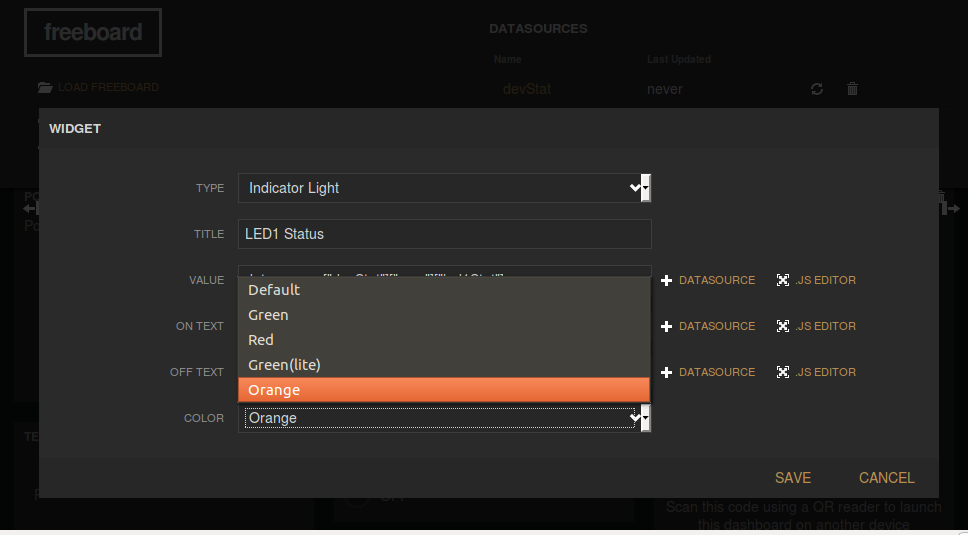
Custom light indicators
Freeboard has a light indicator widget that was not working on passing the configured ON and OFF messages in the version that I pulled. To fix this, I added the following code in the indicatorWidget function object in freeboard.widget.js and freeboard_plugins.js . (to be frank, I was not sure which would work at that time and I did not bother figuring out)
this.onCalculatedValueChanged = function (settingName, newValue) {
	if (settingName == "value") {
		if (newValue == onText) {
			isOn = true;

		}
		else {
			isOn = false;
		}
	}
}
Now, the widget was supporting only one color but I wanted to match the colors of the LEDs I had in my demo board. So, I decided to modify the widget to have configurable LED color options.
Just above the indicatorWidget function element in freeboard_plugins.js, I added the following styles along with the existing .indicator-light styles.
freeboard.addStyle('.indicator-light.default', "background-color:#FFC773;box-shadow: 0px 0px 15px #FF9900;border-color:#FDF1DF;");
freeboard.addStyle('.indicator-light.orange', "background-color:#FFB340;box-shadow: 0px 0px 15px #FFC600;border-color:#C6AB0F;");
freeboard.addStyle('.indicator-light.green', "background-color:#31F015;box-shadow: 0px 0px 15px #89F944;border-color:#47C620;");
freeboard.addStyle('.indicator-light.red', "background-color:#FF1818;box-shadow: 0px 0px 15px #FF4040;border-color:#F00;");
freeboard.addStyle('.indicator-light.lgreen', "background-color:#92B95B;box-shadow: 0px 0px 15px #869F62;border-color:#85A454;");
to make these styles take effect, I modified the updateState() function as:
indicatorElement.toggleClass(currentSettings.color, isOn);
Now, to get these color options when I create a new widget instance, I added the following to the indicator-light settings json
{
  name: "color",
  display_name: "Color",
  type: "option",
  options: [
    {
      name: "Default",
      value: "default"
    },
    {
      name: "Green",
      value: "green"
    },
    {
      name: "Red",
      value: "red"
    },
    {
      name: "Green(lite)",
      value: "lgreen"
    },
    {
      name: "Orange",
      value: "orange"
    }
  ]
}
The new settings window for the widget looks like this:
Dockerizing the server
In the initial release of the dashboard that I was testing using dweet free tire messages, I hosted my modified web page code as a Github page. However, once I implemented the MQTT backend , this was no longer possible. The main reason for this is that all github pages gets loaded over https and the webSocket in the messaging server that I configured uses ws:// instead of wss:// . Since my objective was to roll out the server code and let people use it as they deem fit, getting wss:// configured with valid certificates would have been prohibitive.
an alternate approach is to lower the security of the browser and allow it to use
ws://on a page loaded overhttps.
My preferred development infrastructure is Digitalocean since it is a simple and flexible hosting service. So, for people to easily setup a “demo server” , I rolled all the development I did, into a Dockerfile that can be piulled from Github. So, it is just a matter of running few lines of commands and within minutes (if we are using the high speed network backed of a hosting service), the whole server will be up and running.
here is the Dockerfile that I wrote. It is pretty self explanatory
FROM ubuntu:16.04
MAINTAINER vysakhpillai

RUN apt-get update && apt-get install -y apache2 supervisor mosquitto-clients mosquitto build-essential
RUN mkdir -p /var/lock/apache2 /var/run/apache2 /var/run/sshd /var/log/supervisor /var/lock/mosquitto /var/run/mosquitto

#apis
RUN mkdir -p /var/www/api/listen
COPY configs/listen.sh /var/www/api/listen/to
RUN chmod +x /var/www/api/listen/to

RUN mkdir -p /var/www/api/mdtweet
COPY  configs/sendMessage.c /var/www/api/mdtweet
RUN gcc /var/www/api/mdtweet/sendMessage.c -o /var/www/api/mdtweet/for
run rm /var/www/api/mdtweet/sendMessage.c

#apache
COPY configs/serve-cgi-bin.conf /etc/apache2/conf-available/serve-cgi-bin.conf
COPY configs/serve-cgi-bin.conf /etc/apache2/conf-enabled/serve-cgi-bin.conf
COPY configs/apache2.conf /etc/apache2/apache2.conf
RUN mkdir -p /var/www/html
RUN rm -rf /var/www/html/*
ADD html /var/www/html
RUN a2enmod cgi

COPY configs/mosquitto.conf /etc/mosquitto/mosquitto.conf
COPY configs/supervisord.conf /etc/supervisor/conf.d/supervisord.conf

EXPOSE 80 443
CMD ["/usr/bin/supervisord"]


Leave a comment