

Linux & Python on RISC-V using QEMU from scratch
Introduction
As of today, RISC-V hardware is not always easy to come by on a hobbyist budget. But this need not stop you from exploring the ecosystem. This article explores how to set up RISC-V on QEMU, boot a simple application on it using the PK kernel, and boot a cross-compiled Linux on the emulation platform. We top it by booting a standard Linux distro with python support.
We will be compiling all the tools from scratch to get a good familiarity with the pieces involved. There is quite a lot of info already available out there. So, it might be overwhelming for a beginner. This article brings together the end to end flow into a single document.
Familiarizing the toolchain using spike
We need a bunch of tools to get started.
-
riscv-gnu-toolchain is the toolchain to compile applications for RISC-V. Two flavors run on Linux:
-
riscv64-unknown-elf-gccthat usesnewliband is used for small statically linked standalone programs and embedded targets. -
riscv64-unknown-linux-gnu-gccthat usesglibcand can be used to build programs that can be dynamically linked and executed on an OS like Linux.
if you compile with
-nostartfiles -nostdlib -nostdincboth the toolchains will work the same way. -
-
spike is a RISC-V ISA Simulator that is the golden reference for the ISA. It provides full system emulation or proxied emulation (using
HTIF/FESVR). It is the universal starting point to explore RISC-V targeted software. -
RISC-V Proxy Kernel, commonly known as
pkis an application execution environment that can host statically linked RISC-V ELF binaries. Besides initialization and basic system setup,pkprimarily traps I/O system calls in a tethered I/O limited environment and proxies them to the host. If the RISC-V core runs tethered to an actual host overFESVR,pksend it back to the host. In the case ofspike, the requests are relayed back to the OS hostingspike.
I thought the easiest way to get all the tools in one-shot is to using the riscv-tools repo.
So, I started by installing the dependencies with:
sudo apt install autoconf automake autotools-dev curl libmpc-dev libmpfr-dev libgmp-dev \
                 libusb-1.0-0-dev gawk build-essential bison flex texinfo gperf libtool \
                 patchutils bc zlib1g-dev device-tree-compiler pkg-config libexpat-dev  \
                 libncurses5-dev libncursesw5-dev
Then clone the repo, init submodules, export the install location and trigger the build with :
git clone https://github.com/riscv/riscv-tools.git
git submodule update --init --recursive
export RISCV=~/riscv
./build.sh
But since the riscv-tools repo is not actively maintained, I ended up getting an error during compilation
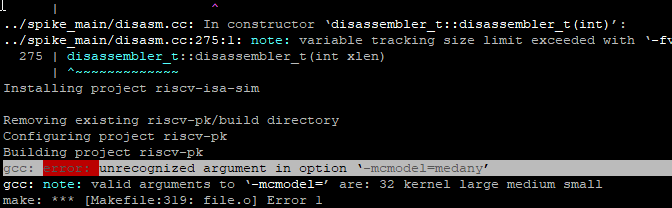
riscv-tools build error
So, I decided to compile each tool manually.
For the GCC tools,
git clone https://github.com/riscv/riscv-gnu-toolchain
cd riscv-gnu-toolchain
./configure --prefix=$RISCV
Pass the option --enable-multilib to build the toolchain with 32-bit and 64-bit support.
To compile the embedded toolchain simply do make -j $(nproc). For the linux version, give make -j $(nproc) linux .
This will clone all required submodules and compile the toolchain and install it to the $RISCV folder. At the end of the process, we will have both the toolchains.

our newly-compiled GCC toolchain
Next, we compile spike from the riscv-isa-sim repo. From the cloned repo, give:
mkdir build
cd build
../configure --prefix=$RISCV
make -j $(nproc)
make install
This will generate spike tools:
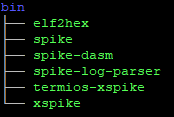
Generated spike tools
We now need to compile riscv-pk to bootstrap bare-metal programs in spike. Make sure that the path where you installed the GCC toolchain is available in PATH. From the cloned repo, give:
mkdir build
cd build
../configure --prefix=$RISCV --host=riscv64-unknown-elf
make -j $(nproc)
make install
This will generate the following tools:
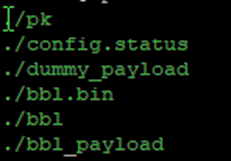
Generated `PK` and bbl
bbl is the Berkeley bootloader, which is a supervisor execution environment for tethered RISC-V systems.
Moment of truth. Let us compile and run a hello world application with RISC-V simulation in spike.
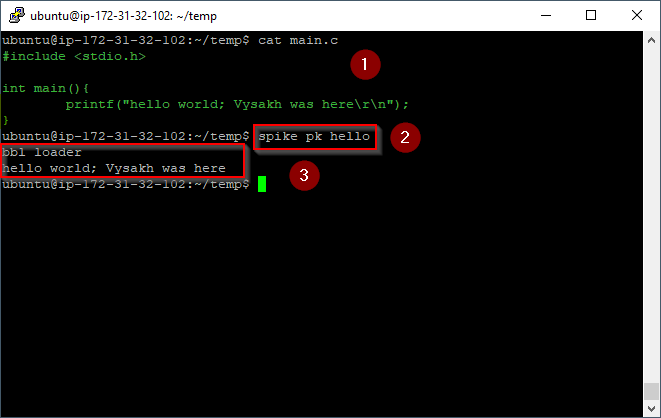
Successful first bare-metal program
This gives us confidence that the toolchain we just built is working.
Spike also has a bunch of debug capabilities. For now, we are not going into the details of a debugging setup since we want first to set up QEMU and run riscv-linux.
Setting-up QEMU for RISC-V emulation
What we saw with spike is essentially bare-metal simulation with support from pk. While it can be done, running whole Linux operating systems in spike is not efficient. We will use system emulation with QEMU for that.
riscv-qemu has been mainstreamed a while back. So, we will use the upstream QEMU repository.
First, install the dependencies.
sudo apt install ninja-build libglib2.0-dev libpixman-1-dev
Clone the repo and move to the latest release tag:
git clone https://git.qemu.org/git/qemu.git
git checkout v5.2.0
./configure --target-list=riscv64-softmmu,riscv64-linux-user --prefix=$RISCV
make -j $(nproc)
make install
This will generate the following files.
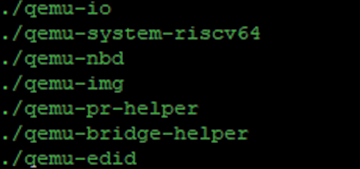
newly built QEMU tools
Compiling the latest Linux kernel, busybox and creating a rootFS
First, install some more deps
sudo apt install libncurses5-dev libncursesw5-dev
Compiling the kernel
We need to cross-compile the kernel and busybox separately. To get the latest Linux kernel and compile it with the toolchain we compiled, follow these steps:
git clone https://github.com/torvalds/linux.git
cd linux
git checkout v5.10
make ARCH=riscv CROSS_COMPILE=riscv64-unknown-linux-gnu- defconfig
make ARCH=riscv CROSS_COMPILE=riscv64-unknown-linux-gnu- -j $(nproc)
Note: In this iteration, we are building a Linux kernel with the default options.
At the end of this build, we will have the compressed, bootable RISC-V kernel in linux/arch/riscv/boot/Image
Compiling busybox.
For the uninitiated, busybox clubs, many userland tools into a single binary and can finally give us the shell at boot.
git clone https://git.busybox.net/busybox
cd busybox
git checkout 1_32_1
CROSS_COMPILE=riscv64-unknown-linux-gnu- make defconfig
CROSS_COMPILE=riscv64-unknown-linux-gnu- make menuconfig
Enable static linking under settings to make it easier to prepare the rootFS later.
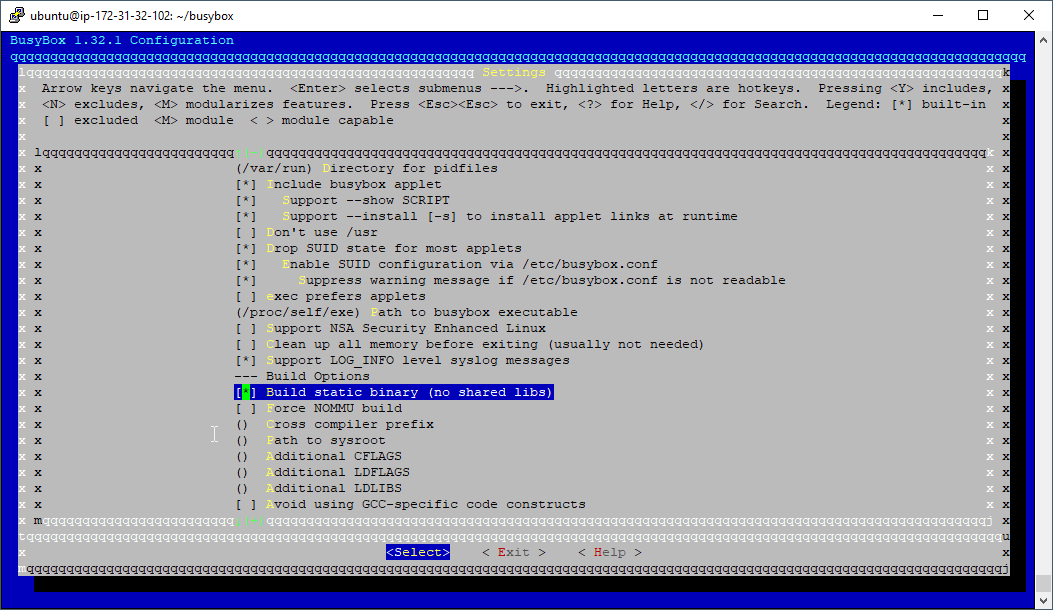
Build options for statically linked `busybox`
CROSS_COMPILE=riscv64-unknown-linux-gnu- make -j $(nproc)
Creating a rootFS
First , we will create a NULL disk and format it as an ext2
dd if=/dev/zero of=root.bin bs=1M count=64
mkfs.ext2 -F root.bin
We will then locally mount the newly created disk image, create the bare minimum files and copy the busybox we compiled.
mkdir mnt
sudo mount -o loop root.bin mnt
cd mnt
sudo mkdir -p bin etc dev lib proc sbin tmp usr usr/bin usr/lib usr/sbin
sudo cp ~/busybox/busybox bin
sudo ln -s ../bin/busybox sbin/init
sudo ln -s ../bin/busybox bin/sh
cd ..
sudo umount mnt
Now the rootFS looks like this:
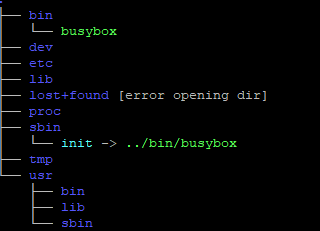
rootFS tree
We have intentionally avoided creating an inittab since this manual process is more for understanding the process. We are relying on Kernel defaults. A full-fledged rootFS can be created using buildroot / Yocto.
First QEMU boot
Boot the Linux image in our QEMU using
qemu-system-riscv64 -nographic -machine virt \
                    -kernel linux/arch/riscv/boot/Image \
                    -append "root=/dev/vda rw console=ttyS0" \
                    -drive file=root.bin,format=raw,id=hd0 \
                    -device virtio-blk-device,drive=hd0
Note: to exit QEMU, type CTRL+a then x.
At boot, execute the following command to make busybox install all the required utility mappings
/bin/busybox --install -s
SUCCESS!!
Running an actual OS
To build an embedded target rootFS, we typically use buildroot or Yocto. But, I decided to use a standard OS to start a complete RISC-V exploration.
If buildroot is used use the
qemu_riscv64_virt_defconfigconfig and boot with the command below:
qemu-system-riscv64 -nographic -machine virt -kernel output/images/Image \
                    -append "root=/dev/vda rw console=ttyS0"             \
                    -drive file=output/images/rootfs.ext2,format=raw,id=hd0\
                    -device virtio-blk-device,drive=hd0
We start by installing virt-builder, a tool that lets us quickly build virtual machines.
sudo apt install libguestfs-tools
By default RISC-V images wont appear in the list. So, we configure the builder repos to be able to pull fedora images.
mkdir -p ~/.config/virt-builder/repos.d/
cat <<EOF > ~/.config/virt-builder/repos.d/fedora-riscv.conf
[fedora-riscv]
uri=https://dl.fedoraproject.org/pub/alt/risc-v/repo/virt-builder-images/images/index
EOF
Now, we can see the RISC-V images by giving the command
virt-builder --list | grep riscv64
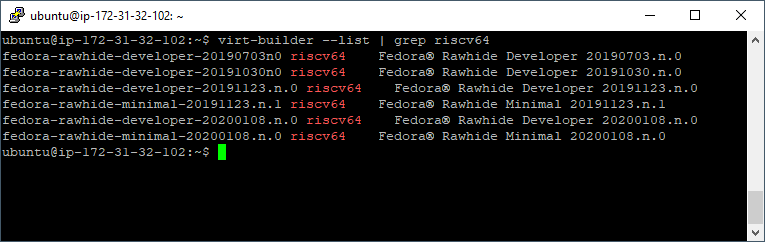
looking for fedora images
We now get the raw disk image and unzip it with :
wget https://dl.fedoraproject.org/pub/alt/risc-v/repo/virt-builder-images/images/Fedora-Developer-Rawhide-20200108.n.0-sda.raw.xz
unxz -k Fedora-Developer-Rawhide-20200108.n.0-sda.raw.xz
This will create the file Fedora-Developer-Rawhide-20200108.n.0-sda.raw
We also need the bootloader. For this, find and download the image using:
virt-builder --arch riscv64 --notes fedora-rawhide-developer-20200108.n.0 | grep fw\_payload
wget https://dl.fedoraproject.org/pub/alt/risc-v/repo/virt-builder-images/images/Fedora-Developer-Rawhide-20200108.n.0-fw\_payload-uboot-qemu-virt-smode.elf
Now boot fedora with:
export VER=20200108.n.0
qemu-system-riscv64 -machine virt
                    -nographic \
                    -smp 4 \
                    -m 8G \
                    -kernel Fedora-Developer-Rawhide-${VER}-fw_payload-uboot-qemu-virt-smode.elf \
                    -object rng-random,filename=/dev/urandom,id=rng0 \
                    -device virtio-rng-device,rng=rng0 \
                    -device virtio-blk-device,drive=hd0 \
                    -drive file=Fedora-Developer-Rawhide-${VER}-sda.raw,format=raw,id=hd0 \
                    -device virtio-net-device,netdev=usernet \
                    -netdev user,id=usernet,hostfwd=tcp::3333-:22
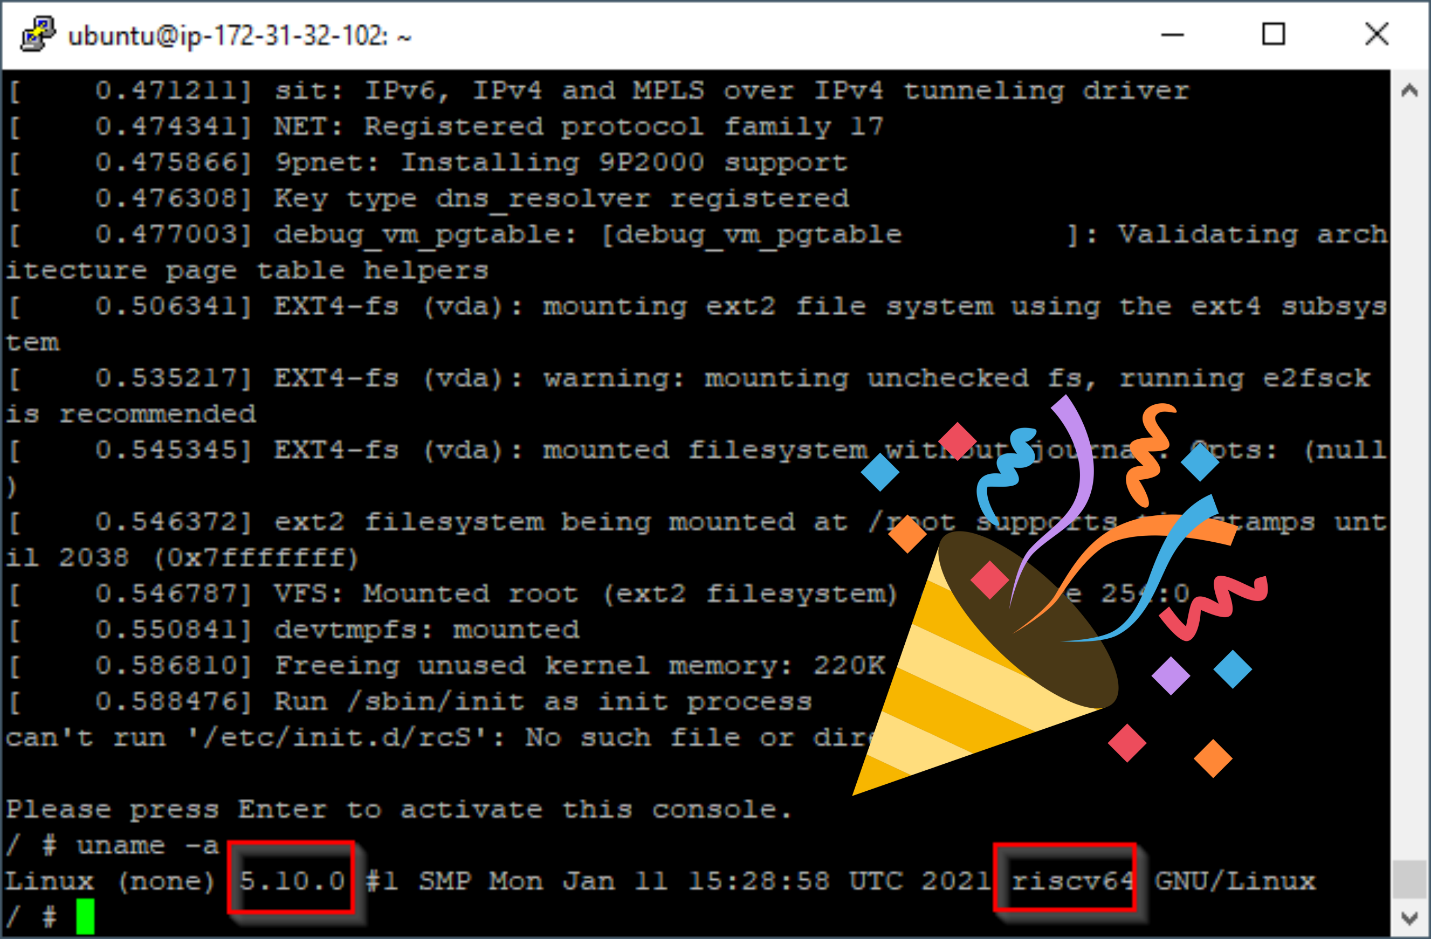
You can see the system info after boot
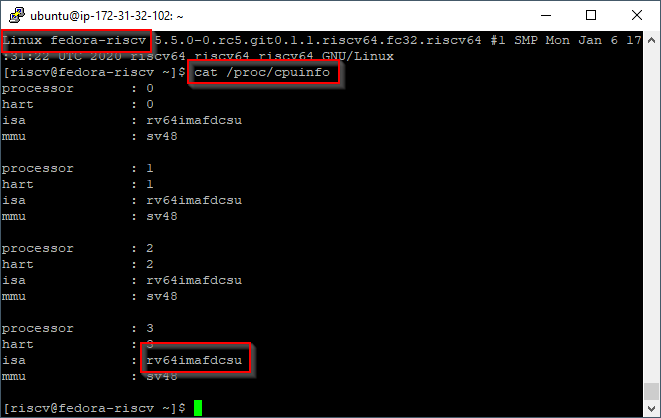
RISC-V QEMU cpuinfo
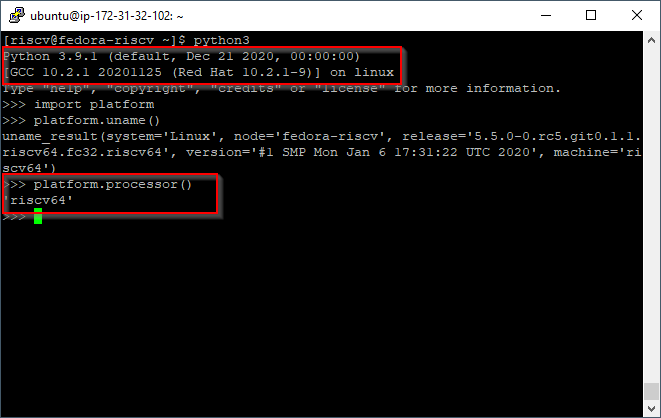
Python3 on RISC-V + Linux


Leave a comment