

System Hardware Partitioning Using Device Trees in a Virtualized System
This article forms the basis for the publication System Partitioning with Virtualization for Federated and Distributed Machine Learning on Critical IoT Edge Systems
If you have brought up Linux on an embedded target (or loosely, any non-PC target), you would have at least heard of the term Device Tree. Device trees have been around for a while and have changed over time. This article looks at how device trees can be leveraged to create sliced systems in a virtualized, embedded system.
I strongly suggest that you read through Motivation for virtualization in embedded systems before proceeding. This will help you better appreciate what we are doing in this article and why it is relevant.
For the hand full of followers of articles I put up here in embeddedinn, you might recall that we did some tweaking of the QEMU device tree representation while building the RISC-V butter robot. The initial part of this article expands on the concepts we covered there.
A quick and dirty introduction to device trees.
The fundamental reason that brought about device trees into the Linux world is the need to avoid creating create new system images for boards where the only difference is the addition/removal of a couple of peripherals that has nothing to do with how the kernel operates. These peripherals might be external to the SoC or even internal to the system. For instance, two SoCs of the same device family, one with 2 I2Cs and one with no I2Cs, should boot the same image, compiled once. (This is under the assumption that the I2C is not handling boot-critical functions). But, to make this a reality, we need a standard mechanism by which the bootloader can pass info about the mapping of peripherals to the kernel at boot. Device trees are here to help you with this.
A device tree starts its life as a Device Tree Source (DTS). This is compiled into a flattened device tree, a.k.a a Device Tree Blob (DTB) using the Device Tree Compiler (DTC). Once a DTB is generated the bootloader can pass it on to the kernel at boot. In an embedded system, DTBs are typically stored in the non-volatile memory where bootloaders are stored. Bootloaders like Uboot will read the DTB and feed it to the kernel along with other boot parameters.
Now, what and how exactly is the HW described in the DTS? The general structure of a DTS entry is shown in the image below.
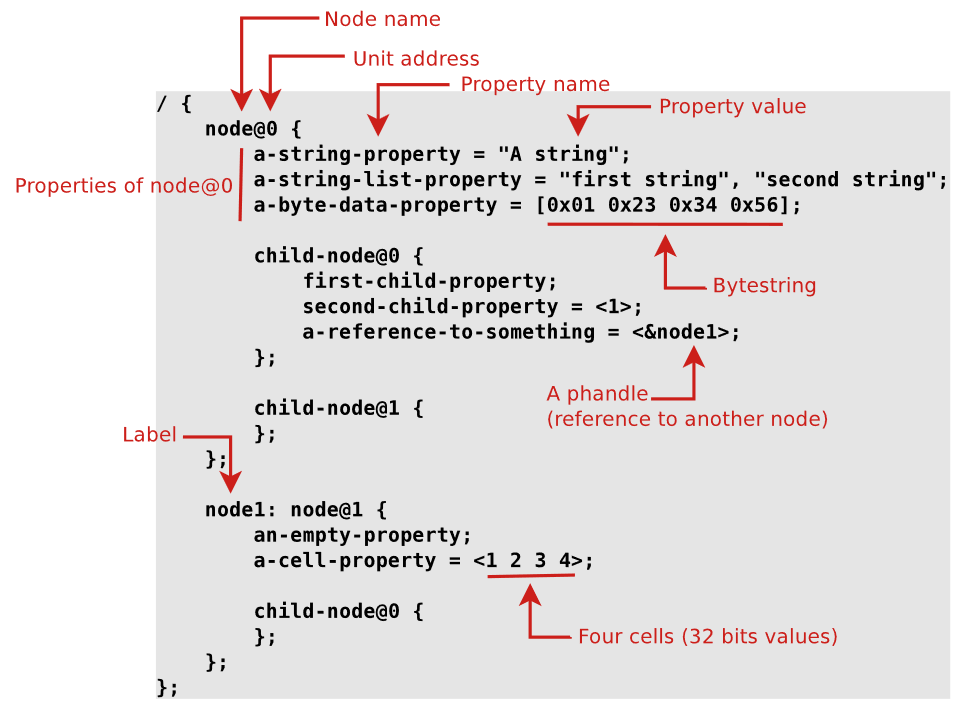
(source: Device tree for dummies)
And, this is how an actual entry would look like:
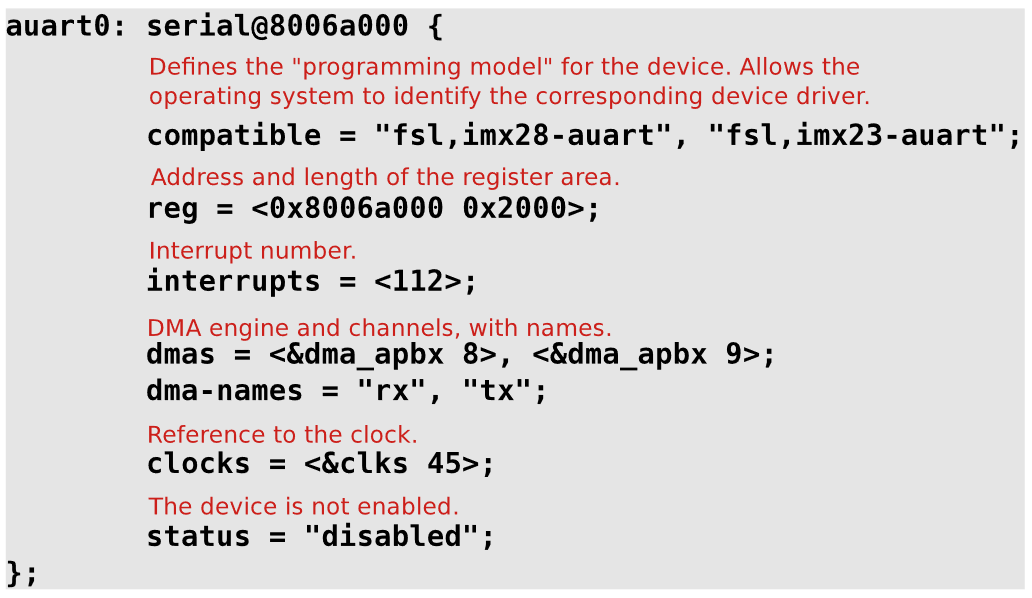
(source: Device tree for dummies)
Device trees in a virtualized system
In the case of a Virtualized system, we can pass different device trees to the guest OSes so that they have access to just a subset of the actual peripherals in the system. To see this in action , here is what we will do:
-
Create a virtualized system using Xvisor on Qemu. This time, we will use Arm A9 emulation.
-
Pass a full set of peripherals to XVisor. We will modify the default DTS of the vExpress emulation target to include 2 additional UART peripherals to see this in action.
- It is not mandatory that we pass the full set of peripherals to the hypervisor since we can pass peripherals not visible even to the hypervisor to the guest OSes. This is ideal for embedded systems that partition a larger SoC into individual discrete “Virtual machines”.
-
Pass a subset (1 UART less) to the guest OS.
The steps to build the system components from source is given in the appendix section of this article. We will look at the modifications and use the results here.
The DTS we modify comes form the xvisor source tree. The file is arch/arm/board/generic/dts/arm/vexpress-v2p-ca9.dts. The modifications I did to introduce two additional UART instances are highlighted in the image below:
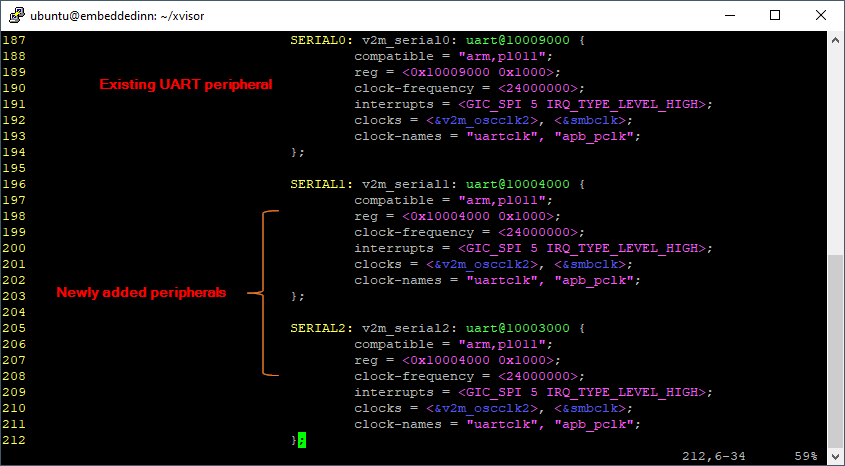
Adding extra peripherals to the system
This new dts can now be compiled and used to boot the qemu instance with the Xvisor image. Once xvisor is up, you can pass the chardev list command to see the enumerated devices.
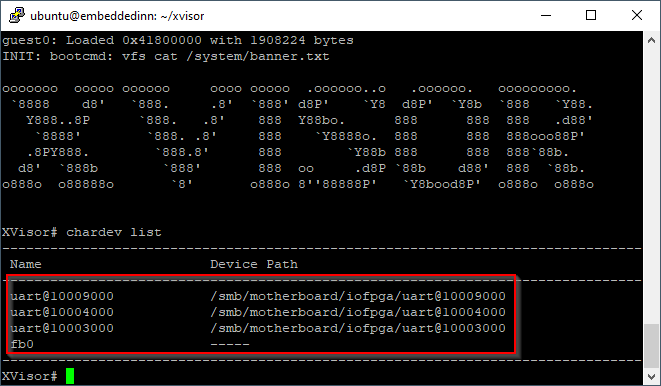
Listing the new peripherals in the hypervisor
The DTS passed to the guest OS is at xvisor/tests/arm32/vexpress-a9/vexpress-a9-guest.dts of the Xvisor source tree. The alias is referred to from linux/arch/arm/boot/dts/vexpress-v2p-ca9.dts in the Linux source tree. You can see the three UARTs and an additional virtual UART enumerated by the Linux class layer. (There are some virtualized devices since we are using QEMU based emulation. However, since we are doing this to validate our conceptual understanding, we will have some leeway with what we see here).
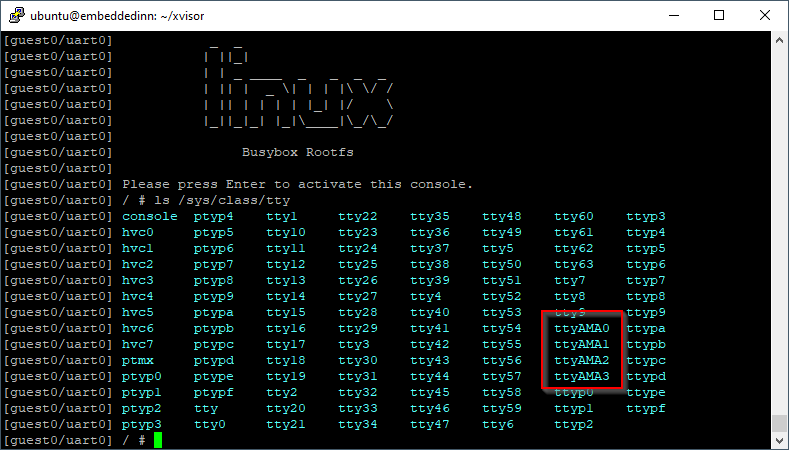
OS listing our new peripheral
If we remove the reference just from the xvisor tree, it will result in a kernel panic since the DTB we compiled into the kernel is still referring to it.
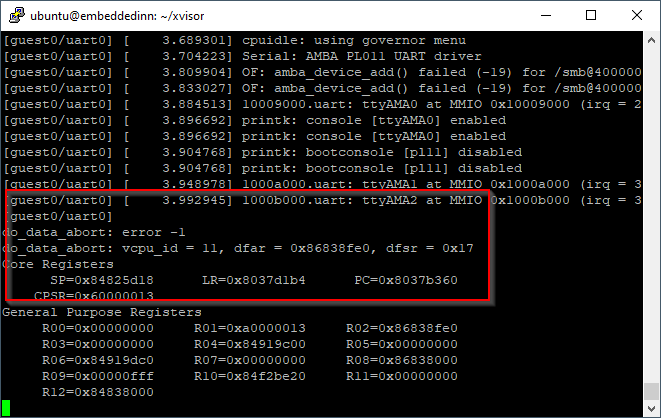
Kernel panic
Once we remove the reference form the kernel DTS as well, we can see that the peripheral that is available in the platform, and visible by the Hypervisor and potentially even other guest OSes is not enumerated by the kernel in this case.
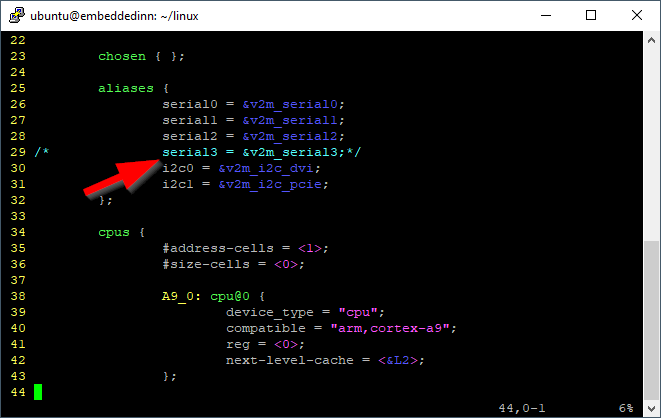
Fixing the internal reference
Security concerns.
Securing access to portions of the hardware is the next item to consider. However, it is a very vast topic that needs focused analysis since there are lots of variables involved. The platform capabilities and how the ring levels are configured in the SoC plays a huge role in physically blocking a guest from accessing peripherals. We will plan this in another article and focus on a specific platform while analyzing it.
Sharing Hardware among guests
Considering a simple trust based system, if a Guest wants to access a peripheral that is mapped into another guest’s device tree, we need to build a client server based message posting infrastructure for one guest to request operations to another. This again is a topic for another article.
Overall the DTS based approach is a bit messy since the kernel is flooded with too many device trees. There are also some ongoing initiatives to improve the state of affairs.
too many device trees
Appendix A: Build Steps
1. Setting up the development environment
Install dependencies with:
sudo apt install autoconf automake autotools-dev curl libmpc-dev libmpfr-dev libgmp-dev \
                 libusb-1.0-0-dev gawk build-essential bison flex texinfo  libtool\
                 patchutils bc zlib1g-dev device-tree-compiler pkg-config libexpat-dev\
                 libncurses5-dev libncursesw5-dev git gcc-multilib git-all  iasl cgdb xorriso\
                 libncurses5-dev m4 flex bison autoconf expect qemu-system-x86 qemu-utils\
                 qemu-system-arm qemu-user libssl-dev bc python genext2fs -y

sudo apt-get install  install gcc-arm-linux-gnueabi
2. Compile Xvisor for the ARM Qemu Target.
At the time of writing this article, Xvisor is in version v0.3.0.
Clone it with :
git clone https://github.com/xvisor/xvisor.git
This version is not compatible out of the box with the latest GCC ARM compiler that we are using. So we need to apply a patch to make it compile.
cd xvisor
wget https://github.com/xvisor/xvisor/pull/125.patch
git apply 125.patch
Now, compile it with:
export CROSS_COMPILE=arm-linux-gnueabi-
make ARCH=arm generic-v7-defconfig
make -j  $(nproc)
We also need to build the tests since that gives us the required scripts and patches required for the rest of the operations
make -C tests/arm32/vexpress-a9/basic
3. Compiling the Guest OS (Linux)
To compile the Linux kernel that can run on Qemu Xvisor, we need to make a bit of changes to the default source code and the generated images. XVisor provides the scripts required to do this. However, compatibility of these tools are flakey at best beyond Linux kernel version 5.4. So, we will use v5.4 for the time being.
Clone the kernel with:
git clone https://github.com/torvalds/linux.git
cd linux
git checkout v5.4
We then use the tooling provided by Xvisor to update the configurations and apply some patches to get the source tree ready for compilation.
cd linux
sed -i 's/0xff800000UL/0xff000000UL/' arch/arm/include/asm/pgtable.h
cp arch/arm/configs/vexpress_defconfig arch/arm/configs/tmp-vexpress-a9_defconfig
../xvisor/tests/common/scripts/update-linux-defconfig.sh -p arch/arm/configs/tmp-vexpress-a9_defconfig -f ../xvisor/tests/arm32/vexpress-a9/linux/linux_extra.config
Now, make a build with the modified configuration.
make O=../linBuild ARCH=arm tmp-vexpress-a9_defconfig

make O=../linBuild/ ARCH=arm Image dtbs -j $(nproc)
Once compilation is done, we need to patch the kernel image to replace sensitive non-privileged instructions and then repack the image.
export CROSS_COMPILE=arm-linux-gnueabi-
../xvisor/arch/arm/cpu/arm32/elf2cpatch.py -f ../linBuild/vmlinux | ../xvisor/build/tools/cpatch/cpatch32 ../linBuild/vmlinux 0
${CROSS_COMPILE}objcopy -O binary ../linBuild/vmlinux ../linBuild/arch/arm/boot/Image
4. Create a root FS with BusyBox
Download and un-compress the busybox source.
wget https://busybox.net/downloads/busybox-1.33.1.tar.bz2
tar xvf busybox-1.33.1.tar.bz2
Xvisor provides the BusyBox defconfig for Qemu emulation. However, this is provided for the 1.31.1 version of BusyBox. This version is not compatible with the latest GlibC since the stime function was deprecated since glibc 2.31. This has since been fixed in BusyBox. So, we will use the latest 1.33.1 version of BusyBox. But, the configuration for this is not part of xvisor. I have raised a PR for it. So, for now we will apply it as a patch.
cd xvisor
wget https://github.com/xvisor/xvisor/pull/137.patch
git apply 137.patch
cp tests/common/busybox/busybox-1.33.1_defconfig ../busybox-1.33.1/.config
cd ../busybox-1.33.1/
export CROSS_COMPILE=arm-linux-gnueabi-
make oldconfig
make install -j $(nproc)
Once BusyBox is compiled, we will populate additional items and the device tree components into the filesystem and package it.
mkdir -p ./_install/etc/init.d
mkdir -p ./_install/dev
mkdir -p ./_install/proc
mkdir -p ./_install/sys
ln -sf /sbin/init ./_install/init
cp -f ../xvisor/tests/common/busybox/fstab ./_install/etc/fstab
cp -f ../xvisor/tests/common/busybox/rcS ./_install/etc/init.d/rcS
cp -f ../xvisor/tests/common/busybox/motd ./_install/etc/motd
cp -f ../xvisor/tests/common/busybox/logo_linux_clut224.ppm ./_install/etc/logo_linux_clut224.ppm
cp -f ../xvisor/tests/common/busybox/logo_linux_vga16.ppm ./_install/etc/logo_linux_vga16.ppm

cd ./_install; find ./ | cpio -o -H newc > ../rootfs.img; cd -
5. Create a disk image for QEMU with Xvisor and the guest OS images.
We will not package the Xvisor image, Guest OS and the Guest rootFS into a disk image that QEMU can use.
cd xvisor

mkdir -p ./build/disk/tmp
mkdir -p ./build/disk/system
cp -f ./docs/banner/roman.txt ./build/disk/system/banner.txt
cp -f ./docs/logo/xvisor_logo_name.ppm ./build/disk/system/logo.ppm
mkdir -p ./build/disk/images/arm32/vexpress-a9
dtc -q -I dts -O dtb -o ./build/disk/images/arm32/vexpress-a9-guest.dtb ./tests/arm32/vexpress-a9/vexpress-a9-guest.dts
cp -f ./build/tests/arm32/vexpress-a9/basic/firmware.bin.patched ./build/disk/images/arm32/vexpress-a9/firmware.bin
cp -f ./tests/arm32/vexpress-a9/linux/nor_flash.list ./build/disk/images/arm32/vexpress-a9/nor_flash.list
cp -f ./tests/arm32/vexpress-a9/linux/cmdlist ./build/disk/images/arm32/vexpress-a9/cmdlist
cp -f ./tests/arm32/vexpress-a9/xscript/one_guest_vexpress-a9.xscript ./build/disk/boot.xscript
cp -f ../linBuild/arch/arm/boot/Image ./build/disk/images/arm32/vexpress-a9/Image
cp -f ../linBuild/arch/arm/boot/dts/vexpress-v2p-ca9.dtb ./build/disk/images/arm32/vexpress-a9/vexpress-v2p-ca9.dtb
cp -f ../busybox-1.33.1/rootfs.img ./build/disk/images/arm32/vexpress-a9/rootfs.img
genext2fs -B 1024 -b 32768 -d ./build/disk ./build/disk.img
6. Boot
Boot into Xvisor with
qemu-system-arm -M vexpress-a9 -m 512M -display none -serial stdio -kernel build/vmm.bin -dtb build/arch/arm/board/generic/dts/arm/vexpress-v2p-ca9.dtb -initrd build/disk.img
Boot the guest OS with
guest kick guest0
vserial bind guest0/uart0
autoexec


Leave a comment