

Booting up my first RISC-V core on an FPGA.
Introduction
RISC-V is an emerging open standard ISA that is set to take the computing world by storm. The beauty of the RISC-V ISA lies in the fact that it is boring. It started as a clean slate design at UC Berkeley to build an easy to learn and easy to teach RISC architecture. So, the core architecture should be pretty straightforward to understand. But, as-it-is, it is just an ISA. To be useful beyond an academic exercise, the ISA should be built into an SoC with other essential components, including a system bus and a memory subsystem. This is a work in progress, and it is this community effort that will eventually make RISC-V a success. There are very few physical RISC-V hard-cores that are commercially available today. Since the economies of scale are yet to kick in, this hardware is yet to be affordable and readily available (for me ). But, I have my FPGAs with me, and I can start experimenting with “soft” cores the way the rest of the development world is doing. So, this article is all about getting a RISC-V Rocket core up on my Xilinx Zynq-7000 Zybo board from Digilent.
A Quickstart
Typically, I follow a bottom-up approach for activities like this. In this case, I decided to go top-down since the Xilinx toolchain is often finicky, and every version comes with some bug or the other. So, the first step was to go with the getting started steps given in ucb-bar/FPGA-zynq . Though this is an abandoned project, I felt positive since I had access to the tools mentioned in the article – Xilinx Vivado and the Digilent Zybo board. The steps here mention that Quick Instructions is the easiest way to get started.
I did the following steps from bash shell:
make fetch-images
make load-sd SD=/e
These steps essentially clone the images repo and copy the content to the SD card. I was happy to see the petalinux prompt, but that happiness was short-lived.
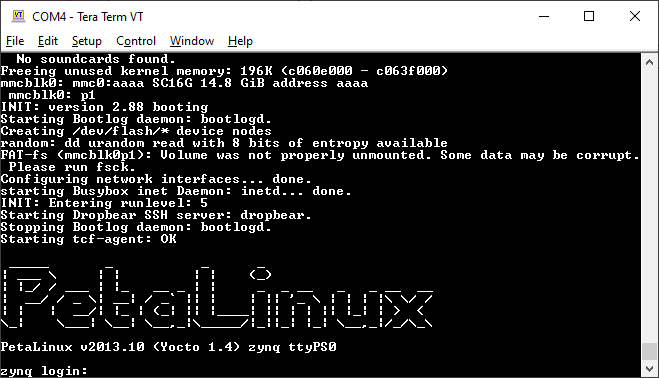
The first petalinux prompt
Note to self: Username is root, the password is root. The defaults in petalinux are retained.
When I tried ./fesvr-zynq pk hello, I was disappointed. The manual says that this step should load a proxy kernel image into the Rocket Core memory and execute it. But, all I got was an ERROR: No cores found message. . However, this was resolved after a reboot. I am yet to figure out how/why this worked.
The next step was to boot riscv-linux on the Rocket core. I was not yet ready to spend a lot of time re-compiling the kernel following steps in the documentation. So, after digging around, I found pkorolov /zynq-fpga with a pre-compiled RISC-V vmlinux image. So, I replaced the contents of the SD card with what I got from the repo and issued the command :
mkdir /sdcard
mount /dev/mmcblk0p1 /sdcard
./fesvr-zedboard +disk=/sdcard/riscv/root/_spike.bin /sdcard/riscv/vmlinux
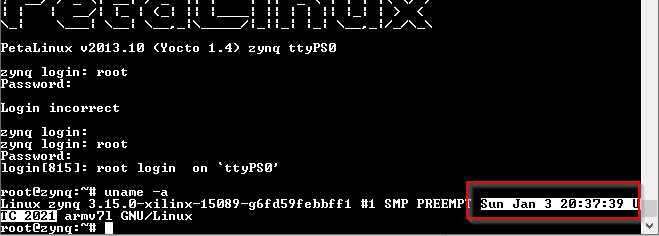
And we have liftoff. It doesn’t matter how many times you have seen Linux boot; the feeling you get when you see it coming up on an FPGA is always priceless.
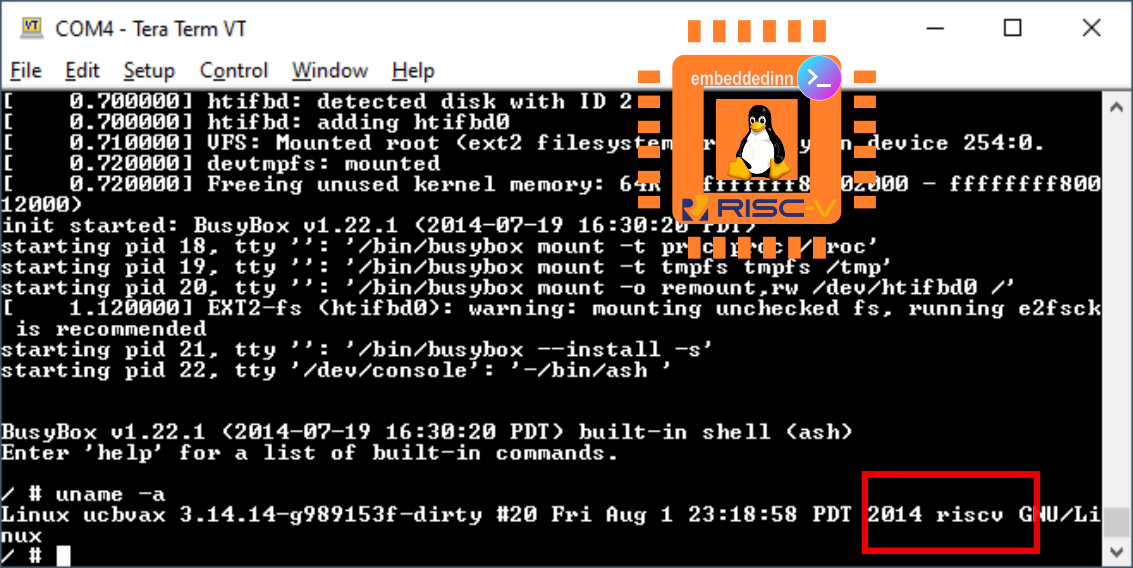
Linux on RISC-V Rocket core.
The obligatory, “Hello World.”
Once Linux is up on a new platform, not building and running hello world is bad juju.
To begin, I got the toolchain from chipsalliance/rocket-tools and compiled them for my Linux box. Instructions are pretty clear in the repo. You just need to load the submodules and run build.sh. Though just the GCC toolchain is sufficient for hello world, I decided to build the entire solution since they will come in handy later. But, build takes a long time to compete as expected.
Or, as I figured out later, just run
sudo apt install gcc-riscv64-unknown-elf
I compiled a simple hello world C code using the freshly minted toolchain. I connected zybo to my home network, configured a static IP in the same subnet and copied the output (a.out) into the ARM linux root using Filezilla.
I tried executing my code by issuing :
./fesvr-zedboard pk a.out
But, I was greeted with an error : An illegal instruction was executed!
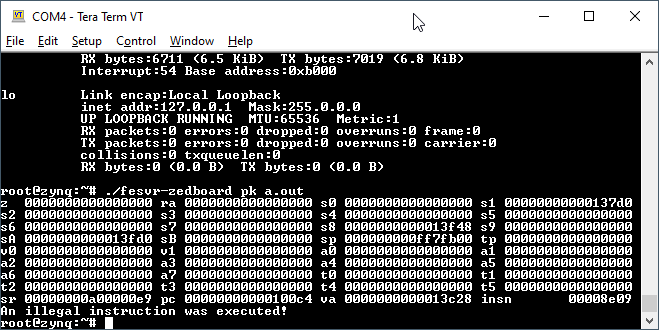
Illegal Instruction Error
After researching further, this seems to be a side effect of using the latest toolchain with an outdated version of the pre-compiled image’s proxy kernel (PK). I need to get more understanding of what is happening here to resolve this.
So, what is going on here ? (fesvr?)
While the core was up, and I was able to execute my code on the Linux image that came up, I wondered how the communication is happening here? I have an ARM core on which I am issuing a fesvr command that is somehow getting it across to the RISC-V core on the PL (aka FPGA) side of the Zynq.
The mode in which the Rocket Core works in Zynq is called a tethered mode. In this mode, the Rocket core exposes two interfaces
-
A host interface
-
A memory interface.
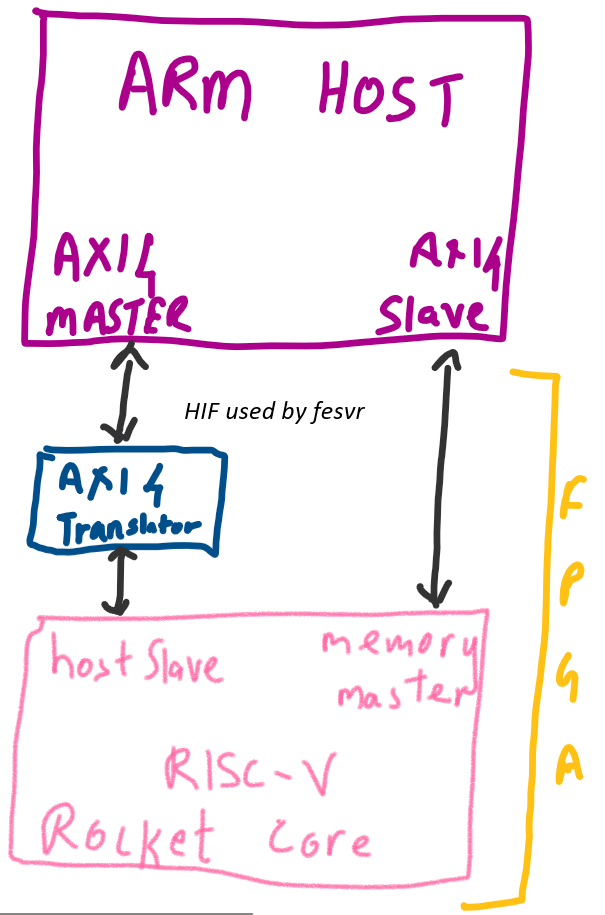
HIF used by fesvr
The ARM host uses the host interface (HIF) to control the Rocket core. This is a slave port, and the ARM core acts as the master. This communication uses a valid-ready protocol that is typical in AXI. However, the Rocket Host slave is not AXI4 compliant. So, a translation layer is implemented.
The memory interface in the Rocket core is AXI4 compliant. This is a master interface, and the Rocket core generates memory requests to the ARM core. Since this is an AXI interface, these memory operations are handled entirely in hardware.
This tethered model means that the core cannot work standalone. The FrontEnd SerVeR (fesvr) runs on host machine and serves as a bootloader. It also executes I/O syscalls on behalf of the proxy kernel since all the actual hardware is connected to the Host ARM core.
The main memory (the DDR3 on the zybo, connected to the Zynq-7000) is shared between the ARM and Rocket cores. The lower 256MB is allocated to ARM and the upper 256 MB is allocated to the RISC-V core.
When we execute a pk command, this loads the proxy kernel and executes the application on top of the PK. PK is responsible for initializing and configuring the system for code execution.
To move out of the outdated tools, let us build our own HW bitstream and SW images.
Building a bitstream and system Software
After cloning and initializing the submodules from ucb-bar / fpga-zynq , I got a version of the Rocket Core configured by Chisel for my zybo board. This process also creates a Vivado project that we can use to explore the Zynq platform.
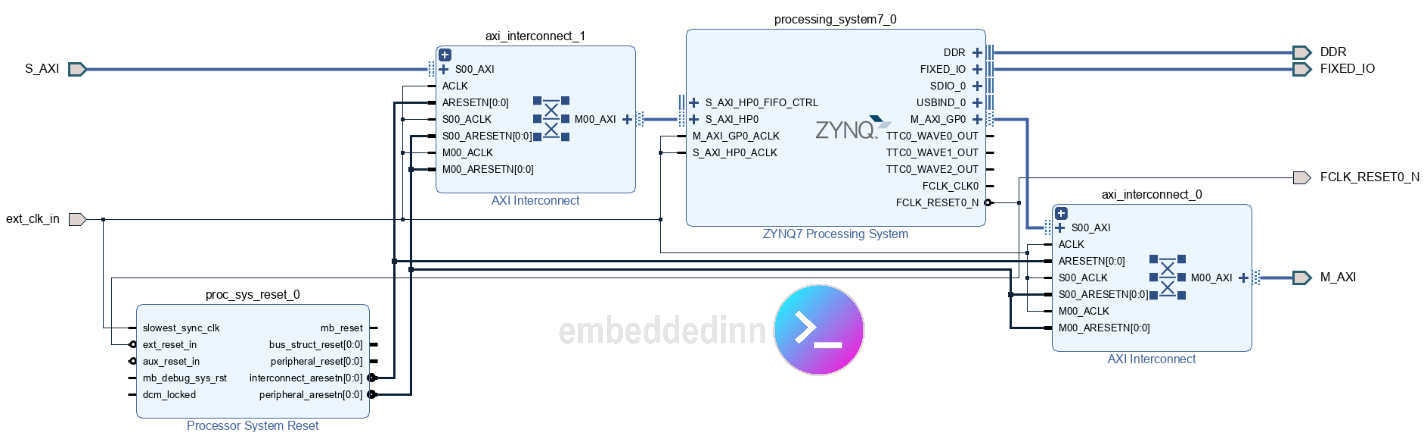
Vivado Block design of ARM PS for RISCV tether
We can see the AXI master and slave ports in the HIF clearly in the block diagram generated by Vivado.
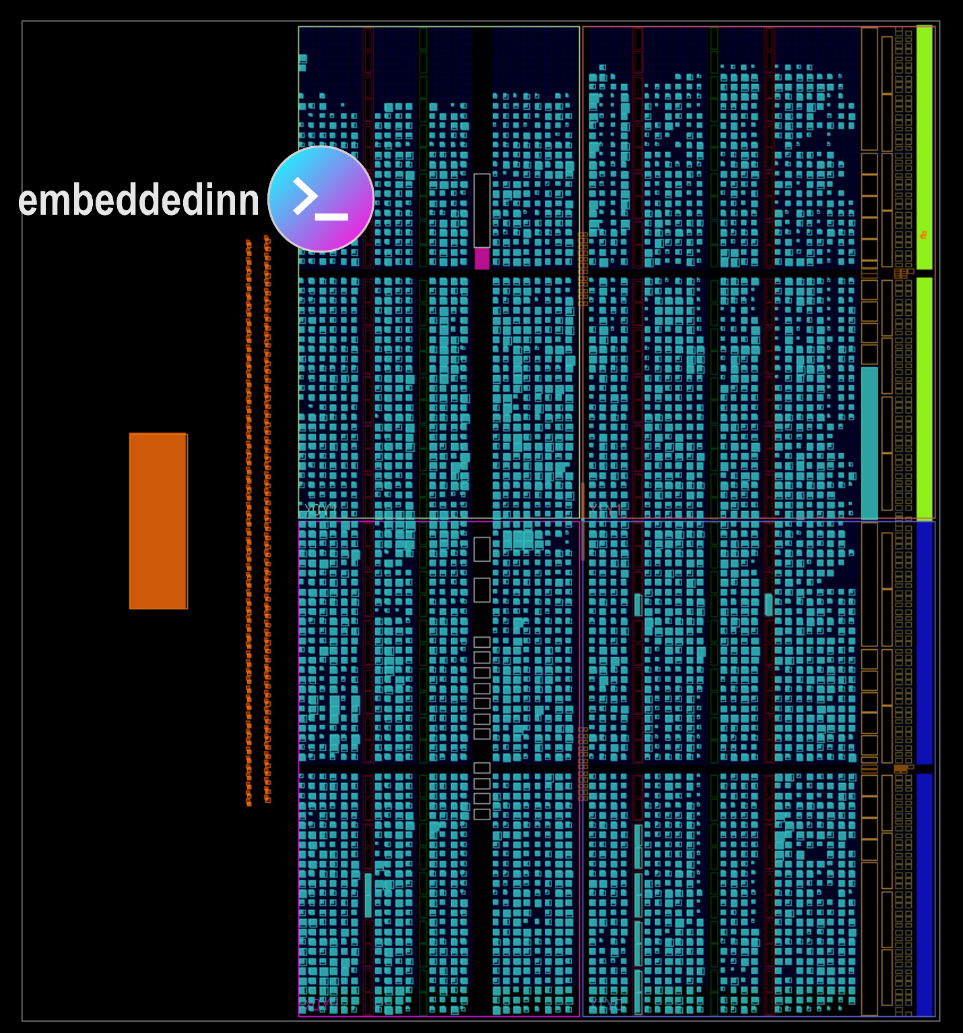
The implementation diagram and slice utilization details are shown in the images below.

Slice Utilization Report
System Implementation
At the end of this process, the bitstream and hardware platform files are ready. We import this into the Vitis SDK to create the First Stage Boot Loader and the Arm PS linux image and uboot. I followed the steps in ucb-bar / fpga-zynq for this.
Additionally, I also re-compiled pk to match the toolchain for my hello world and updated the ramdisk image with it.
This is how the old linux was.

Pre-Built Linux image
This is how the new linux came up.
Newly built Linux image
Finally, I copied the a.out that failed to execute before and ran it successfully.
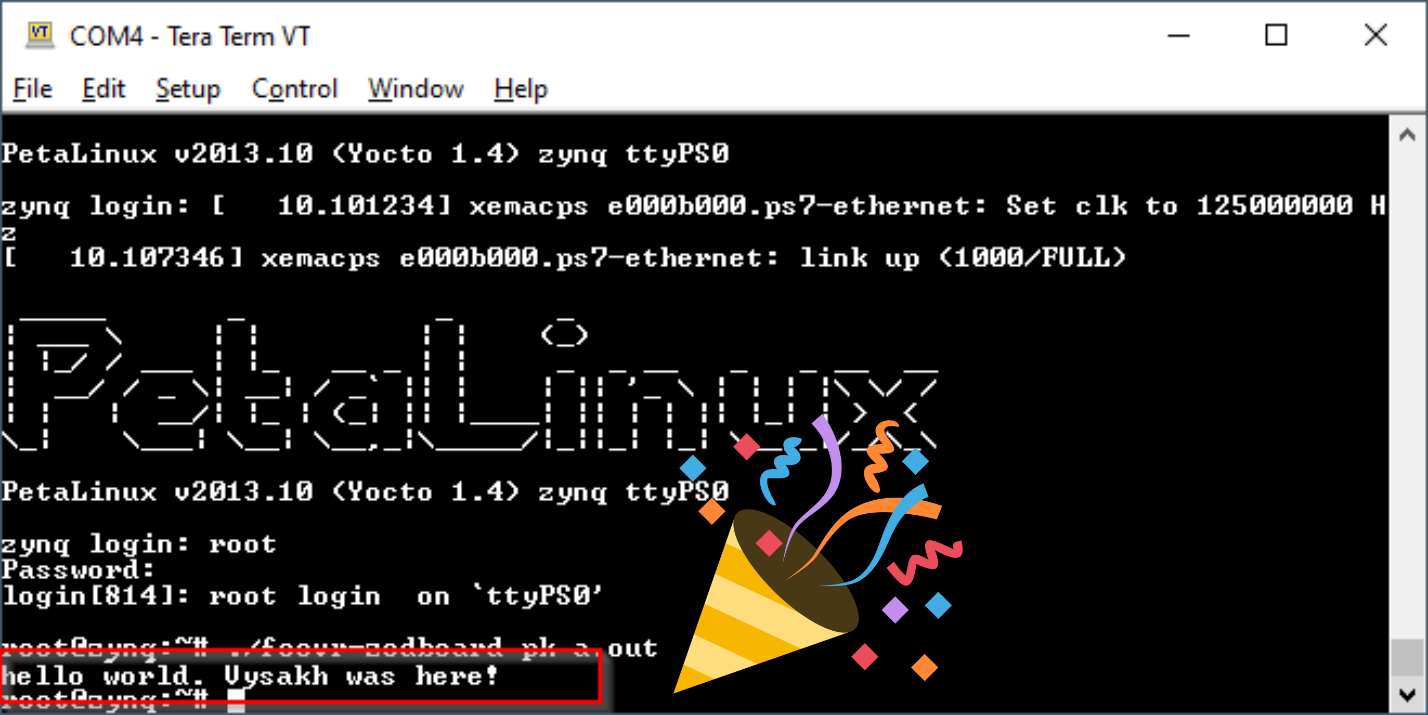
SUCCESS!!!


Leave a comment