

Exploring virtualization in RISC-V machines
This article forms the basis for the publication System Partitioning with Virtualization for Federated and Distributed Machine Learning on Critical IoT Edge Systems
Virtualizing RISC-V
“RISC-V is classically virtualizable” – We come across this statement very often when we read about the merits of the RISC-V ISA. This article looks at what this statement means and how practical virtualization works with the RISC-V architectures.
Introduction
Virtualization is the key to cloud computing since that is the technology allowing us to partition a highly specced out machine into smaller independent and isolated virtual machines. However, virtualization is not just for enterprise or general-purpose computing. It is advantageous in embedded systems – especially the safety-critical ones, where we can leverage the computing power of a single modern CPU to implement smaller, independent systems. An implementation that would require multiple physical CPUs (chips) in a non-virtualized environment can all be “crammed” into a single chip/single-board solution while still maintaining the standalone nature of each system. The main driving factor for this approach is the need to minimize Size, Weight, Power, and Cost (SWaP+C) in system design.
Understanding the Terminology
Let us first look at some terminology related to virtualization before going into the details of RISC-V virtualization.
The first term to look at is virtualization itself. Simply put, it is the technology that lets you run multiple operating systems (or privileged bare-metal software) from a single physical machine (Host Machine). The virtual instances of the hardware on which the operating systems execute are often referred to as Virtual Machines (VM / Guest VM). These virtual machines are managed by a firmware called the hypervisor that arbitrates (and at times emulates) the Virtual Machine’s access to the underlying hardware.
Classic Virtualization requirements, also known as Popek and Goldberg virtualization requirements, states three main characteristics of a Virtual Machine.
-
Equivalence / Fidelity: The SW should behave similarly in the VM and the actual HW.
-
Resource control / Safety: The VM must have absolute control of the virtualized resources.
-
Efficiency / Performance: The majority of the machine instructions should be executed directly on the hardware.
In the context of classic virtualization, the ISA is further classified into three:
-
Privileged instructions: Those that trap if the processor is in user mode and do not trap if it is in system mode (supervisor mode).
-
Control sensitive instructions: Those that attempt to change the configuration of resources in the system.
-
Behavior sensitive instructions: Those whose behavior or result depends on the configuration of resources (the content of the relocation register or the processor’s mode).
The excerpt below from [2] summarizes the classic virtualizable nature of RISC-V well:
The RISC-V ISA was designed from the ground-up to be classically virtualizable by allowing to electively trap accesses to virtual memory management control and status registers (CSRs) as well as timeout and mode change instructions from supervisor/user to machine mode. Furthermore, RISC-V provides fully precise exception handling, guaranteeing the ability to fully specify the instruction stream state at the time of an exception. The ISA simplicity coupled with its virtualization-friendly design allow the easy implementation of a hypervisor recurring to traditional techniques(e.g., full trap-and-emulate, shadow page tables) as well as the emulation of the hypervisor extension, described further ahead in this section, from machine mode
Motivation for virtualization in embedded systems
The popularity of cloud ecosystems and user VM software like virtual box makes it easy to visualize the concept of a VM. However, another critical area where virtualization plays a critical role in developing modern, cost-effective, resilient systems.
It is a common practice to build redundancy into fault-tolerant embedded systems by having multiple physical computational blocks (say, MCUs) doing the same / monitoring work to derive the final results using a voting and consensus mechanism.
Faults in these systems are often classified broadly into hardware errors and software errors. Hardware errors are caused due to bugs and faults in the hardware or run time faults such as memory read errors in the system bus due to system-level interference or even external causes like radiation. However, the technology involved in building fault-tolerant hardware has significantly evolved in the last couple of decades. Most major semiconductor manufacturers now carry rad-hard, automotive, space, and military-grade silicon that goes through specialized processes to ensure robustness at the silicon level. While these technologies do not prevent the need for hardware redundancy, parts of the system that are relatively less critical can blindly trust these advances. (I know, this is an exaggeration).
Software errors, on the other hand, are evolving into an untamable beast. Irrespective of the amount of testing and defensive coding we do, the sheer scale of modern systems and accelerated development cycles result in corner cases and errors. The difficulty of doing complete integration testing at a system level has resulted in critical systems following a distributed architecture where software systems with relatively lesser complexity will run on dedicated hardware. With this, a failure in one module will not bring the whole system to a grinding halt.
An excellent example to understand this concept is a modern car. A critical system like the ECU, EBS, etc., runs on their dedicated hardware. But, by extension, even systems like climate control, lighting control, infotainment, etc., also run on their hardware. This is where virtualization can be leveraged.
We can potentially run smaller software sub-systems isolated away in their virtual machines while hosting all of them in a single hardware. The primary advantage of this approach is a reduction in hardware cost while keeping software development complexity relatively the same. Each piece of software runs as if it is executing in its dedicated hardware, with the hypervisor taking care of the orchestration. The disadvantage is that there is lower redundancy to protect against hardware failure.
Virtualization in RISC-V
Virtualization is part of the key design goals of RISC-V. This is clearly spelled out right from the design thesis by Waterman [1]
Key RISC-V design goals are:
-
Separate the ISA into a small base ISA and optional extensions
-
Support both 32-bit and 64-bit address spaces
-
Facilitate custom ISA extensions
-
Support variable-length instruction set extensions
-
Provide efficient hardware support for modern standards
-
Orthogonalize the user ISA and privileged architecture, allowing full virtualizability and enabling experimentation in the privileged ISA while maintaining user application binary interface (ABI) compatibility.
The RISC-V reference privileged architecture (RPA) naturally supports classical virtualization and can be extended to support hardware-accelerated virtualization. RPA is orthogonal to the user ISA, and this enables classical virtualization. Suppose privileged features (like interrupt-enable) are exposed to unprivileged (user/guest mode) software. In that case, it can make classical virtualization impossible since there will be no way for a hypervisor or host OS to intercept/tap and emulate the operation.
In a full-fledged implementation, the architecture will look like this:
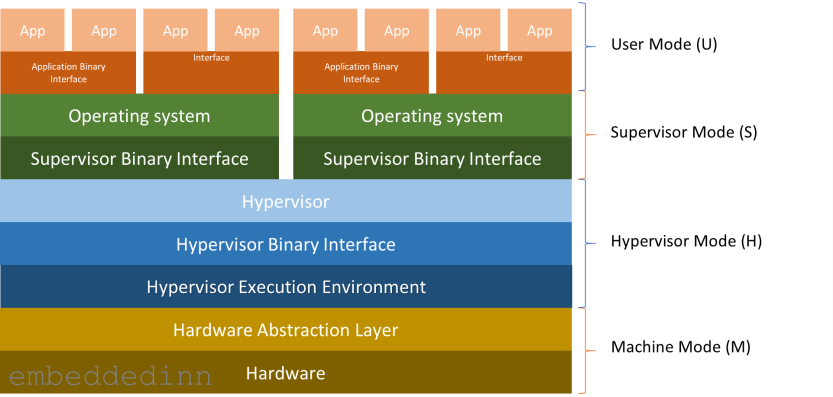
Layers in the RISC-V spec
Applications make requests to the application execution environment (typically an OS) using the ABI.
In a RISC-V system, we often see a Supervisor Binary Interface (SBI) between the hardware and the operating system. This layer, along with the supervisor execution environment (SEE), takes care of implementing privileged instructions. This might be something as simple as a bootloader or a complex Hypervisor. The bottom line is that the SBI abstracts primitive I/O makes the OS more portable and enables virtualization.
A system needs just 2 modes to facilitate a practical operating system that executes applications in isolation from each other. A user mode for regular operations and a privileged mode (set of instructions) that trap when executed in user mode. This is also the minimum criteria to support classic virtualization. RISC-V introduces 2 additional modes specifically to assist virtualization. So, the 4 RISC-V modes privilege modes are:
-
User mode (U), where the applications generally executes with the least privilege.
-
Supervisor mode (S) that provides operating systems basic exception processing and virtual memory support.
-
Hypervisor Mode (H) for Virtual machine monitors with support for I/O access virtualization
-
Machine Mode (M) with full hardware access. This is the only mandatory mode and is sufficient for simple embedded systems.
Practically there is an HS mode, which is a hypervisor extended supervisor mode that.
From a Virtual memory standpoint, having a Hypervisor mode means that there are 2 levels of address translations:
-
Application virtual address to guest physical address (VS level page table)
-
Guest physical address to machine physical address (HS level page table)
The V bit controls the virtualization mode. When V is set, either VU- or VS-mode are executing, and 2nd stage translation is in effect. When V is low, the system may execute in M-, HS- or U- mode. The extension defines a few new hypervisor instructions and CSRs and extends existing machine CSRs to control the guest virtual memory and execution. A hypervisor executing in HS-mode can directly access these registers to inspect the virtual machine state and efficiently perform context switches. The hypervisor must manually manage the original supervisor registers, which are not banked.
The three types of Hypervisors
There are primarily three types of hypervisors:
-
Type 1 / Complete Monolithic: Native or Bare metal hypervisor with a common software for Host hardware access, CPU virtualization, and Guest IO emulation (e.g. Xvisor, Xen,VMWare ESX Server, Microsoft HyperV, OKL4 Microvisor etc.)
-
Type 2 / Partially Monolithic: Hosted on an OS as an extension of the base OS kernel (e.g. Linux KVM, FreeBSD Bhyve, VMWare Workstation, Oracle VirtualBox, etc.)
-
Micro-kernelized: Micro-kernelized hypervisors (e.g. Xen) are usually light-weight micro-kernels providing basic Host hardware access + CPU virtualization in kernel and for rest it depends on a Managment Guest (e.g. Dom0 of Xen) which provides complete Host hardware access, Management interface, and Guest IO emulation.
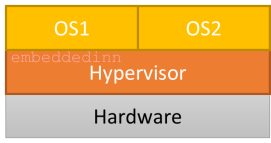
Type 1 Hypervisor
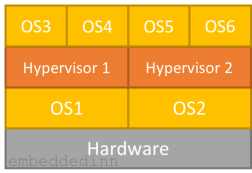
Type 2 Hypervisor
Getting your hands dirty
We will try out a both type 1 and type 2 hypervisor using QEMU for RISCV. For type 1, we will use Xvisor and For type 2, we will use Linux KVM.
KVM on RISC-V
Compiling the toolchain:
We can either install the RISC tooling that is available on most OS platforms using a package manager, or compile it from the source. I prefer compiling it from the source experiments like these since I will have a better control over the version and feature set of the compiler I am using.
A lot of the dependencies we are installing here will be used even in subsequent steps. So, it is better to install them even if you are installing a pre-packaged compiler.
mkdir ~/riscv
export RISCV=~/riscv

sudo apt install autoconf automake autotools-dev curl libmpc-dev libmpfr-dev libgmp-dev \
                 libusb-1.0-0-dev gawk build-essential bison flex texinfo gperf libtool \
                 patchutils bc zlib1g-dev device-tree-compiler pkg-config libexpat-dev  \
                 libncurses5-dev libncursesw5-dev git

git clone https://github.com/riscv/riscv-gnu-toolchain
cd riscv-gnu-toolchain
./configure --prefix=$RISCV --enable-multilib
make -j $(nproc)
make -j $(nproc) linux

export PATH=$PATH:$RISCV
The compiler will now be available in $RISCV\bin.
Alternatively, if you want to use the packaged compiler (in ubuntu), install it with:
sudo apt-get install gcc-riscv64-linux-gnu
In case you are doing this, use the prefix
riscv64-linux-gnu-in the steps below, instead ofriscv64-unknown-linux-gnu-
Compiling QEMU for RSIC-V with virtualization extensions.
Install additional dependencies
sudo apt install ninja-build pkg-config libglib2.0-dev libpixman-1-dev libtirpc-dev unzip
Compile and install QEMU from official sources. Virtualization support is enabled by default in teh RISC-V configuration in QEMU mainline.
git clone https://github.com/kvm-riscv/qemu.git
cd qemu
./configure --target-list="riscv32-softmmu riscv64-softmmu"
make -j $(nproc)
The QEMU executable will be available in the build folder.
M-mode runtime for boot: OpenSBI Firmware
For the M mode bootup firmware, we will use openSBI
git clone https://github.com/riscv/opensbi.git
cd opensbi
export CROSS_COMPILE=riscv64-unknown-linux-gnu-
make -j $(nproc) PLATFORM=generic
compile Linux with RISC-V KVM support
RISC-V KVM support is not fully merged into the Linux mainline at the moment. So, we will be using a fork of the kernel to play around with KVM.
git clone https://github.com/kvm-riscv/linux.git
mkdir build-riscv64
export ARCH=riscv
export CROSS_COMPILE=riscv64-unknown-linux-gnu-
make -C linux O=`pwd`/build-riscv64 defconfig
make -C linux O=`pwd`/build-riscv64 -j $(nproc)
The same
.configwill work with the mainline kernel though all options are not available in the RISC-V Kconfig.
The KVM tool to make our lives easier
kvmtoolis a lightweight tool for hosting KVM guests. As a pure virtualization tool it only supports guests using the same architecture, though it supports running 32-bit guests on those 64-bit architectures that allow this.”. KVM tool requires libfdt to be cross compiled.
KVM tool depends on dtc at runtime. So we first compile it.
git clone git://git.kernel.org/pub/scm/utils/dtc/dtc.git
cd dtc
export ARCH=riscv
export CROSS_COMPILE=riscv64-unknown-linux-gnu-
export CC="${CROSS_COMPILE}gcc -mabi=lp64d -march=rv64gc"
TRIPLET=$($CC -dumpmachine)
SYSROOT=$($CC -print-sysroot)
make libfdt
make EXTRA_CFLAGS="-mabi=lp64d" DESTDIR=$SYSROOT PREFIX=/usr LIBDIR=/usr/lib64/lp64d install-lib install-includes
Now, build kvmtool
git clone https://github.com/kvm-riscv/kvmtool.git
export ARCH=riscv
export CROSS_COMPILE=riscv64-unknown-linux-gnu-
cd kvmtool
make lkvm-static -j $(nproc)
${CROSS_COMPILE}strip lkvm-static
Now, lets build a root FS for our OS
Download busybox:
wget https://busybox.net/downloads/busybox-1.33.1.tar.bz2
Configure buildroot to re-use our toolchain and make:
tar -C . -xvf busybox-1.33.1.tar.bz2
export ARCH=riscv
export CROSS_COMPILE=riscv64-unknown-linux-gnu-
make -C busybox-1.33.1 defconfig
make -C busybox-1.33.1 install
Populate the FS and create an image to boot from:
git clone https://github.com/kvm-riscv/howto.git
mkdir -p busybox-1.33.1/_install/etc/init.d
mkdir -p busybox-1.33.1/_install/dev
mkdir -p busybox-1.33.1/_install/proc
mkdir -p busybox-1.33.1/_install/sys
mkdir -p busybox-1.33.1/_install/apps
ln -sf /sbin/init busybox-1.33.1/_install/init
cp -f ./howto/configs/busybox/fstab busybox-1.33.1/_install/etc/fstab
cp -f ./howto/configs/busybox/rcS busybox-1.33.1/_install/etc/init.d/rcS
cp -f ./howto/configs/busybox/motd busybox-1.33.1/_install/etc/motd
cp -f ./kvmtool/lkvm-static busybox-1.33.1/_install/apps
cp -f ./build-riscv64/arch/riscv/boot/Image busybox-1.33.1/_install/apps
cd busybox-1.33.1/_install; find ./ | cpio -o -H newc > ../../rootfs_kvm_riscv64.img; cd -
Boot the host OS
./qemu/build/riscv64-softmmu/qemu-system-riscv64 -cpu rv64,x-h=true -M virt -m 512M -nographic -bios opensbi/build/platform/generic/firmware/fw_jump.bin -kernel ./build-riscv64/arch/riscv/boot/Image -initrd ./rootfs_kvm_riscv64.img -append "root=/dev/ram rw console=ttyS0 earlycon=sbi"
note the argument
-cpu rv64,x-h=true
Then the guest OS over KVM
./apps/lkvm-static run -m 128 -c2 --console serial -p "console=ttyS0 earlycon=uart8250,mmio,0x3f8" -k ./apps/Image --debug
Xvisor on RISC-V
Dependency installation:
sudo apt-get install python genext2fs
clone and build Xvisor
git clone https://github.com/xvisor/xvisor.git
cd xvisor
export CROSS_COMPILE=riscv64-unknown-linux-gnu-
make ARCH=riscv generic-64b-defconfig
make
Note: I had to apply the patch from https://github.com/xvisor/xvisor/pull/125 to get the compilation to pass.
Build the FW
Firmware will be built as part of the test routines
make -C tests/riscv/virt64/basic
Build Linux to be loaded with Xvisor support
First we will clone and update the configuration using Xvisor scripts
git clone  https://github.com/torvalds/linux.git
cp linux/arch/riscv/configs/defconfig linux/arch/riscv/configs/tmp-virt64_defconfig
xvisor/tests/common/scripts/update-linux-defconfig.sh -p linux/arch/riscv/configs/tmp-virt64_defconfig -f xvisor/tests/riscv/virt64/linux/linux_extra.config
Then compile Linux
mkdir build-riscv64
export ARCH=riscv
export CROSS_COMPILE=riscv64-unknown-linux-gnu-
make -C linux O=`pwd`/build-riscv64 tmp-virt64_defconfig
make -C linux O=`pwd`/build-riscv64 -j $(nproc)
make -C linux O=`pwd`/build-riscv64 ARCH=riscv Image dtbs
Create the FS
Download busybox:
wget https://busybox.net/downloads/busybox-1.33.1.tar.bz2
Configure buildroot to re-use our toolchain and make:
tar -C . -xvf busybox-1.33.1.tar.bz2
export ARCH=riscv
export CROSS_COMPILE=riscv64-unknown-linux-gnu-
make -C busybox-1.33.1 defconfig
make -C busybox-1.33.1 all install -j $(nproc)
Populate the FS and create an image to boot from:
cd busybox-1.33.1/_install; find ./ | cpio -o -H newc > ../../rootfs.img; cd -
cd xvisor
mkdir -p ./build/disk/tmp
mkdir -p ./build/disk/system
cp -f ./docs/banner/roman.txt ./build/disk/system/banner.txt
cp -f ./docs/logo/xvisor_logo_name.ppm ./build/disk/system/logo.ppm
mkdir -p ./build/disk/images/riscv/virt64
dtc -q -I dts -O dtb -o ./build/disk/images/riscv/virt64-guest.dtb ./tests/riscv/virt64/virt64-guest.dts
cp -f ./build/tests/riscv/virt64/basic/firmware.bin ./build/disk/images/riscv/virt64/firmware.bin
cp -f ./tests/riscv/virt64/linux/nor_flash.list ./build/disk/images/riscv/virt64/nor_flash.list
cp -f ./tests/riscv/virt64/linux/cmdlist ./build/disk/images/riscv/virt64/cmdlist
cp -f ./tests/riscv/virt64/xscript/one_guest_virt64.xscript ./build/disk/boot.xscript
cp -f ~/build-riscv64/arch/riscv/boot/Image ./build/disk/images/riscv/virt64/Image
dtc -q -I dts -O dtb -o ./build/disk/images/riscv/virt64/virt64.dtb ./tests/riscv/virt64/linux/virt64.dts
cp -f ~/busybox-1.33.1/rootfs.img ./build/disk/images/riscv/virt64/rootfs.img
genext2fs -B 1024 -b 32768 -d ./build/disk ./build/disk.img
launch QEMU with Xvisor
~/qemu/build/qemu-system-riscv64 -cpu rv64,x-h=true -M virt -m 512M -nographic -bios ~/opensbi/build/platform/generic/firmware/fw_jump.bin -kernel ./build/vmm.bin -initrd ./build/disk.img -append 'vmm.bootcmd="vfs mount initrd /;vfs run /boot.xscript;vfs cat /system/banner.txt"'
you now have the xvisor prompt and you can kick start the guest operating systems.
References:
[1] https://people.eecs.berkeley.edu/~krste/papers/EECS-2016-1.pdf


Leave a comment