

Setting up GitHub SSO for your website with NGINX and Vouch Proxy
While making access-restricted content source code deliveries, it is the norm today to use a private Git repository. In the case of GitHub, it is a good practice to create an organization and create private repos and teams under the organization to handle who can access the contents. This works well for source code and can all be done with free tier resources. However, a git repo is not the best place to host archives. While all popular platforms, including GitHub, provide some free storage space, it is not enough for most use cases. Also, static pages like GitHub pages cannot be access controlled.
In this article, I will show you how to set up GitHub SSO for your website serving developer resources using vouch-proxy. This will allow you to host your archives and other developer resources on your website and control access to them using GitHub SSO.
An overview of how the flow works are shown below:
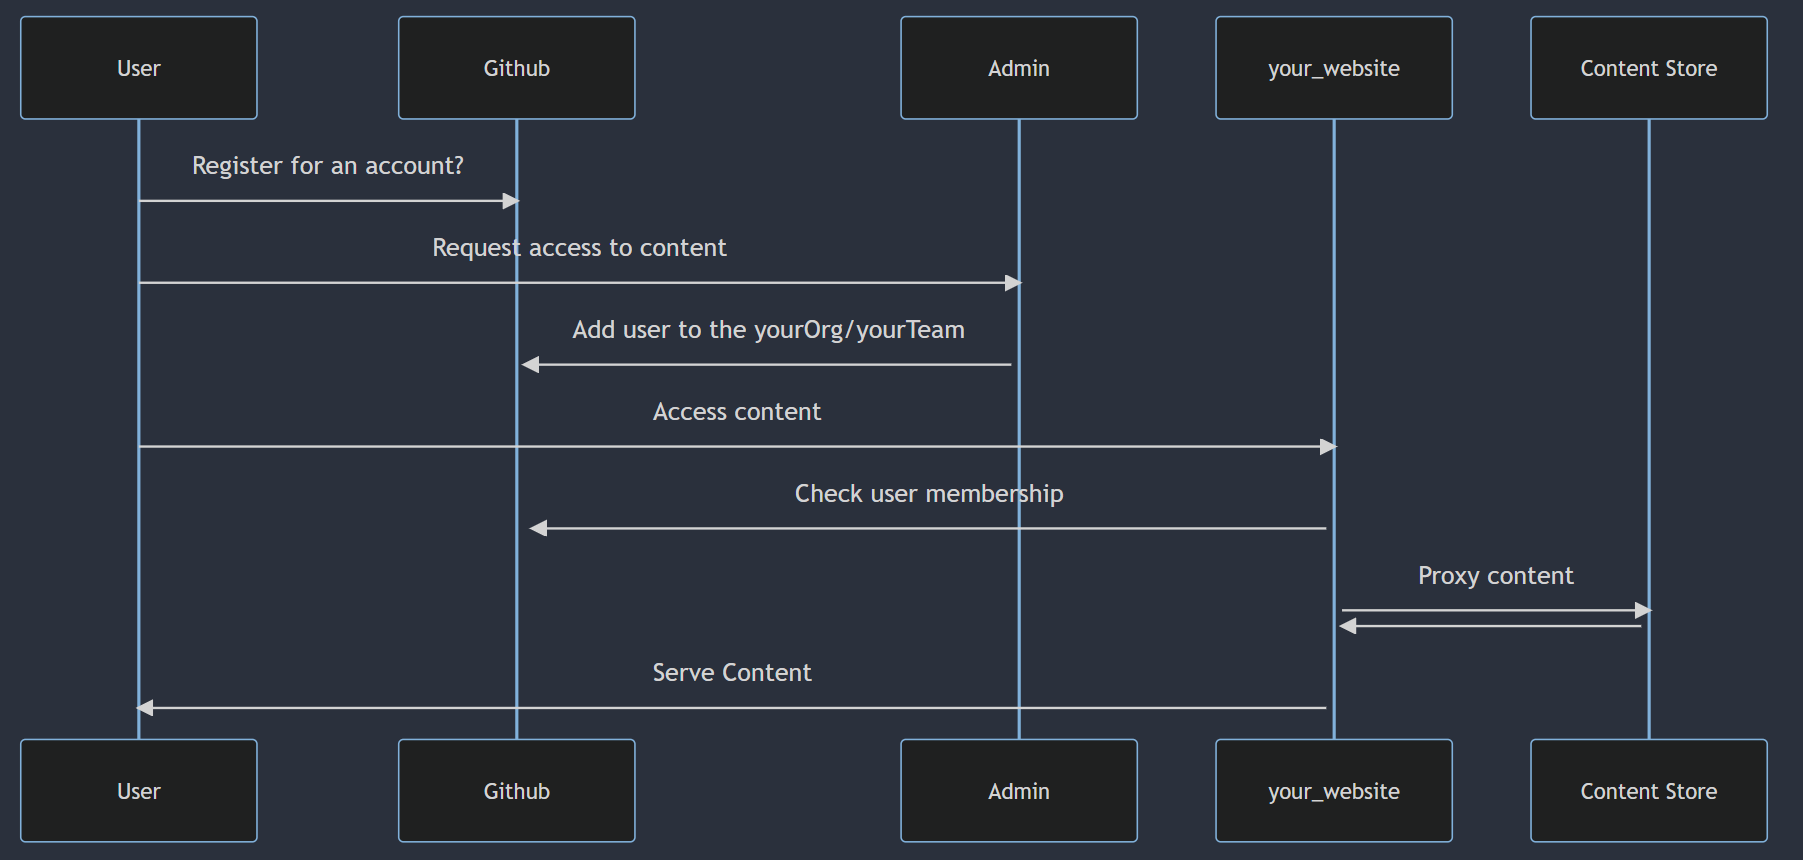
Authentication workflow
AWS EC2 setup
We need first to set up a Linux instance on AWS EC2. I will be using Ubuntu 20.04 for this article. The instance should have a public IP address and be accessible from the internet. I will be using a t2.micro instance for this article. I will use Elastic IP addresses to prevent IP addresses from changing across reboots. You can read more about it here. Once a domain is purchased, we will redirect the domain to the public IP address of the instance. We will also need to open ports 80 and 443 on the instance to allow access to the website. You can read more about it here. Also, enable port 22 for SSH access. For security, this can be disabled or restricted once the setup is complete.
Setting up a domain
Now we need to set up a domain. You can use any domain registrar of your choice. I will be using namecheap for this article. Once you have a domain, you need to set up a DNS record to point to the EC2 instance’s public IP address.
Create the following DNS records:
| Type | Host | Value |
|---|---|---|
| A | @ | Public IP address of the EC2 instance |
| A | content | Public IP address of the EC2 instance |
| CNAME | www | The AWS dns name e.g. xxx.ca-central-1.compute.amazonaws.com |
We will discuss the content subdomain later in the article.
Installing NGINX
We will be using NGINX as a reverse proxy to serve our website. We will also use NGINX to serve static content. To install NGINX, run the following commands:
sudo apt update
sudo apt install nginx
To verify that NGINX is running, run the following command:
sudo systemctl status nginx
You should see the following output:
● nginx.service - A high performance web server and a reverse proxy server
     Loaded: loaded (/lib/systemd/system/nginx.service; enabled; vendor preset: enabled)
     Active: active (running) since Fri 2022-09-23 05:17:57 UTC; 18h ago
       Docs: man:nginx(8)
    Process: 55148 ExecStartPre=/usr/sbin/nginx -t -q -g daemon on; master_process on; (code=exited, status=0/SUCCESS)
    Process: 55149 ExecStart=/usr/sbin/nginx -g daemon on; master_process on; (code=exited, status=0/SUCCESS)
   Main PID: 55150 (nginx)
      Tasks: 2 (limit: 1146)
     Memory: 4.9M
        CPU: 686ms
     CGroup: /system.slice/nginx.service
             ├─55150 "nginx: master process /usr/sbin/nginx -g daemon on; master_process on;"
             └─55151 "nginx: worker process" "" "" "" "" "" "" "" "" "" "" "" "" "" "" "" "" "" "" "" "" "" "" "" "" "" "" ""

Sep 23 05:17:57 ip-192-21-10-255 systemd[1]: nginx.service: Deactivated successfully.
Sep 23 05:17:57 ip-192-21-10-255 systemd[1]: Stopped A high performance web server and a reverse proxy server.
Sep 23 05:17:57 ip-192-21-10-255 systemd[1]: Starting A high performance web server and a reverse proxy server...
Sep 23 05:17:57 ip-192-21-10-255 systemd[1]: Started A high performance web server and a reverse proxy server.
Installing Vouch Proxy
Vouch Proxy is a reverse proxy that authenticates users using a third-party identity provider. It is a Go application and requires golang to be installed before you can build it. To install golang, run the following commands:
sudo apt update
sudo apt install golang
To verify that golang is installed, run the following command:
go version
You should see something like the following output:
go version go1.18.1 linux/amd64
Now we can clone and build vouch-proxy. To do so, run the following commands:
git clone https://github.com/vouch/vouch-proxy.git
cd vouch-proxy
./do.sh goget
./do.sh build
To verify that vouch-proxy is built, run the following command:
./vouch-proxy -version
You should see the following output. The version number may differ depending on where the build was done.
vouch-proxy version 0.37.3
Configuring Vouch Proxy
Vouch Proxy requires a configuration file to run. The configuration file is a YAML file. Sample configuration files can be found under the config directory. You can copy config/config.yml_example_github to config/config.yml and edit it to suit your needs. The configuration file is well documented with comments.
The following is a sample configuration file:
vouch:
  logLevel: info

  testing: false

  listen: 0.0.0.0  # VOUCH_LISTEN
  port: 9090       # VOUCH_PORT

  writeTimeout: 15 # VOUCH_WRITETIMEOUT
  readTimeout: 15  # VOUCH_READTIMEOUT
  idleTimeout: 15  # VOUCH_IDLETIMEOUT

  domains:
  - yourdomain.io

  cookie:
    secure: true
    domain: yourdomain.io

  teamWhitelist:
    - your_org/your_team1
    - your_org/your_team2


  headers:
    jwt: X-Vouch-Token                # VOUCH_HEADERS_JWT
    querystring: access_token         # VOUCH_HEADERS_QUERYSTRING
jwt:
    maxAge: 240
    compress: true

oauth:
  # create a new OAuth application at:
  # https://github.com/settings/applications/new
  provider: github
  client_id: xxxxxxxxxxxxxxxxxxxx
  client_secret: xxxxxxxxxxxxxxxxxxxxxxxxxxxxxxxxxxxxxxxx
We have set the configuration to use GitHub as the identity provider and allow only members of the your_org/your_team1 and your_org/your_team2 teams to access the website. You can change the configuration to suit your needs.
To create the client id and client secret, go to https://github.com/settings/applications/new and create a new OAuth application.
- Set the
Homepage URLto the domain name you have setup earlier. - Set the
Authorization callback URLtohttps://yourdomain.io/auth.
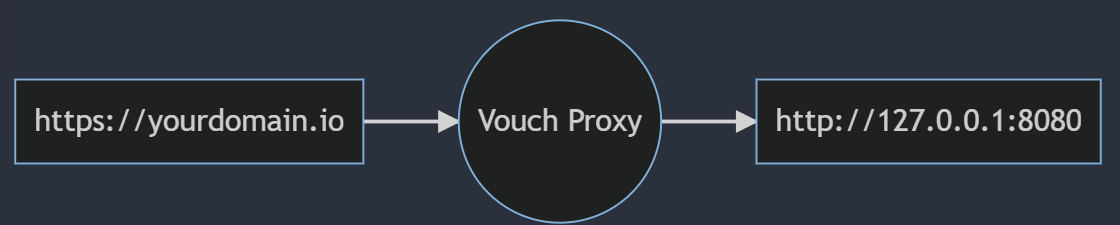
Vouch-proxy is configured to listen to port 9090. We will be using NGINX to proxy requests to this port. Though this configuration is listening on the 0.0.0.0 interface, we will use the localhost interface to access the application. Since the 9090 port is not exposed to the internet, this is not a security concern. However, it can be configured to listen on the localhost interface by setting the listen configuration.
Running Vouch Proxy
To run vouch-proxy, run the following command to run it as a daemon:
nohup ./vouch-proxy -loglevel debug > vouch.log 2>&1 &
The vouch-proxy documentation (here)[https://github.com/vouch/vouch-proxy/tree/master/examples/startup] has more information on how to run vouch-proxy as a systemd service.
Note that logs are redirected to the vouch.log file. You can view the logs and can fill up the disk space. You can use tail -f vouch.log to view the logs in real-time.
Configuring NGINX
Now that we have vouch-proxy up and running, we can configure NGINX to proxy requests. We will create two sites in NGINX. One for the authentication and the other for the actual website that serves requests to yourdomain.io. The actual website will be proxied to the vouch-proxy server using the auth_request module of NGINX. So any requests to the actual website will be redirected to the vouch-proxy server for authentication. This in turn, takes the user to the GitHub login page. After the user logs in, GitHub redirects the user back to the vouch-proxy server. The vouch-proxy server then redirects the user back to the actual website.
Authentication workflow
The two configuration files below should be created under the /etc/nginx/sites-available directory. Then a soft link should be created under the /etc/nginx/sites-enabled directory.
The following is the configuration for the authentication site:
upstream vouch {
	# set this to the location of the vouch proxy
	server localhost:9090;
}
server {
	listen 443 ssl http2;
	server_name yourdomain.io;

  # Certificates set by Let's encrypt certbot
	ssl_certificate /etc/letsencrypt/live/yourdomain.io/fullchain.pem;
	ssl_certificate_key /etc/letsencrypt/live/yourdomain.io/privkey.pem;

	# This location serves all of the paths vouch uses
	location ~ ^/(auth|login|logout|static) {
		proxy_pass http://vouch;
		proxy_set_header Host $http_host;
	}

	location = /validate {
		# forward the /validate request to Vouch Proxy
		proxy_pass http://vouch/validate;

		# be sure to pass the original host header
		proxy_set_header Host $http_host;

		# Vouch Proxy only acts on the request headers
		proxy_pass_request_body off;
		proxy_set_header Content-Length "";

		# optionally add X-Vouch-User as returned by Vouch Proxy along with the request
		auth_request_set $auth_resp_x_vouch_user $upstream_http_x_vouch_user;

		# these return values are used by the @error401 call
		auth_request_set $auth_resp_jwt $upstream_http_x_vouch_jwt;
		auth_request_set $auth_resp_err $upstream_http_x_vouch_err;
		auth_request_set $auth_resp_failcount $upstream_http_x_vouch_failcount;
	}

	# if validate returns `401 not authorized`, then forward the request to the error401block
	error_page 401 = @error401;

	location @error401 {
		# redirect to Vouch Proxy for login
		return 302 $scheme://$http_host/login?url=$scheme://$http_host$request_uri&vouch-failcount=$auth_resp_failcount&X-Vouch-Token=$auth_resp_jwt&error=$auth_resp_err;
		# you usually *want* to redirect to Vouch running behind the same Nginx config protected by HTTPS
		# but to get started you can forward the end user to the port that vouch is running on
	}

	error_page 404 @error404;
	location @error404 {
		root /var/www/html/404.html;
		internal;
	}

	# proxy pass authorized requests to your service
	location / {
		# send all requests to the `/validate` endpoint for authorization
		auth_request /validate;

		# forward authorized requests to your service yourdomain.io
		proxy_pass http://127.0.0.1:8080;
		# you may need to set these variables in this block as per https://github.com/vouch/vouch-proxy/issues/26#issuecomment-425215810
		auth_request_set $auth_resp_x_vouch_user $upstream_http_x_vouch_user;
		auth_request_set $auth_resp_x_vouch_idp_claims_groups $upstream_http_x_vouch_idp_claims_groups;
		auth_request_set $auth_resp_x_vouch_idp_claims_given_name $upstream_http_x_vouch_idp_claims_given_name;

		# set user header (usually an email)
		proxy_set_header X-Vouch-User $auth_resp_x_vouch_user;
		# optionally pass any custom claims you are tracking
		proxy_set_header X-Vouch-IdP-Claims-Groups $auth_resp_x_vouch_idp_claims_groups;
		proxy_set_header X-Vouch-IdP-Claims-Given_Name $auth_resp_x_vouch_idp_claims_given_name;
		# optionally pass the accesstoken or idtoken
		#     proxy_set_header X-Vouch-IdP-AccessToken $auth_resp_x_vouch_idp_accesstoken;
		#     proxy_set_header X-Vouch-IdP-IdToken $auth_resp_x_vouch_idp_idtoken;
	}
}

# HTTP redirect to HTTPS
server {
	listen 80;
	server_name _;
	return 301 https://$host$request_uri;
}
The following is the configuration for the actual website hosting the contents running on port 8080, listening on 127.0.0.1 :
server {
	listen 127.0.0.1:8080 default_server;
	root /var/www/html;

	# Add index.php to the list if you are using PHP
	index index.html index.htm index.nginx-debian.html;

	server_name _;

	location / {
		# First attempt to serve request as file, then
		# as directory, then fall back to displaying a 404.
		try_files $uri $uri/ =404;
	}
}
Configuring the Certificates
We will use Let's Encrypt to issue certificates. First install certbot
sudo apt install certbot python3-certbot-nginx
Then run the following command to see if certificates can be issued for the domain. This is a dry run to see if the domain configurations are in order and if the certificates can be issued.
sudo certbot certonly --nginx -d yourdomain.io -d www.yourdomain.io -d content.yourdomain.io --dry-run
If the above command runs successfully, run the following command to issue the certificates. This step will also update the nginx configuration files to include the certificates. In the configuration in the previous section, the certificates are already set:
sudo certbot certonly --nginx -d yourdomain.io -d www.yourdomain.io -d content.yourdomain.io
Note: we will talk about the
content.yourdomain.iodomain later.
Populate the site contents and test
Now that the certificates are issued, we can populate the site contents. All the content should go into /var/www/html served by the site configured to listen to the 8080 port.
Test configuration and restart Nginx
To test if the configurations are correct, run the following command:
sudo nginx -t
If the configurations are correct, then restart Nginx:
sudo systemctl restart nginx
Test the site
Now that the site is up and running, we can test it. Open the browser and go to https://yourdomain.io. You should first be redirected to GitHub to login in case you are not already logged in. Once logged in, you will be asked to allow yourdomain.io to access your GitHub profile. Once it is allowed to, the team membership will be verified, and you will be redirected to the site contents.
Accessing contents over the command line
Vouch-proxy is built to work with a web browser. This makes accessing contents behind the proxy via the command line a bit difficult. To solve this, we will provide an alternate access mechanism to the contents via the content.yourdomain.io domain. This domain will utilize the GitHub API Key and Username passed in the request header to authenticate the user. This makes it easy to frame curl commands to access contents. We will restrict access using this mechanism to only the items under the content directory. This is because documentation and other items that are not meant to be accessed via the command line should not be accessible via this mechanism.
To do this, we will create a new site configuration file for the content.yourdomain.io domain within the yourdomain.io configuration file with the following changes:
An API key can be created by going to https://github.com/settings/tokens/ne and creating a new token with the read:org scope. This token will be used to authenticate the user. The username is the GitHub username of the user.
server {
	# sideband server to serve contents with GitHub API key-based authentication
	listen 443 ssl http2;
	server_name content.yourdomain.io;

  # certificate placed here by certbot
	ssl_certificate /etc/letsencrypt/live/microchip-hpsc.io/fullchain.pem;
	ssl_certificate_key /etc/letsencrypt/live/microchip-hpsc.io/privkey.pem;


	# proxy pass authorized requests to your service
	location / {
		# send all requests to the `/validate` endpoint for authorization
		auth_request /keyvalidate;

		# unauthorized requests return 404 from Github API. by default, Nginx returns 500 for this case. But we want to return 404.
		error_page 500 =401 /error/401;
		# forward authorized requests to microchip-hpsc.io/contents
		proxy_pass http://127.0.0.1:8080/contents/;
	}

	# validate the request by checking the membership of the user in the GitHub org
	location /keyvalidate {
		# use google's DNS server to resolve the GitHub API
		resolver 8.8.8.8;
		proxy_method GET;
		proxy_set_header Authorization "Bearer $http_apikey";
		proxy_set_header Accept "application/vnd.github+json";
		proxy_pass https://api.github.com/orgs/your_orgName/teams/your_team1/memberships/$http_user;
	}

	location /error/401 {
		return 401;
	}
}
The /validate endpoint will validate any request to the content.yourdomain.io domain. This endpoint will use the apikey and user headers to validate the user. If the user is a member of the your_team1 team in the your_orgNam organization, then the request will be forwarded to the http://127.0.0.1:8080/contents/ endpoint. This endpoint will serve the contents under the contents directory.
This means that to access contents under “https://yourdomain.io/contents/yourfile.txt”, using APIKey and Username, the request should be directed to “https://content.yourdomain.io/yourfile.txt” with the apikey and user headers set.
An example of such a request is:
curl -H "apikey: <your_apikey>" -H "user: <your_username>" https://content.yourdomain.io/yourfile.txt
In case the membership of the user is not verified, the GitHub request will return a 404 error. Since auth_request honours only 2xx and 401, this will be returned as a 500 to the user. Hence, we do additional configuration to map the 500 error to the 401 error. This will make it easy to handle the error on the client side.
Accessing contents over the command line - supporting multiple teams
This section was added on 17-Feb–2023, after the original post was published.
The above configuration supports only one team for command line access of content. To support multiple teams, we can build a local authentication server that will validate the user membership in the team. This server would run in parallel to vouch-proxy and can be used as the proxy_pass endpoint in the nginx configuration.
The server code would look something like this:
# A fastapi server listening on port 8000
# This server is used to authenticate users and return a 401 if the user is not authenticated
# Sample curl command to test the API is as follows:
# curl -H "apikey: <your_apikey>" -H "user: <your_username>" localhost:8000/auth
# Github teams to check are in the list github_teams.

from fastapi import FastAPI, Header, HTTPException
from fastapi.responses import JSONResponse
import requests
import os

app = FastAPI()

github_teams = ["team1","team2","team3"]
orgName = "your_orgName"

@app.get("/auth")
async def auth_user(apikey: str = Header(...), user: str = Header(...)):
    #strip the apikey of any leading or trailing spaces
    apikey = apikey.strip()
    if check_user(user,apikey):
        return JSONResponse(status_code=200, content="")
    else:
        return JSONResponse(status_code=401, content="")

def check_user(user,apikey):
    # check if the user is part of one of the given github teams
    for team in github_teams:
        url = f"https://api.github.com/orgs/{orgName}/teams/{team}/memberships/{user}"
        request_headers = {
            'Authorization': 'Bearer ' + apikey,
            'Accept': 'application/vnd.github.v3+json'
        }
        response = requests.get(url, headers=request_headers)
        print("response: ", response.status_code)
        if response.status_code == 200:
            return True

    return False

if __name__ == "__main__":
    import uvicorn
    uvicorn.run(app, host="localhost", port=8000)
Conclusion
In this post, we have seen how to set up a site accessible only to members of a GitHub organization. We have also seen how to access the site’s contents via the command line using the GitHub API Key and Username.


Leave a comment