

Creating the littlefs-tools Python package and auto-deploying it to PyPI with a CI/CD pipeline
I recently built a python script to package the contents of a folder into a littleFS binary image. This article documents my steps to make it into a pip installable package – littlefs-tools.
You can install the tools by simply issuing the command pip install littlefs-tools.
Introduction
LittleFS is a little fail-safe filesystem designed for microcontrollers. It is designed to work with microcontrollers and flash memories and has a bunch of configuration options to fine-tune its performance for the flash part of your choice.
While using LittleFS in a project, one of the challenges is creating that first filesystem image with contents from your development machine. It is not always practical to format the media and populate the contents at first boot. Often this is addressed by executing a custom routine in the target to receive files over an interface (like the network interface or UART) and then write it into the media, followed by an imaging step that copies the newly created media image for flashing into other parts.
littlefs-tools is a set of python-based tools that can be used to generate, extract and list the contents of a LittleFS media image. It contains the following tools.
-
littlefs_createaccepts a source directory as the input and generates a LittleFS media image binary with the same contents and directory structure as the input. -
littlefs_listlists the directory and file structure of an input LittleFS media image binary as a tree. -
Littlefs_extractreverseslittlefs_createand extracts the contents of a media image into the native filesystem.
Creating and listing LittleFS media images with littlefs-tools
Though distributed as a python module, these tools are intended to be executed as a command-line tool. Consequently, the code is written into a single python file without classes. It is built on top of littlefs-python. To use LittleFS functionality within your python code, please use littlefs-python directly.
Package Details
I am using Python setuptools to package the script into a distribution. Information required to package the python code into a pip package comes from the setup.py file.
from setuptools import setup
from pathlib import Path

this_directory = Path(__file__).parent
long_description = (this_directory / "README.md").read_text()

setup(
    name="littlefs_tools",
    version="1.0.4",
    description="Python package to create littleFS filesystem image binaries",
    long_description=long_description,
    long_description_content_type="text/markdown",
    url="https://github.com/vppillai/littlefs_tools",
    author="Vysakh P Pillai",
    author_email="vysakhpillai@embeddedinn.xyz",
    license="MIT",
    packages=["littlefs_tools"],
    install_requires=["littlefs-python", "colorama"],
    entry_points={
        "console_scripts": [
            "littlefs_list=littlefs_tools.littlefs_tools:list_files",
            "littlefs_create=littlefs_tools.littlefs_tools:create_image",
            "littlefs_extract=littlefs_tools.littlefs_tools:extract_files",
        ],
    },
    classifiers=[
        "Development Status :: 3 - Alpha",
        "Intended Audience :: Science/Research",
        "License :: OSI Approved :: MIT License",
        "Topic :: Scientific/Engineering",
        "Topic :: System :: Filesystems",
        "Operating System :: POSIX :: Linux",
        "Programming Language :: Python :: 3",
        "Programming Language :: Python :: 3.4",
        "Programming Language :: Python :: 3.5",
        "Programming Language :: Python :: 3.6",
        "Programming Language :: Python :: 3.7",
        "Programming Language :: Python :: 3.8",
        "Programming Language :: Python :: 3.9",
        "Programming Language :: Python :: 3.10"
    ],
)
Some points to note about the setup file are:
-
Long description is read in from the
README.mdfile in the repo and converted into a string. This is then used along with thelong_description_content_typeargument. This is to make theREADME.mdcontents visible as-is on thePyPIpage. -
The complete list of
PyPIclassifiers is available at https://pypi.org/classifiers/ -
The
console_scriptsentry_pointsis used to map individual functions in the source file into executable commands that can be directly invoked from the CLI when the python module is installed.
A python wheel (which is the package format used by PiPI) is essentially a simple zip file; we can see the contents by opening it using an archive manager like 7 Zip. Within the *-dist-info directory of the wheel, we can see the entry_points.txt file that pip will use to generate scripts in the /bin (or ~/.local/bin based on pip invocation permissions. In the case of the littlefs_create command, the script looks like this. Note that the create_image() function is being invoked.:
#!/home/vysakh/temp/pipPackage/littlefs_tools/venv/bin/python3
# -*- coding: utf-8 -*-
import re
import sys
from littlefs_tools.littlefs_tools import create_image
if __name__ == '__main__':
    sys.argv[0] = re.sub(r'(-script\.pyw|\.exe)?$', '', sys.argv[0])
    sys.exit(create_image())
The actual source files for the package are within the littlefs_tools directory. It includes an __init__.py file to make the module importable by the tool invocation scripts. However, as mentioned before, littlefs-tools are not meant to be imported for direct use.
Tests
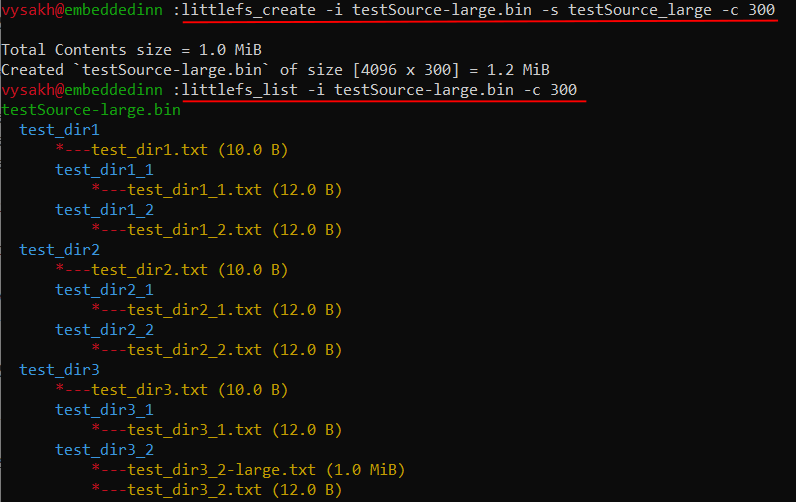
I wrote two minimal tests that generate a directory tree with some contents and invoke littlefs_tools scripts to test functionality. The contents are packaged, then listed and extracted. Since the test are written as shell scripts (ironically, not in python. Because, why not 😊 ), there are no simple functions to compare the output of the list command. So, a digest of the output is generated (using the sha256sum command) and compared against a hard-coded digest of the expected output. (I know, yuck, right? But it’s beautifully simple and works in 3 lines of code, and it is not something I expect to keep changing often).
# List files in the generated binary and compare to the expected output
outputSum=$( littlefs_list -i testSource-large.bin -c 300 | sha256sum )
expectedSum="801b53e121b9c7b382a575d990db3f75711a3d8f859ade2f8c01d61ebecce75a  -" # generated by running littlefs_list -i testSource.bin  | sha256sum

if [ "$outputSum" != "$expectedSum" ]; then
    echo -e "\e[31mlittlefs_list failed\e[0m"
    echo "Expected: $expectedSum"
    echo "Got:      $outputSum"
    exit 1
else
    echo -e "\e[32mlittlefs_list passed\e[0m"
fi
The test then extracts the contents of the image binary into another directory and compares it to the source using the diff command.
The second test script (test_large.sh) does the same but adds a 1 MiB file into the equation and modifies the block count to accommodate this. Consequently, the updated block size should be passed with the -c flag to the tools during invocation.
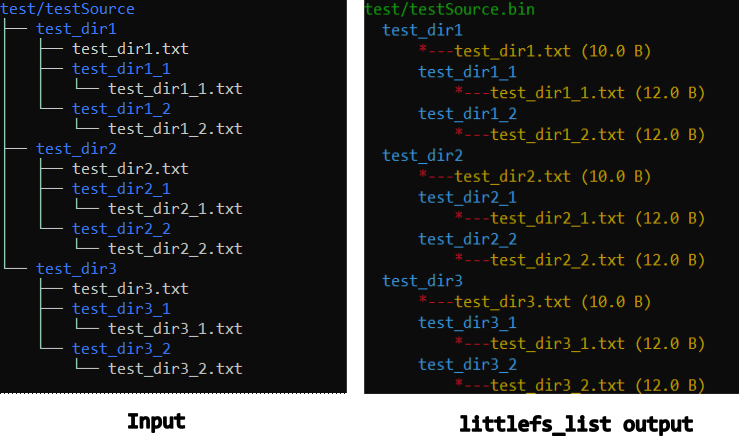
Comparison of source and extracted trees
Deployment Details
The test and deployment pipelines are built as separate Github Actions. The test pipeline executes on all pushed and PRs to the main branch, while the deployment pipeline executes when a tag is created.
The test pipeline runs test. sh and test_large.sh on python versions 3.6 to 3.10 using the GitHub Actions Matrix Strategy on an Ubuntu Runner.
The build-test workflow file as of version 1.0.4 looks like this:
name: Build_Tests

on:
  push:
    branches: [ main ]
  pull_request:
    branches: [ main ]
  workflow_dispatch:

jobs:
  build_wheels:
    name: Build wheels on $ - Py $
    runs-on: $
    strategy:
      matrix:
        os: [ubuntu-latest]
        python-version: [3.6, 3.7, 3.8, 3.9, "3.10"]

    steps:
    - uses: actions/checkout@v2
    - name: Set up Python $
      uses: actions/setup-python@v2
      with:
        python-version: $
    - name: Install dependencies
      run: |
        python -m pip install -r requirements.txt
    - name: Build Wheel
      run: |
        python setup.py sdist
        python setup.py bdist_wheel --universal
    - name: Install wheel
      run: |
        ls dist
        python -m pip install dist/littlefs_tools-*.whl  --force
    - name: run command help
      run: |
        littlefs_create -h
        littlefs_list -h
        littlefs_extract -h
    - name: Run functional tests - default options
      run: |
        cd test
        ./test.sh
    - name: Run functional tests - large file
      run: |
        cd test
        ./test_large.sh
Before creating a release tag, we need to ensure that the version number in setup.py is updated. This is because PyPI prevents overriding package versions. The PyPI upload token is added as a Github Action Secret in the PYPI_API_TOKEN variable. Though executing twine commands directly from the actions workflow is more optimal, I am using the pypi-publish actions from the marketplace published by the Python Packaging Authority (pypa). The deployment workflow file as of version 1.0.4 looks like this:
Update from Jan 2024: OpenID Connect (OIDC) allows your GitHub Actions workflows to authenticate with PyPI to publish Python packages and is the preferred mechanism now. Read more about the setup here
name: Publish package to pypi on tag

on:
  push:
    tags:
    - '*'
  workflow_dispatch:

jobs:
  build_wheel:
    name: Build wheel and publish to pypi
    runs-on: ubuntu-latest

    steps:
    - uses: actions/checkout@v2
    - name: Set up Python 3.10
      uses: actions/setup-python@v2
      with:
        python-version: "3.10"
    - name: Install dependencies
      run: |
        python -m pip install -r requirements.txt
    - name: Build Wheel
      run: |
        python setup.py sdist
        python setup.py bdist_wheel --universal
    - name: Publish Package
      uses: pypa/gh-action-pypi-publish@release/v1
      with:
        password: $
        skip_existing: false
If you use LittleFS in your project or are interested in trying it out, give littlefs-tools a try and let me know what you think in the comments section below.


Leave a comment