

Demystifying Digital Signatures - A Step-by-Step Guide to Understanding and Using Secure Digital Signatures
Introduction
Digital signatures are a fundamental building block of modern cryptography. We often use digital signatures without realizing it in our day to day lives. For example, when you visit a website, your browser verifies the authenticity of the website using a digital signature. In this article, we’ll explore how digital signature works, how to generate and verify digital signatures, and how to use digital signatures to sign and verify files.
My original motivation to write this article is to develop some fundamental understanding of digital signatures for the embedded systems and system engineering community. I have often seen that digital signatures are seen as a mystery by many developers. I hope that this article will help demystify digital signatures and help developers understand how digital signatures work and how to use them in their projects.
While there is an abundance of digital signature usage in the cryptocurrency world, I will not be covering that in this article.
I have built a web-tool to play around with digital signatures at https://vppillai.github.io/cryptoScript/FileSigner.html. You can use this tool to generate and verify digital signatures for files. The tool is written in Javascript and uses the WebCrypto API to generate and verify digital signatures. The source code for the tool and a few other useful crypto scripts are available at https://github.com/vppillai/cryptoScript
We will cover the details of the tool in the later sections of this article. For now, let’s start with the basics.
I would recommend that you also read my articles on Introduction to digital certificates and Understanding X.509 Certificate Structure before continuing with this article if you are new to cryptography.
What is a Digital Signature?
A digital signature is a mathematical scheme for verifying the authenticity of digital messages or documents. A valid digital signature gives a recipient reason to believe that the message was created by a known sender, and that the message was not altered in transit. Digital signatures are commonly used for software distribution, financial transactions, and in other cases where it is important to detect forgery or tampering.
Now, what does it look like ?
The short / incomplete answer - something like this (in base64)
``bash DzjGzKR5LZgAdU9ObP/bt9LFf5/+YtlTHJNtWZH8kAOQE5cTW0lE/Q9jQcdScVsNuvktdhfaBZhowgoY08S8Fw==
Or, this (in `hex`)

```bash
0f 38 c6 cc a4 79 2d 98 00 75 4f 4e 6c ff db b7 d2 c5 7f 9f fe 62 d9 53 1c 93 6d 59 91 fc 90 03
90 13 97 13 5b 49 44 fd 0f 63 41 c7 52 71 5b 0d ba f9 2d 76 17 da 05 98 68 c2 0a 18 d3 c4 bc 17
To understand how a digital signature is generated and how its useful in verifying the authenticity of data, we need to understand the underlying cryptographic primitives that are used to generate a digital signature. Most importantly, we need to understand the concept of a cryptographic hash function.
Cryptographic Hash Functions
A cryptographic hash function is a mathematical algorithm that maps data of arbitrary size to a bit string of a fixed size (a hash) and is designed to be a one-way function, that is, a function which is non-feasible to invert. The only way to recreate the input data from an ideal cryptographic hash function’s output is to attempt a brute-force search of possible inputs to see if they produce a match, or use a rainbow table of matched hashes. (rainbow tables are pre-computed lookup tables where the hash of every possible text input combination is stored. This allows for quick lookup of data given the hash).
Since the hashing function converts an input of arbitrary size to a fixed size output, it is often called a Digest function. The length of the hash determines how easy or difficult it is to find a hash collision for a given input. The longer the hash, the more difficult it is to find a collision. For example, the SHA-1 hash function produces a 160-bit hash. This means that there are 2^160 possible hashes. This is a very large number. If you were to try to find a collision for a given input, you would have to try 2^160 different inputs to find a collision. This is not feasible. However, if the hash function produces a 32-bit hash, then there are only 2^32 possible hashes. This is a much smaller number. If you were to try to find a collision for a given input, you would only have to try 2^32 different inputs to find a collision. This is feasible given the computational capability we have today.
A cryptographic hash function is different from a regular hash function in that it has to satisfy the following properties:
- Deterministic: The same input will always result in the same output.
- Quick Computation: The hash function should be quick to compute.
- Pre-Image Resistance: Given a hash, it should be difficult to find the input that produced the hash.
- Second Pre-Image Resistance: Given an input, it should be difficult to find another input that produces the same hash.
- Collision Resistance: It should be difficult to find two inputs that produce the same hash.
- Avalanche Effect: A small change in the input should result in a large change in the output.
- Non-Invertible: It should be difficult to find the input given the output.
- Non-Repudiation: The sender of the message cannot deny sending the message.
- Uniqueness: The hash should be unique to the input.
- Uniformity: The hash should be uniformly distributed.
- Pseudorandomness: The hash should be indistinguishable from a random number generator.
- Non-Associativity: The hash of the concatenation of two inputs should not be the same as the concatenation of the hashes of the two inputs.
- Non-Commutativity: The hash of the concatenation of two inputs should not be the same as the concatenation of the hashes of the two inputs in reverse order.
- Non-Idempotency: The hash of the hash of an input should not be the same as the hash of the input.
An example of sha256 hash of a string is shown below:
$ echo -n "Hello World" | sha256sum
a591a6d40bf420404a011733cfb7b190d62c65bf0bcda32b57b277d9ad9f146e  -
$ echo -n "Hello World!" | sha256sum
7f83b1657ff1fc53b92dc18148a1d65dfc2d4b1fa3d677284addd200126d9069  -
Digital signatures and Public Key Cryptography
Simply put, a digital signature is an “Encrypted hash” of a message. This implies that an encryption algorithm is involved in the process of creating a digital signature. However, the encryption algorithm used to create a digital signature is different from the encryption algorithm used to encrypt data. The encryption algorithm used to create a digital signature is called a Signing Algorithm. The encryption algorithm used to encrypt data is called an Encryption Algorithm. The signing algorithm is a part of a larger class of algorithms called Public Key Cryptography algorithms.
Some examples of Digital Signature Algorithms are:
RSA(Rivest-Shamir-Adleman):RSAis an asymmetric cryptographic algorithm widely used for encryption, digital signatures, and key exchange. It relies on the difficulty of factoring large prime numbers.DSA(Digital Signature Algorithm):DSAis a United States Federal Government standard for digital signatures. It is based on the mathematical concept of modular exponentiation and discrete logarithm problem.ECDSA(Elliptic Curve Digital Signature Algorithm):ECDSAis an asymmetric cryptographic algorithm based on elliptic curve mathematics. It provides strong security with shorter key lengths compared to RSA andDSA.EdDSA(Edwards-curve Digital Signature Algorithm):EdDSAis an elliptic curve digital signature algorithm designed for high performance and security. It offers faster signing and verification compared toECDSA.
How are Digital Signatures generated?
We will focus on the ECDSA algorithm to look at how a digital signature is generated.
We will not go into the details of key generation and the mathematics behind the ECDSA algorithm. We will focus on the steps involved in generating a digital signature.
The steps involved in generating a digital signature are as follows:
Note: These steps provide a simplified overview of the ECDSA process. In practice, there may be additional considerations such as encoding, padding, and other security measures that need to be taken into account for proper implementation.
Generate a key pair
A private key and a corresponding public key. The private key (signing key) is kept secret, while the public key (verification key) can be shared with others in order to verify the signature.
Signature Generation
- Choose a random number called the
ephemeral keyornonce. This is a one-time use number. - Compute the
k-coordinateby multiplying the generator point on the elliptic curve by the nonce. - Compute the
r-coordinateby taking thex-coordinate of the resulting point modulo the order of the curve. - Compute the
s-coordinateby taking the modular inverse of the nonce and multiplying it with the sum of the hash of the message and the product of the private key and r-coordinate, again modulo the order of the curve.
The resulting signature is a pair of 32 byte values (r, s). The signature is 64 bytes in total. Note that the signature is also dependent on the hash algorithm used. typically sha256 is used with ECDSA.
My web-tool available here can be used to generate a signature using the ECDSA algorithm. The tool also provides the option to generate a key pair and verify a signature.
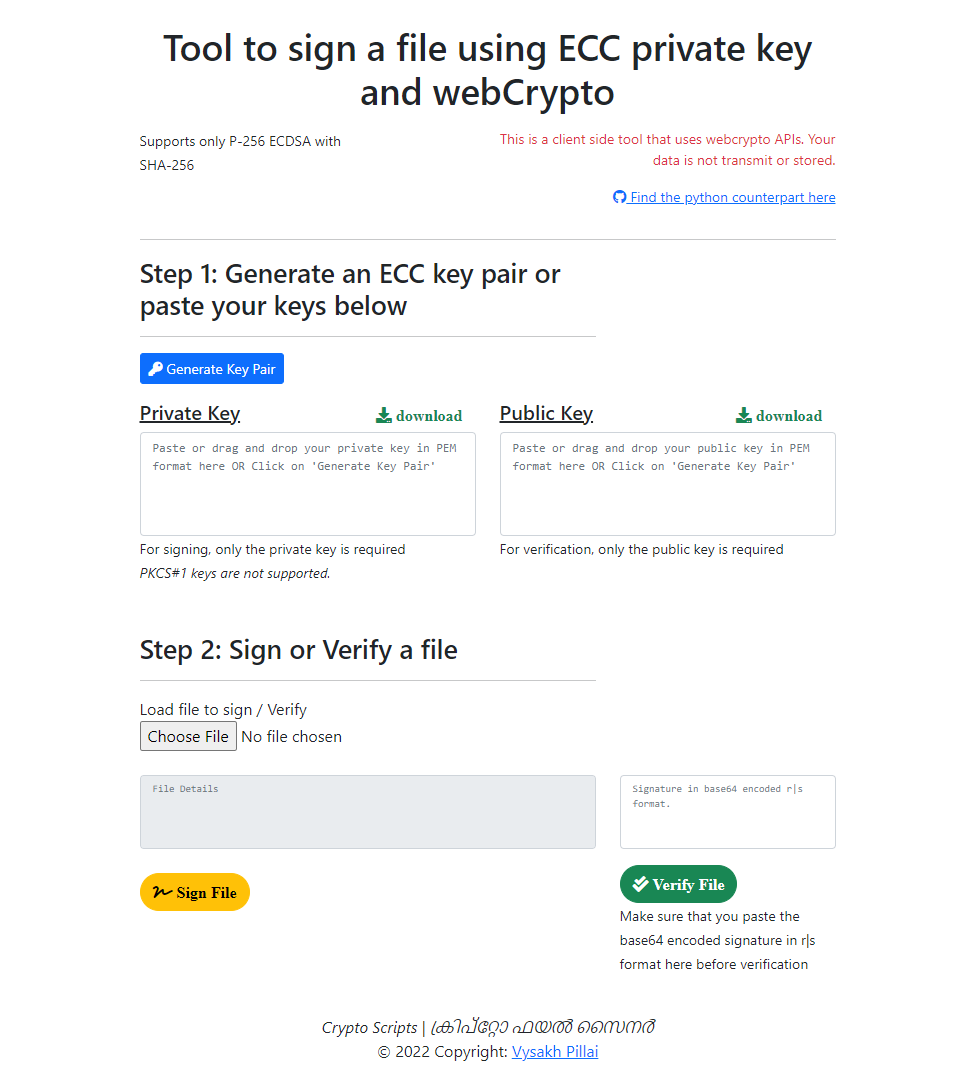
Digital Signature Tool
You can also try this out using the openssl command line tool. With the commands below, you can generate a key pair, sign a message, and view the signature. note the hashing algorithm used is sha256. Openssl lets you use any of the following hashing algorithm selectors here : -sha1, -sha224 , -sha256, -sha3-224, -sha3-256, -sha3-384, -sha3-512, -sha384, -sha512, -sha512-224, -sha512-256, -shake128, -shake256.
$ openssl ecparam -name secp256k1 -genkey -noout -out private.pem
$ openssl ec -in private.pem -pubout -out public.pem
$ echo -n "Hello World" | openssl dgst -sha256 -sign private.pem > signature.bin
$ hexdump -C signature.bin
The signature is generated in the DER format. The hexdump command can be used to view the contents of the signature file. You would notice that the output is larger than 64 bytes (32 bytes for r and 32 bytes for s). This is because the signature is encoded in the DER format. To see the actual r and s values, you can use the asn1parse command:
$ openssl asn1parse -inform DER -in signature.bin
A sample of the output, while using my temporary keys looks like this:
    0:d=0  hl=2 l=  69 cons: SEQUENCE
    2:d=1  hl=2 l=  33 prim: INTEGER           :D4EC3929BF67345CA1442AE9B145BA1B50550C5DD1851A2EFE91D23F26CE012C
   37:d=1  hl=2 l=  32 prim: INTEGER           :4B0C79E4AFBED5C3158968C0398D3910948D103E101B720F8ABC2B12A1A275E0
The DER encoding for storing ECDSA signatures is defined in RFC 3279.
Its interesting to note that the signature changes every time you sign the same message. This is because the nonce is chosen randomly every time. This is a security feature to prevent the private key from being exposed. You can opt out of this feature by using a deterministic nonce. An example is Deterministic ECDSA RFC 6979. This is not supported by openssl yet.
Signature Verification
- Obtain the public key of the signer.
- Compute the modular inverse of the signature’s
s-coordinate. - Compute the
w-coordinateby multiplying the inverse ofswith the hash of the message. - Compute the
u-coordinateby multiplying the inverse ofswith the signature’sr-coordinate. - Compute the
v-coordinateby multiplying the generator point on the elliptic curve byu-coordinateand the public key byw-coordinate, and summing them. - If the resulting
x-coordinateofv-coordinatemodulo the order of the curve matches the signature’sr-coordinate, the signature is considered valid.
Following the steps in the signature generation section, you can verify the signature using the openssl command line tool:
$ echo -n "Hello World" | openssl dgst -sha256 -verify public.pem -signature signature.bin
Any change to the message will result in a different signature, and the verification will fail.
$ echo -n "Hello World!" | openssl dgst -sha256 -verify public.pem -signature signature.bin
Transmitting Digital Signatures
The digital signature algorithms do not specify how the generated digital signatures can be clubbed with the original data. This is left to the implementer. The simplest form of transmitting the signature is one where the r and s values are concatenated together. This is called the raw format. The resulting signature is 64 bytes in length. There is no reference to the signer or the message that was signed. This is not a recommended format for transmitting signatures unless it is part of a larger, well defined protocol.
DER formatted signatures as defined in RFC 3279 are just a step up from the raw format. The DER format is a binary format that is not human readable. The base64 encoding of the DER format is 88 bytes in length and can be appended to the original message and transmitted over the network. The receiver can then extract the signature and verify it.
$ echo -n "Hello World" | openssl dgst -sha256 -sign private.pem | base64
Unlike other PEM format headers specified in specifications like RFC 7468, there is no header defined to store just the base64 encoded signature since the signature alone cannot be used without additional data about the signer or the message. However, in all these methods standalone signature transmission is possible since the process of signature verification recomputes the hash of the message and compares it with the hash in the signature.
Note that the key used to verify the signature must be stored securely in a root of trust.
PKCS#7 / Cryptographic Message Syntax (CMS)
CMS, also commonly referred to as PKCS#7 (Public Key Cryptography Standards #7), is a standard syntax for securely exchanging signed or encrypted messages. The ECDSA digital signature is typically included as part of a SignedData structure, along with the original message, the signer’s certificate, and any necessary cryptographic information. CMS allows for more advanced features like including multiple signers, certificates, and timestamps. (Dat ain CMS is often referred to as CMS container or PKCS#7 container)
PKCS#7 has an embedded mode where the original message is included in the signature. It also has a detached mode where the original message is not included in the signature. The detached mode is typically used when the original message is too large to be included in the signature or is wrapped in another data format like PDF already.
The openssl command line tool can be used to generate a CMS container. However, a certificate is required to hold the public key of the signer. The certificate can be self-signed or issued by a certificate authority. An ECC certificate can be generated using the openssl command line tool as follows:
$ openssl req -new -x509 -key private.pem -out cert.pem -days 365 -subj '/CN=embeddedinn.ca/O=embeddedinn/C=IN'
Now, we can generate a CMS container using the openssl command line tool as follows:
$ echo -n "Hello World" | openssl cms -sign -signer cert.pem -inkey private.pem -outform PEM -out signedData.cms
The generated data is in DER format. You can see the contents using the command
$ openssl asn1parse -in signedData.cms
    0:d=0  hl=4 l= 941 cons: SEQUENCE
    4:d=1  hl=2 l=   9 prim: OBJECT            :pkcs7-signedData
   15:d=1  hl=4 l= 926 cons: cont [ 0 ]
   19:d=2  hl=4 l= 922 cons: SEQUENCE
   23:d=3  hl=2 l=   1 prim: INTEGER           :01
   26:d=3  hl=2 l=  13 cons: SET
   28:d=4  hl=2 l=  11 cons: SEQUENCE
   30:d=5  hl=2 l=   9 prim: OBJECT            :sha256
   41:d=3  hl=2 l=  11 cons: SEQUENCE
   43:d=4  hl=2 l=   9 prim: OBJECT            :pkcs7-data
   54:d=3  hl=4 l= 462 cons: cont [ 0 ]
   58:d=4  hl=4 l= 458 cons: SEQUENCE
   62:d=5  hl=4 l= 367 cons: SEQUENCE
   66:d=6  hl=2 l=   3 cons: cont [ 0 ]
   68:d=7  hl=2 l=   1 prim: INTEGER           :02
   71:d=6  hl=2 l=  19 prim: INTEGER           :258BB8CE183F0F0AB4BD0D5119E69397ABFD72
   92:d=6  hl=2 l=  10 cons: SEQUENCE
   94:d=7  hl=2 l=   8 prim: OBJECT            :ecdsa-with-SHA256
  104:d=6  hl=2 l=  60 cons: SEQUENCE
  106:d=7  hl=2 l=  23 cons: SET
  108:d=8  hl=2 l=  21 cons: SEQUENCE
  110:d=9  hl=2 l=   3 prim: OBJECT            :commonName
  115:d=9  hl=2 l=  14 prim: UTF8STRING        :embeddedinn.ca
  131:d=7  hl=2 l=  20 cons: SET
  133:d=8  hl=2 l=  18 cons: SEQUENCE
  135:d=9  hl=2 l=   3 prim: OBJECT            :organizationName
  140:d=9  hl=2 l=  11 prim: UTF8STRING        :embeddedinn
  153:d=7  hl=2 l=  11 cons: SET
  155:d=8  hl=2 l=   9 cons: SEQUENCE
  157:d=9  hl=2 l=   3 prim: OBJECT            :countryName
  162:d=9  hl=2 l=   2 prim: PRINTABLESTRING   :IN
  166:d=6  hl=2 l=  30 cons: SEQUENCE
  168:d=7  hl=2 l=  13 prim: UTCTIME           :230609171437Z
  183:d=7  hl=2 l=  13 prim: UTCTIME           :240608171437Z
  198:d=6  hl=2 l=  60 cons: SEQUENCE
  200:d=7  hl=2 l=  23 cons: SET
  202:d=8  hl=2 l=  21 cons: SEQUENCE
  204:d=9  hl=2 l=   3 prim: OBJECT            :commonName
  209:d=9  hl=2 l=  14 prim: UTF8STRING        :embeddedinn.ca
  225:d=7  hl=2 l=  20 cons: SET
  227:d=8  hl=2 l=  18 cons: SEQUENCE
  229:d=9  hl=2 l=   3 prim: OBJECT            :organizationName
  234:d=9  hl=2 l=  11 prim: UTF8STRING        :embeddedinn
  247:d=7  hl=2 l=  11 cons: SET
  249:d=8  hl=2 l=   9 cons: SEQUENCE
  251:d=9  hl=2 l=   3 prim: OBJECT            :countryName
  256:d=9  hl=2 l=   2 prim: PRINTABLESTRING   :IN
  260:d=6  hl=2 l=  86 cons: SEQUENCE
  262:d=7  hl=2 l=  16 cons: SEQUENCE
  264:d=8  hl=2 l=   7 prim: OBJECT            :id-ecPublicKey
  273:d=8  hl=2 l=   5 prim: OBJECT            :secp256k1
  280:d=7  hl=2 l=  66 prim: BIT STRING
  348:d=6  hl=2 l=  83 cons: cont [ 3 ]
  350:d=7  hl=2 l=  81 cons: SEQUENCE
  352:d=8  hl=2 l=  29 cons: SEQUENCE
  354:d=9  hl=2 l=   3 prim: OBJECT            :X509v3 Subject Key Identifier
  359:d=9  hl=2 l=  22 prim: OCTET STRING      [HEX DUMP]:04142382890FDDDBBF313C80856D85320FFB674D8D75
  383:d=8  hl=2 l=  31 cons: SEQUENCE
  385:d=9  hl=2 l=   3 prim: OBJECT            :X509v3 Authority Key Identifier
  390:d=9  hl=2 l=  24 prim: OCTET STRING      [HEX DUMP]:301680142382890FDDDBBF313C80856D85320FFB674D8D75
  416:d=8  hl=2 l=  15 cons: SEQUENCE
  418:d=9  hl=2 l=   3 prim: OBJECT            :X509v3 Basic Constraints
  423:d=9  hl=2 l=   1 prim: BOOLEAN           :255
  426:d=9  hl=2 l=   5 prim: OCTET STRING      [HEX DUMP]:30030101FF
  433:d=5  hl=2 l=  10 cons: SEQUENCE
  435:d=6  hl=2 l=   8 prim: OBJECT            :ecdsa-with-SHA256
  445:d=5  hl=2 l=  73 prim: BIT STRING
  520:d=3  hl=4 l= 421 cons: SET
  524:d=4  hl=4 l= 417 cons: SEQUENCE
  528:d=5  hl=2 l=   1 prim: INTEGER           :01
  531:d=5  hl=2 l=  83 cons: SEQUENCE
  533:d=6  hl=2 l=  60 cons: SEQUENCE
  535:d=7  hl=2 l=  23 cons: SET
  537:d=8  hl=2 l=  21 cons: SEQUENCE
  539:d=9  hl=2 l=   3 prim: OBJECT            :commonName
  544:d=9  hl=2 l=  14 prim: UTF8STRING        :embeddedinn.ca
  560:d=7  hl=2 l=  20 cons: SET
  562:d=8  hl=2 l=  18 cons: SEQUENCE
  564:d=9  hl=2 l=   3 prim: OBJECT            :organizationName
  569:d=9  hl=2 l=  11 prim: UTF8STRING        :embeddedinn
  582:d=7  hl=2 l=  11 cons: SET
  584:d=8  hl=2 l=   9 cons: SEQUENCE
  586:d=9  hl=2 l=   3 prim: OBJECT            :countryName
  591:d=9  hl=2 l=   2 prim: PRINTABLESTRING   :IN
  595:d=6  hl=2 l=  19 prim: INTEGER           :258BB8CE183F0F0AB4BD0D5119E69397ABFD72
  616:d=5  hl=2 l=  11 cons: SEQUENCE
  618:d=6  hl=2 l=   9 prim: OBJECT            :sha256
  629:d=5  hl=3 l= 228 cons: cont [ 0 ]
  632:d=6  hl=2 l=  24 cons: SEQUENCE
  634:d=7  hl=2 l=   9 prim: OBJECT            :contentType
  645:d=7  hl=2 l=  11 cons: SET
  647:d=8  hl=2 l=   9 prim: OBJECT            :pkcs7-data
  658:d=6  hl=2 l=  28 cons: SEQUENCE
  660:d=7  hl=2 l=   9 prim: OBJECT            :signingTime
  671:d=7  hl=2 l=  15 cons: SET
  673:d=8  hl=2 l=  13 prim: UTCTIME           :230609171500Z
  688:d=6  hl=2 l=  47 cons: SEQUENCE
  690:d=7  hl=2 l=   9 prim: OBJECT            :messageDigest
  701:d=7  hl=2 l=  34 cons: SET
  703:d=8  hl=2 l=  32 prim: OCTET STRING      [HEX DUMP]:A591A6D40BF420404A011733CFB7B190D62C65BF0BCDA32B57B277D9AD9F146E
  737:d=6  hl=2 l= 121 cons: SEQUENCE
  739:d=7  hl=2 l=   9 prim: OBJECT            :S/MIME Capabilities
  750:d=7  hl=2 l= 108 cons: SET
  752:d=8  hl=2 l= 106 cons: SEQUENCE
  754:d=9  hl=2 l=  11 cons: SEQUENCE
  756:d=10 hl=2 l=   9 prim: OBJECT            :aes-256-cbc
  767:d=9  hl=2 l=  11 cons: SEQUENCE
  769:d=10 hl=2 l=   9 prim: OBJECT            :aes-192-cbc
  780:d=9  hl=2 l=  11 cons: SEQUENCE
  782:d=10 hl=2 l=   9 prim: OBJECT            :aes-128-cbc
  793:d=9  hl=2 l=  10 cons: SEQUENCE
  795:d=10 hl=2 l=   8 prim: OBJECT            :des-ede3-cbc
  805:d=9  hl=2 l=  14 cons: SEQUENCE
  807:d=10 hl=2 l=   8 prim: OBJECT            :rc2-cbc
  817:d=10 hl=2 l=   2 prim: INTEGER           :80
  821:d=9  hl=2 l=  13 cons: SEQUENCE
  823:d=10 hl=2 l=   8 prim: OBJECT            :rc2-cbc
  833:d=10 hl=2 l=   1 prim: INTEGER           :40
  836:d=9  hl=2 l=   7 cons: SEQUENCE
  838:d=10 hl=2 l=   5 prim: OBJECT            :des-cbc
  845:d=9  hl=2 l=  13 cons: SEQUENCE
  847:d=10 hl=2 l=   8 prim: OBJECT            :rc2-cbc
  857:d=10 hl=2 l=   1 prim: INTEGER           :28
  860:d=5  hl=2 l=  10 cons: SEQUENCE
  862:d=6  hl=2 l=   8 prim: OBJECT            :ecdsa-with-SHA256
  872:d=5  hl=2 l=  71 prim: OCTET STRING      [HEX DUMP]:304502207B4407CA32F558874B428B6FE214D213AF62DB5319F2B8551388FD96551B7830022100F8A1A13639D8FD346F10D2AEA42FD644C06B206B09F6D93FF80B6FBD2C495AA5
In this case, the pkcs7-data is empty. However, if you use the -nodetach flag when signing, the pkcs7-data will contain the data that was signed.
The signer information is packaged along with the signature. The signer information includes the signer’s certificate, which contains the signer’s public key. The recipient can use the signer’s public key to verify the signature. The recipient can also use the signer’s certificate to verify the signer’s identity. typically, (unlike this example of a self signed certificate), the signer’s certificate is signed by a trusted certificate authority (CA), which means that the recipient can verify the signer’s identity using its root of trust.
To verify the signature using openssl, we can use the following command:
openssl cms -verify -inform PEM -in signedData.cms -content <(echo -n "Hello World") -CAfile cert.pem
Note that we are passing the CA certificate to the -CAfile flag. This is because the signer’s certificate is self-signed, so we need to tell openssl to trust it. If the signer’s certificate was signed by a trusted CA, we would not need to pass the CA certificate to the -CAfile flag.
Commands to generate and verify embedded CMS signatures are shown below:
$ echo -n "Hello World" | openssl cms -sign -signer cert.pem -inkey private.pem -outform PEM -out signedData.cms -nodetach
$ openssl cms -verify -inform PEM -in signedData.cms -CAfile cert.pem
GNU Privacy Guard (GPG)
GPG (GNU Privacy Guard) is a widely-used software tool that provides encryption and cryptographic functionality, including the ability to generate and verify digital signatures. GPG is an implementation of the OpenPGP (Pretty Good Privacy) standard, which is a widely-adopted protocol for secure communication and data encryption.
GPG uses the standard algorithms like RSA and ECDSA. But adds some custom layers on top of it. The overall steps to generate a digital signature are very similar and are as follows:
To create a digital signature, the owner of the private key uses GPG to sign a document or a message, generating a unique cryptographic hash of the data and encrypting it with the private key. This creates a digital signature that can be attached to the document.
To verify the digital signature, recipients of the signed document can use GPG and the signer’s public key. GPG performs the necessary cryptographic operations to validate the digital signature and confirm the integrity and authenticity of the document. If the verification process is successful, it means that the document has not been tampered with and was indeed signed by the owner of the corresponding private key.
GPG provides a command-line interface (CLI) as well as integration with various email clients and other software applications. It is widely used for secure communication, file encryption, and digital signatures in both personal and enterprise contexts.
While importing an existing PEM format key into GPG is possible, it need some amount of key manipulation and is outside the scope of this article. Instead, we will generate a new key pair using GPG. The following command will generate a new key pair:
$ gpg --full-generate-key --expert
The --expert flag is used to enter the expert mode, which allows us to specify the key type and size.
I generated a P-256 ECC key pair. To sign a message, we can use the following command:
$ echo -n "Hello World" > content.txt
$ gpg --armor --detach-sign content.txt
This generates a detached signature file called content.txt.asc. If the --armor option is not passed, the signature will be binary.
-----BEGIN PGP SIGNATURE-----

iHUEABMIAB0WIQTp3iRUphvQZqakqnlJeX7QAKUCYQUCZIN6dQAKCRBJeX7QAKUC
YYQSAQCfF7eYS9q7pNCF9uuqC2Ns5xWEARA1dY6oDpSMfY9a7wEAr8F+J3lpNoLV
SuGs9Gz9M4flI+1sxMm2xHTOb6UwhEI=
=zC2Y
-----END PGP SIGNATURE-----
To verify the signature, we can use the following command:
$ gpg --verify content.txt.asc content.txt

gpg: Signature made Fri 09 Jun 2023 12:16:05 PM PDT
gpg:                using ECDSA key E9DE2454A61BD066A6A4AA7949797ED000A50261
gpg: checking the trustdb
gpg: marginals needed: 3  completes needed: 1  trust model: pgp
gpg: depth: 0  valid:   1  signed:   0  trust: 0-, 0q, 0n, 0m, 0f, 1u
gpg: Good signature from "vppillai <vppillai@embeddedinn.xyz>" [ultimate]
We can also use the gpg command to encrypt and decrypt files. The following command will encrypt the file content.txt using the public key of the recipient:
$ gpg --encrypt --recipient vppillai@embeddedinn.xyz --armor content.txt
The encrypted file will be called content.txt.asc.
-----BEGIN PGP MESSAGE-----

hH4DdnSk57UrZfYSAgMEAPi09MyRCe5Dq1Cw4Mv9ZZErePUjVThoQ+WymHGocn8F
Es90lp0GVUSkG/7e3fjuUQDpcuDTH7PthurqYwhL8DAjAFFykwnsIrr+SoDtXZ3B
j2FJqeYz+bIPAn2azwq2z2TVSCIy6KxN7alOF2oLfTHSUgE8a6/YFh+nr8ye0WpG
xYGOVE0P+z9ZI5Tx1tXuYxWiTb15bUPXeWdnc5p2FewjT9b88L6Bn7Y05dwXb2gW
Jbg4Spq4jF2fM9YSmuGEWoEulz8=
=JrES
-----END PGP MESSAGE-----
To decrypt the file, we can use the following command. In a real-world scenario, the recipient would use their private key to decrypt the file. Contents of the file cannot be decrypted without the private key.
$ gpg --decrypt content.txt.asc

gpg: encrypted with 256-bit ECDH key, ID 7674A4E7B52B65F6, created 2023-06-09
      "vppillai <vppillai@embeddedinn.xyz>"
Hello World
GPG key servers are used to share public keys. The following command can be used to upload the public key to a key server:
gpg --keyserver keyserver.ubuntu.com --send-keys E9DE2454A61BD066A6A4AA7949797ED000A50261
The following command can be used to download the public key from a key server:
gpg --keyserver keyserver.ubuntu.com --recv-keys E9DE2454A61BD066A6A4AA7949797ED000A50261
To delete a key from the key server, we can use the following command:
gpg --keyserver keyserver.ubuntu.com --delete-keys E9DE2454A61BD066A6A4AA7949797ED000A50261

Digital Signature Tool
We will now look at some of the common use cases of digital signatures.
X.509 Certificates
X.509 is a standard format for public key certificates. It is used in many applications, including TLS/SSL, email, and code signing. X.509 certificates are used to authenticate the identity of the communicating parties and ensure the integrity of the exchanged messages.
When a certificate is requested from a certificate authority (CA), the CA verifies the identity of the requester and issues a certificate. The certificate contains the requester’s public key and is digitally signed by the CA. The CA’s signature is created using the CA’s private key. The certificate also contains the CA’s public key, which is used to verify the CA’s signature, along with the root of trust present in the client’s system.
you can see the signature algorithm used in the certificate and the signature using the command:
$ openssl x509 -in cert.pem -noout -text


Certificate:
    Data:
        Version: 3 (0x2)
        Serial Number:
            25:8b:b8:ce:18:3f:0f:0a:b4:bd:0d:51:19:e6:93:97:ab:fd:72
        Signature Algorithm: ecdsa-with-SHA256
        Issuer: CN = embeddedinn.ca, O = embeddedinn, C = IN
        Validity
            Not Before: Jun  9 17:14:37 2023 GMT
            Not After : Jun  8 17:14:37 2024 GMT
        Subject: CN = embeddedinn.ca, O = embeddedinn, C = IN
        Subject Public Key Info:
            Public Key Algorithm: id-ecPublicKey
                Public-Key: (256 bit)
                pub:
                    04:89:ac:ee:13:35:c5:41:5a:8c:c9:f8:9b:22:ce:
                    99:8e:0a:29:f9:f5:d2:dc:6e:1f:1f:4b:15:9b:8f:
                    2a:01:ed:d9:ee:a4:e3:ef:7c:a0:cc:a7:37:73:5a:
                    47:8a:3b:0e:87:24:56:b3:1c:f0:89:73:54:fd:15:
                    b9:71:4d:61:a3
                ASN1 OID: secp256k1
        X509v3 extensions:
            X509v3 Subject Key Identifier:
                23:82:89:0F:DD:DB:BF:31:3C:80:85:6D:85:32:0F:FB:67:4D:8D:75
            X509v3 Authority Key Identifier:
                keyid:23:82:89:0F:DD:DB:BF:31:3C:80:85:6D:85:32:0F:FB:67:4D:8D:75

            X509v3 Basic Constraints: critical
                CA:TRUE
    Signature Algorithm: ecdsa-with-SHA256
         30:46:02:21:00:af:d2:93:36:10:fe:39:f1:88:9d:b5:0f:37:
         a7:f1:db:8e:3c:41:f7:39:42:12:76:93:fb:69:cb:7c:99:11:
         f1:02:21:00:d2:b5:63:cf:b7:d9:f6:74:66:69:5a:00:6d:08:
         55:f7:cf:31:99:19:ef:c1:65:cc:69:80:55:26:13:29:84:4c
Signatures in TLS
In the TLS 1.2 protocol, digital signatures are primarily used for authentication and integrity verification of data exchanged between the client and server. The key areas where digital signatures are used in TLS 1.2 are:
-
Handshake Protocol: to authenticate the identities of the communicating parties and ensure the integrity of the exchanged messages.
-
Server Authentication: When the server presents its digital certificate to the client during the handshake, it includes a digital signature created using the private key of the certificate authority (CA) that issued the certificate. The client verifies this signature using the corresponding CA’s public key to ensure the authenticity of the server’s certificate.
-
Client Authentication (optional): In case of mutual authentication, the server may request the client to present its digital certificate. Similar to server authentication, the client’s certificate includes a digital signature from a trusted CA, and the server verifies it to authenticate the client.
-
-
Key Exchange: The key exchange process in TLS 1.2 ensures that the client and server can establish a shared secret key to encrypt and decrypt data during the secure communication. Digital signatures are used to ensure the integrity of the key exchange process.
-
Server Key Exchange: In certain cases, the server may use a digital signature to sign the parameters used in the key exchange, ensuring that they have not been tampered with during transmission. An example of this is the
Diffie-Hellmankey exchange method, where the server signs theDiffie-Hellmanparameters using its private key. -
Client Key Exchange: The client may also employ digital signatures during the key exchange, depending on the key exchange method used. For example, in the
Diffie-Hellmankey exchange method, the client signs theDiffie-Hellmanparameters using its private key.
-
-
Certificate Revocation: TLS 1.2 supports checking the revocation status of certificates to ensure they have not been revoked or invalidated. Digital signatures are utilized in the certificate revocation process, where revocation information is signed by the CA or certificate issuer.
Signatures in SSH
- Host Key Authentication:
When a client connects to an SSH server for the first time, the server presents its host key. The client verifies the authenticity of the host key by checking its digital signature, which is typically performed using a public key infrastructure (PKI) scheme. This process involves the following the client sends a challenge to the server, which signs the challenge using its private key and sends the digital signature back to the client. The client verifies the signature using the server’s public key to authenticate the server. This is defined in the SSH Transport Layer Protocol.
- User Authentication:
If an SSH, users initiates auth using public key cryptography. The challenge response process is similar to host key authentication, but the client and server roles are reversed. The client generates a key pair (public key and private key) and adds the public key to the server’s authorized keys file. When the user attempts to connect, the server sends a challenge to the client, which signs the challenge using its private key and sends the digital signature back to the server. The server verifies the signature using the user’s public key to authenticate the user.
SSH also supports certificate-based authentication. In this case, users have certificates issued by a trusted certificate authority (CA). The certificates contain public keys and digital signatures from the CA. When a user connects to the server, the client sends its certificate to the server. The server verifies the certificate’s digital signature with the CA’s public key to authenticate the user. This also includes the challenge response process to prove access to the private key.
Signatures in Email
The protocol commonly used for implementing digital signatures in emails is the Secure/Multipurpose Internet Mail Extensions (S/MIME). It operates within the protocol the framework of the MIME standard, which allows the inclusion of non-textual attachments, such as images or documents, in email messages.
S/MIME relies on X.509 digital certificates issued by trusted Certificate Authorities (CAs) and relies on PKI to verify the authenticity of the sender. The sender’s email client uses the private key of the sender’s digital certificate to sign the email message. The recipient’s email client uses the sender’s public key to verify the signature and authenticate the sender. The recipient’s email client also uses the sender’s public key to encrypt the email message, ensuring confidentiality.
The CMS format discussed earlier is used to store and transmit the signatures.
The sender and the receiver have to exchange their public key with each other. This process happens automatically when the sender and recipient exchange emails for the first time with most of the modern email clients.
GPG provides a similar functionality for email signing and encryption. It uses a web of trust model, where users can sign each other’s public keys to verify their authenticity. GPG also supports the use of X.509 certificates for email signing and encryption.
ARC (Authenticated Received Chain) and DKIM (DomainKeys Identified Mail) aim at protecting emails in transit:
Authenticated Received Chain (ARC):
ARC is a protocol designed to address the challenges of email authentication when messages pass through intermediaries, such as mailing lists or forwarding services. These intermediaries can modify the message or its headers, potentially breaking the existing email authentication mechanisms like SPF, DKIM, and DMARC.
ARC provides a mechanism to create a chain of authentication results as the email passes through these intermediaries. It adds ARC headers to the message, containing cryptographic seals and signatures that verify the integrity of the email’s original authentication results.
When an email recipient receives a message with ARC headers, they can use these headers to validate the authenticity and integrity of the authentication results. By examining the ARC-Seal and ARC-Message-Signature, the recipient can ensure that the email’s authentication results have not been tampered with during transit.
DomainKeys Identified Mail (DKIM):
DKIM is an email authentication method that allows the receiver to verify the authenticity of an email’s domain and ensure that the message hasn’t been altered during transit.
When an email is sent using DKIM, the sending domain adds a digital signature to the email headers using asymmetric cryptography. The signature is generated by the sending domain’s private key, and the recipient can verify it using the domain’s public key published in DNS (Domain Name System) records.
The DKIM-Signature header contains information such as the signing algorithm, domain, selector, timestamp, and a hash value of selected headers. By recalculating the hash and verifying the signature with the public key, the recipient can confirm that the email has indeed been sent by the claimed domain and hasn’t been modified.
DKIM helps combat email spoofing and provides a level of trust in the authenticity of the email’s source. It is one of the components used by email providers to determine the email’s reputation and whether it should be delivered to the recipient’s inbox or treated as suspicious or spam.
Both ARC and DKIM enhance email authentication and integrity. While DKIM focuses on verifying the domain and message integrity, ARC focuses on preserving the authentication results as the email passes through intermediaries. Together, they contribute to a more secure email ecosystem by preventing spoofing, tampering, and enhancing trust in email communication.
Signatures in Git
Git can be configured to digital signatures to verify the authenticity of commits and tags. Git uses the GPG tool to generate and manage the keys. The following commands can be used to configure Git to use GPG:
$ git config user.signingkey <key-id>
The GPG format can be optionally be set to ssh or x509 using the following commands:
$ git config gpg.format ssh
$ git config gpg.format x509
To sign commits and tags, use the -S option with the git commit and git tag commands:
$ git commit -S -m "commit message"
$ git tag -s <tag-name>
A signed commit or tag can be verified using the git verify-commit and git verify-tag commands:
$ git verify-commit <commit-id>
$ git verify-tag <tag-name>
And, a signed commit can be viewed using the git show command:
$ git show <commit-id>
A sample output of the git show command is shown below:
  $ git show v1.0.0
  tag v1.0.0
  Tagger: vppillai <vppillai@embeddedinn.ca>
  Date:   Fri June 9 20:29:41 2023 -0700

  Signed tag
  -----BEGIN PGP SIGNATURE-----
  Version: GnuPG v1

  dSWsBAADAgAGBQJTZbQlAAoJEF0+sviABDDrZbQH/09PfE51KPVPlanr6q1v4/Ut
  LQxAojUWiLQdg2ESJItkcuweYg+kc3HCyFejeDIBw9dpXt00rY26p05qrpnG+85b
  hM1/PswpHLuBSr+oCIDj5GMC2r2iEKsfv2fJbNW8iWAXVLoWZRF8B0MfqX/YTMbm
  ecorc4iXzQu7tupRihslbNkfvfciMnSDeSvzCpWAHl7h8Wj6hhqePmLm9lAYqnKp
  8S5B/1SSQuEAjRZgI4IexpZoeKGVDptPHxLLS38fozsyi0QyDyzEgJxcJQVMXxVi
  RUysgqjcpT8+iQM1PblGfHR4XAhuOqN5Fx06PSaFZhqvWFezJ28/CLyX5q+oIVk=
  =EFTF
  -----END PGP SIGNATURE-----

  commit e3cb51b3086661a2876825062c3057d0e851a444
  Author: vppillai <vppillai@embeddedinn.ca>
  Date:   Fri June 9 20:29:41 2023 -0700
As you can see, the signature is stored as part of the commit object.
Code Signing and Signed Linux Kernel Modules
While source signing as we saw in the Git section is technically a form of code signing, the term code signing is typically used to refer to the signing of compiled code. Code signing is used to verify the authenticity of software and to ensure that the software has not been tampered with. Code signing is commonly used for software distribution, such as software updates, and for mobile apps. Code signing is also used for driver signing in Windows and for kernel modules in Linux.
There is no standard way to store a signature as part of a binary like format like ELF. The signature is typically stored in a separate file, which is then distributed along with the binary. The signature file can be in any format, such as CMS, PGP, or XML. The signature file can also be stored in a separate location, such as a database, and referenced by the binary.
The Linux kernel handles signed modules differently. While the details are available in the Linux documentation, the highlights are outlined below.
- Enable kernel level module signature verification by setting the
CONFIG_MODULE_SIGconfiguration option toyin the kernel configuration file. The certifiate used for verification is stored in thecertsdirectory in the kernel source tree. - Under normal conditions, when CONFIG_MODULE_SIG_KEY is unchanged from its default, the kernel build will automatically generate a new keypair using openssl. This will be stored under the certs directory in the kernel source tree. At runtime, it can be seen at
/proc/keys - The
scripts/sign-filetool is used to generate and append the signature to the module. A signed module has a digital signature simply appended at the end. The string~Module signature appended~. at the end of the module’s file confirms that a signature is present. Module Signature Blockin the module consists of the following components:
- Signature Header: The signature header contains metadata about the signature, such as the size of the signature and the version of the signature format. It provides information necessary for the kernel to interpret and validate the signature.
    struct module_signature {
    uint8_t		algo;		/* Public-key crypto algorithm [0] */
    uint8_t		hash;		/* Digest algorithm [0] */
    uint8_t		id_type;	/* Key identifier type [PKEY_ID_PKCS7] */
    uint8_t		signer_len;	/* Length of signer's name [0] */
    uint8_t		key_id_len;	/* Length of key identifier [0] */
    uint8_t		__pad[3];
    uint32_t	sig_len;	/* Length of signature data */
  };
- Signature: The signature itself, generated by the sign-file script. The
USE_PKCS7option is enabled by default. If disabled, a CMS format signature is generated.
- If the
~Module signature appended~string is present , the kernel will then read the signature header and signature from the end of the module and validate it. The offset of the signature header is calculated by subtracting the size of the signature header from the size of the module. The signature header is then read from the module and validated. If the signature header is valid, the signature is then read and validated. If the signature is valid, the module is loaded. If the signature is invalid, the module is not loaded and an error message is displayed.
JWT
JSON Web Token (JWT) is an open standard for securely transmitting information between parties as a JSON object. The information can be verified and trusted because it is digitally signed. JWTs can be signed using a secret (with the HMAC algorithm) or a public/private key pair using RSA or ECDSA. You can read more about JWTs in detail in my previous article on the topic.
Image signing for Secure Boot in system engineering
By system engineering, I refer to the low level software that is responsible for booting the system and loading the operating system. secure system boot and secure software update are two important aspects of system engineering. Secure boot ensures that the system boots only authorized software. Secure software update ensures that the software is not tampered with during the update process. Image signing is an important aspect of both secure boot and secure software update.
The topics in the following sub sections require a detailed explanation. I will cover them in detail in future posts. For now, I will provide a brief overview of each topic.
UEFI
UEFI stands for Unified Extensible Firmware Interface. UEFI is a specification that defines a software interface between an operating system and platform firmware. UEFI is a replacement for the legacy BIOS firmware interface. UEFI is a very broad topic that requires its own post. So, in order to avoid mis-representation or over simplification of data, I will just state that when Secure Boot is enabled, the UEFI firmware checks the digital signatures of the bootloader and any subsequent components before allowing them to execute. I will later write a detailed post on UEFI and Secure Boot, going into the details of the signature header, signing and key exchange process etc.
UBOOT
Das U-Boot (Universal Bootloader) is an open source, primary boot loader used in embedded devices to boot the Linux kernel, among other things. U-Boot provides a mechanism known as Verified boot to verify the integrity of the boot image. The boot image is a FIT image that contains the kernel, device tree, and other components. The boot image is signed using a private key. The public key is stored in the U-Boot environment. The signature is verified by U-Boot before booting the image.
U-Boot Flattened Image Tree (FIT) is a very flexible, structured container format which supports multiple kernel images, device trees, ram disks, etc. It includes hashes to verify images. So adding signatures to it is straight forward.
U-Boot can be configured to use a variety of signature formats, such as PKCS7, CMS, and raw signatures. The signature is stored in the FIT image itself. The signature is verified by U-Boot before booting the image. U-Boot can also be configured to use a TPM to store the public key. The TPM can be used to verify the signature.
Grub
GRUB (GRand Unified Bootloader) is a popular bootloader used in many Linux-based operating systems. Starting with version 2.02, GRUB introduced support for digital signatures to ensure the authenticity and integrity of its configuration files and executable modules.
The digital signature support in GRUB involves the following key components:
-
GRUB Configuration File (grub.cfg): The main configuration file for GRUB, which specifies the boot options and configuration settings. The configuration file can be signed using digital signatures to prevent unauthorized modifications.
-
Executable Modules: GRUB can load and execute various modules during the boot process, such as filesystem drivers or cryptographic libraries. These modules can also be signed to ensure their integrity and authenticity.
-
Signature Verification: During the boot process, GRUB verifies the digital signatures of its configuration file and executable modules to ensure they haven’t been tampered with or modified by unauthorized sources. The signatures are verified using the corresponding public keys.
The specific signature format used by GRUB is based on the GNU gpg (GNU Privacy Guard) format. GRUB utilizes the GPG toolchain, including GPG keys and the gpg utility, for creating and verifying the digital signatures.
The process generally involves signing the GRUB configuration file and modules using a private key, and the corresponding public key is embedded within the GRUB bootloader or stored in a secure location accessible by GRUB. During the boot process, GRUB verifies the digital signatures using the embedded or trusted public key.
The exact steps and configuration options for setting up and managing digital signatures in GRUB can vary depending on the specific version and distribution of GRUB being used. It’s important to consult the GRUB documentation and distribution-specific guides for detailed instructions on generating keys, signing files, and configuring GRUB to perform signature verification.
Android Verified Boot (AVB)
Android Verified Boot (AVB) is a security feature implemented in Android devices to ensure the integrity and authenticity of the boot process. AVB utilizes digital signatures to verify the integrity of boot components, including the bootloader, kernel, and device tree.
Here’s an overview of how digital signatures are used in Android Verified Boot:
-
Boot Image Signatures: Android devices use a verified boot process where each boot image (bootloader, kernel, and device tree) is digitally signed. The digital signature is generated using an asymmetric cryptography algorithm, such as RSA, and is based on a private key held by the device manufacturer or trusted entity.
-
Signature Verification: During the boot process, the bootloader verifies the digital signatures of the boot images using the corresponding public key. If the signatures are valid and match the computed hash of the boot images, the boot process continues. If the signatures are invalid or the hashes do not match, the bootloader will not proceed, indicating a potential tampering or compromise.
-
Chain of Trust: AVB establishes a chain of trust by ensuring that each subsequent boot component is verified using its own digital signature. This means that the bootloader verifies the kernel, and the kernel verifies the device tree, ensuring the integrity of each stage.
-
Key Management: The public key used for verifying the boot image signatures is stored in the device’s trusted hardware, such as a Trusted Execution Environment (TEE), or in a read-only memory location that is tamper-resistant. This ensures that only authorized parties can update the boot components and corresponding digital signatures.
-
Updates and Rollback Protection: When updating the firmware or boot images, AVB enforces version checks and prevents downgrades to older, potentially vulnerable versions. It ensures that the updated boot images are signed with a newer version of the digital signature.
The exact implementation of Android Verified Boot, including the signature formats and key management mechanisms, can vary across different device manufacturers and Android versions. However, the underlying principle of using digital signatures to verify the integrity and authenticity of boot components remains consistent.
Linux IMA/EVM
Linux IMA (Integrity Measurement Architecture) and EVM (Extended Verification Module) are security features in the Linux kernel that provide mechanisms for measuring and verifying the integrity of files and data on a Linux system. Here’s a brief overview of IMA and EVM:
- Integrity Measurement Architecture (IMA):
- IMA is a framework that allows the kernel to measure the integrity of files and data at various points in the system.
- It works by calculating cryptographic hashes (e.g., SHA-256) of files and storing these measurements in a separate area called the IMA measurement list.
- During boot or at runtime, IMA can compare the calculated hashes with the stored measurements to detect any unauthorized modifications or tampering.
- IMA supports different measurement policies, including a default policy that measures all files, and custom policies that allow fine-grained control over which files are measured.
- Extended Verification Module (EVM):
- EVM builds upon IMA and provides additional integrity and authenticity guarantees by adding digital signatures to the measured data.
- EVM extends the IMA measurement list with signatures that are computed using asymmetric cryptography (e.g., RSA, ECDSA).
- EVM signatures are generated by trusted entities, such as a trusted root key or a key managed by a hardware security module (HSM).
- During runtime, EVM can verify the signatures in the measurement list, ensuring that the measured data has not been tampered with and originates from a trusted source.
- EVM can also provide cryptographic verification of the kernel itself and other critical components in the system.
Together, IMA and EVM provide a framework for enforcing and verifying the integrity and authenticity of files and data on a Linux system. They are often used in security-sensitive environments where ensuring the integrity of system components and detecting unauthorized changes is crucial.
It’s important to note that the specific implementation and configuration of IMA and EVM may vary across Linux distributions and kernel versions. Detailed documentation and configuration options can be found in the Linux kernel source tree and the documentation provided by the specific distribution or security frameworks built on top of IMA and EVM.
Conclusion
There are so many more places and ways to use digital signatures. This is just a small sample of the many ways digital signatures are used in the real world. Hopefully this gives you a better understanding of how digital signatures are used in practice. Its important to note that the use of digital signatures in any system is only as good as the system design that can store Signer Public Keys in a tamper resistant way. If the Signer Public Keys can be tampered with, then the entire system is compromised.


Leave a comment