

Docker 101 for embedded systems Dev and DevOps
Docker 101 for embedded systems Dev & DevOps.
I started using docker back in 2016 and ever since, I have been using it in the context of embedded systems DevOps. This article condenses the learning so that someone starting afresh can get to speed quickly. You can read my article on bring-up a buildroot image on docker in the article Docker: Scratching an itch to build from ground up.
I’ll first introduce some of the key concepts and commands, and then we will look at some docker for embedded systems DevOps use-cases.
Docker what?
To understand what docker is, first, you need to understand the concept of containers.
A container is pretty much like a pre-configured VM at a high level. It lets you package all your tools, configurations, and dependencies. It provides an isolated execution environment for your code without worrying about the dependency versions, configuration mismatch, etc. But, unlike a VM, a complete OS (and baggage) is not part of the container. Its leaner and leverages the capabilities of the underlying OS. It also comes pre-configured with purpose-specific tools. (That way, it is closer to a python virtual environment than a VM?)
Containers use the underlying OS kernel to provide application-level virtualization. Due to this, a container image created for an OS might not work with another OS. (Docker toolbox addresses this.)
Docker is one of the tools that let you create, configure, and use containers. Podman is another example of a container tool.
Practically, containers are stored in a container repository. DocerHub is an example of a public container repo. It contains official and unofficial images. You can use docker to fetch and start one of these images. Your entire development/deployment environment will be up and running with a single command. This is one of the primary docker use cases.
For instance, if you want to try out the latest RISC-V clang nightly build without messing up your environment, pull it from DockerHub and use it in the container with:
docker run -dit tuxmake/riscv_clang-nightly
followed by docker attach <container ID>
If you ended up opening many, close all with docker container prune.
Architecture
Docker has a client-server architecture. The client communicates to the daemon (server) using a REST API. So, the daemon can be local or be in the network. You will read more about the components shown in teh diagram below in the following sections.

(Source: docs.docker.com)
Docker is written in the Go programming language and takes advantage of several features of the Linux kernel to deliver its functionality. Docker uses a technology called namespaces to provide the isolated workspace called the container. When you run a container, Docker creates a set of namespaces for that container.These namespaces provide a layer of isolation. Each aspect of a container runs in a separate namespace and its access is limited to that namespace. (Source:
)
Docker Images
A docker container “executes” a docker image. The container includes all the essential components required to execute an image. This consists of a virtual FS, networking, etc.
A docker image is built by layering different images. The base image is typically a Linux distribution. When you do a docker pull or docker run, these layers are downloaded and stacked on top of each other to create the final container image.
Essential Commands
| pull | Brings in images from a repo into your machine. | ||||||||||
| images | List all the local images. | ||||||||||
| run | Run an image in a new container.
|
||||||||||
| ps | List all running containers.
|
||||||||||
| stop | Stop the container | ||||||||||
| start | Start a stopped container | ||||||||||
| logs | List logs of a container. | ||||||||||
| exec | Execute a command in a container. Provide container id and the command to execute.
|
||||||||||
| container prune | Clear stopped containers. | ||||||||||
| rmi | Delete an image | ||||||||||
| tag | Image rename | ||||||||||
| system prune | Clean all images and containers. |
Docker Networking
Like an application running in a VM, an application virtualized in a container is unaware it is executing within it. So, applications in different container instances can open the same ports. To use these ports, we need to bind a host port to a container port.
To bind a container port to a host port, use the -p argument to docker run.
docker run -p8000:6379 redis
Docker also has internal networking that lets containers talk to each other. To list the networks that are available use:
docker network ls
To create a custom network, use:
docker network <network name>
Once a network is created, you can pass it in the run command using the –net argument. The required ports should also be bound using -p while adding a container to a network.
Containers within the same network can talk to each other using the container name.
Building docker images
A Dockerfile is a recipe for building docker images. Key commands that can be used in a Dockerfile are listed below
FROM |
Denotes the base image |
ENV |
Environment variables |
RUN |
Execute a command within the container |
COPY |
Copy something from the host into the container |
CMD |
Entry point command to execute after boot |
Once you create a Dockerfile, you build it with
docker build -t myApp:0.1 .
The image is built and stored locally. It can be listed with docker images. It can then be pushed to a registry using
docker push
When you push updated versions, only the changed layers are pushed.
For private registries, you can use Amazon ECR, Digital Ocean, etc. You can use DockerHub for public registries.
Persistent Volumes
The data generated and written into the virtual container filesystem is destroyed when the container stops. We use persistent volumes to overcome this.
Volumes maps (mounts) host file system paths into the container file system.
They are three types of volumes
-
Host Volumes
Pass the host and destination paths within the container using the
-vargument to the run command.docker run -v /home/embeddedinn/data:/var/lib/mysql/data -
Anonymous Volumes
Only the container directory is passed to
-vargument. A directory is created within the host to map this automatically. In Linux, this is created in the/var/lib/docker/volumesfolder. -
Named Volumes
Similar to anonymous, but a name for the volume can be passed.
docker -v name:/var/lib/mysql/dataThis is the recommended method. For shared volumes, the same name can be used across containers.
Volume access issues
Especially when the container and host OSes are different (even different Linux distros), the volumes might face access issues due to the differences in the user and group ID mappings of the volume and the container user.
One option is to use the docker run -u with the argument -u $(id -u):$(id -g) to map the container user to the host user. However, if a user with the same uid:gid is not present in the container already then you will face run time issues. Most notably, you will see an I have no name! prompt in the container bash prompt.
An alternate mechanism is to create the required user in the host and then map the user to the container. The same user should be used to create and operate on the volume source before and after mount. To create the user with a specific uid and gid, use the following commands.
addgroup --gid 24 user
adduser --disabled-password --gecos '' --uid 1367 --gid 24 user
The magic numbers are the user id and group id of the user to be created. This can be obtained using the id command with the -u flag for the user and -g flag for the group ID.
Once the user is created, switch to the user with su user. user being the user name we created.
Performance Impact
Typically, Docker containers are not running on a virtualized environment. They operate on top of a thin isolation layer implemented between the host kernel and the container (Cgroups, VLANs, etc.). This means, inherently, there will be minimal performance impact when running a dockerized application if the host and container OSes are the same (e.g. Linux host running a Linux container). Practically, the applications are just running in a different namespace. (If the host OS is different from the container OS, there will be a significant performance.)
But, if we take a closer look at the kernel features enabling the containerization namespaces, we see that there are kernel traps set to limit access to certain features from within the container. This feature is called seccomp and you can see the full list of features blocked by the default profile in docker documentation. In short around 44 out of the 300+ system calls are blocked inside the container and if your application extensively relies on these, there will be a significant hit to the performance. This variation in performance can be easily seen by running a standard benchmarking suite. A snapshot of the results of my pyperformance run inside and outside a container is given in Appendix A at the end of this article.
The containerization layer also implements a virtual filesystem using a non-persistent sparse file system. We saw in previous sections that host directories can be mounted in the contains using volumes. This introduces some performance issues, mainly based on the differences between how the container and the host OS handle the underlying native FS.
If you understand what you are doing, the seccomp:unconfined profile can be used to disable the kernel traps and regain performance.
Some other tricks to improve performance are given below. (These tips just addresses the issues discussed in this article. There are many more application specific improvements that can be done to improve performance.)
- Use
--privilegedto run the container in privileged mode. This will allow the container to access all the host features. - Use
--net=hostto run the container in host networking mode. This will allow the container to talk to other containers in the host. - Work with the non-persistent virtual filesystem and clone your code into the container when you want to work on it.
- Use a named volume to share the same data between containers. (not exavtly a performance improvement, but it is a good idea for certain cases.)
Using an IDE to develop using tools within the container
VS Code supports using docker containers as full fledged development environments while also having access to the full set of VS Code features.
Make sure that you have the latest version of VS Code installed with the remote container extension enabled.
If you have a container up and running, you can attach to it and start operating inside the container by selecting “Remote-Containers: Attach to running container…” from the command menu or by selecting the containe from the “Remote Explorer” menu.
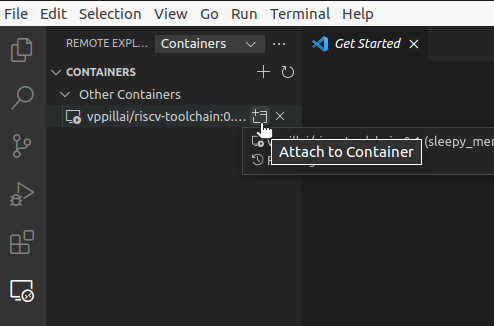
VS Code remote explorer menu
Once the container is attached, you can select the folder within the container to be added to the workspace and start working on it. If you start a terminal, it will be started within the container. This way, you get a full fledged workspace that uses the tools within the container. This process will create a work space configuration file that is specific to the image you are using. So, the next time you connect to the container, the workspace will be restored.
If we always operate in this manner, we can ease the process a bit more by automatically starting a container when we open the project from a folder. This is done by including a .devcontainer.json file in the root of the project (or .devcontainer/devcontainer.json). Once you open a folder that containes the .devcontainer.json file, a new container can be auto launched by the IDE with the reopen in container option. The workspace folder will be auto-mounted in the container.
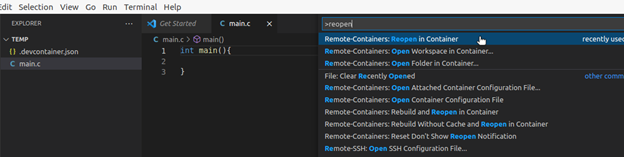
VS Code remote re-launch option
The .devcontainer.json in this case was:
{
  "image": "tuxmake/riscv_clang-nightly"
}
Instead of specifying the image here, a Dockerfile can be used to build the image dynamically by including it in the .devcontainer folder.
you can launch the container menu by clicking on the container button on the botton left of the VSCode ribbon.
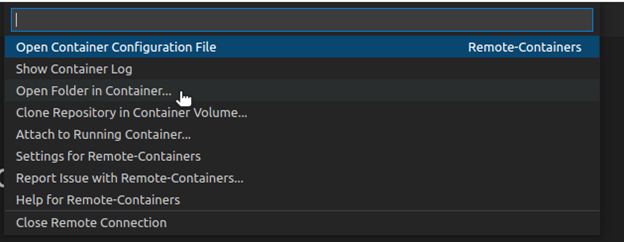
VS Code remote options
Usecase 1: Setting up a custom RISC-V toolchain image
Let’s consider a development ecosystem to enable developers and CI to use a standard, custom toolchain version. This can be enabled using docker with the following steps.
-
Cloning and Compiling the toolchain in a docker container
To create the toolchain in a clean environment, lets first bring up a container with a persistent volume, then clone the git repo, install dependencies and compile the toolchain.
 docker run -it -v /home/embeddedinn/docker/volume/toolInstall:/opt/riscv ubuntu:20.04 /bin/bash

 sudo apt-get install autoconf automake autotools-dev curl python3 libmpc-dev libmpfr-dev bgmp-dev gawk build-essential bison flex texinfo gperf libtool patchutils bc zlib1g-dev bexpat-dev git

 git clone https://github.com/riscv/riscv-gnu-toolchain

 cd riscv-gnu-toolchain
 ./configure --prefix=/opt/riscv --with-arch=rv32gc --with-abi=ilp32d --enable-multilib
 make -j$(nproc)
 make -j$(nproc) linux
At the end of this process, the compiled toolchain will be available in the
/home/embeddedinn/docker/volume/toolInstallfolder mapped as a volume to/opt/riscvwithin the container. -
Creating a docker image
Now that we have compiled the toolchain that works on ubuntu
20.04, we can go ahead and package it into a docker image that other developers and the CI can pull.This is how the Dockerfile will look like
 FROM ubuntu:20.04
 RUN mkdir /opt/riscv
 COPY toolInstall/* /opt/riscv/
 ENV PATH="/opt/riscv:${PATH}"
 RUN apt-get update
 RUN DEBIAN_FRONTEND=noninteractive apt-get install -y --no-install-recommends tzdata
 RUN apt-get install autoconf automake autotools-dev curl libmpc-dev libmpfr-dev libgmp-dev \
                 libusb-1.0-0-dev gawk build-essential bison flex gperf libtool \
                 patchutils bc zlib1g-dev device-tree-compiler pkg-config libexpat-dev  \
                 libncurses5-dev libncursesw5-dev python python3 git vim -y
 CMD /bin/bash
You can build the image using
docker build -t riscv-toolchain:0.1 .Once the build completes, the image will be available locally. You can use
docker imagesto see it. -
Pushing the docker image to the container registry
For others to use the image, you created you need to make it available through a container registry. Depending on the registry you are using, there will be different steps to push the image. In this case, we are using DockerHub. The image needs to be renamed (tagged) to the format appropriate to the registry.
docker tag riscv-toolchain:0.1 vppillai/riscv-toolchain:0.1Then login to the registry and push the image.
docker login
docker push vppillai/riscv-toolchain:0.1
Once pushed, you can see the image details from the hub interface https://hub.docker.com/r/vppillai/riscv-toolchain/
-
Using the image
Now that the image has been pushed, developers and CI can use it with
docker run -it vppillai/riscv-toolchain:0.1
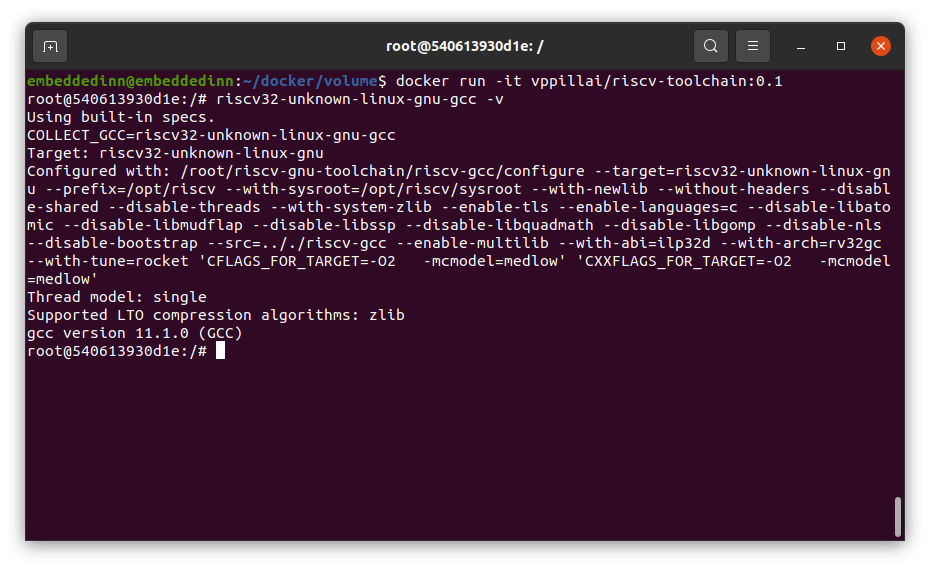
Container with the new RISC-V toolchain
If you want to compile a codebase in your local machine with this toolchain, you can mount the volume into the container while running it.
Usecase 2: Compiling MPLABX projects with a custom Docker image
Microchip MPLABX project builds can be automated in a CI/CD pipeline using a Docker image with the tools pre-configured. MPLABX 6.0 even provides a CI/CD wizard tool to generate Docker files finetuned for your project needs.
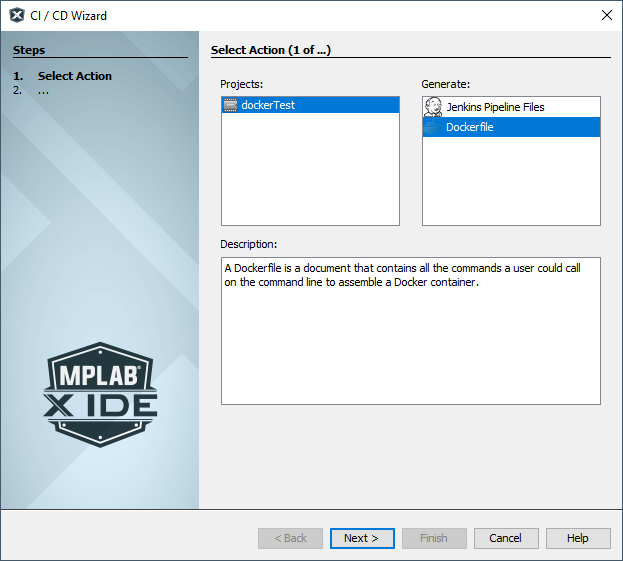
MPLAB X CI/CD Wizard
A sample Dockerfile generated using the wizard looks like this:
# This file was generated by the CI/CD Wizard version 1.0.391.
# See the user guide for information on how to customize and use this file.

FROM debian:buster-slim

ENV DEBIAN_FRONTEND noninteractive

USER root
RUN dpkg --add-architecture i386 \
    && apt-get update -yq \
    && apt-get install -yq --no-install-recommends \
        ca-certificates \
        curl \
        make \
        unzip \
        procps \
    && apt-get clean && rm -rf /var/lib/apt/lists/* /tmp/* /var/tmp/*
# Download and install MPLAB X IDE version 6.00
ENV MPLABX_VERSION 6.00

RUN curl -fSL -A "Mozilla/4.0" -o /tmp/mplabx-installer.tar \
         "https://ww1.microchip.com/downloads/en/DeviceDoc/MPLABX-v${MPLABX_VERSION}-linux-installer.tar" \
 && tar xf /tmp/mplabx-installer.tar -C /tmp/ && rm /tmp/mplabx-installer.tar  \
 && USER=root ./tmp/MPLABX-v${MPLABX_VERSION}-linux-installer.sh --nox11 \
    -- --unattendedmodeui none --mode unattended \
 && rm ./tmp/MPLABX-v${MPLABX_VERSION}-linux-installer.sh \
 && rm -rf /opt/microchip/mplabx/v${MPLABX_VERSION}/packs/Microchip/*_DFP \
 && rm -rf /opt/microchip/mplabx/v${MPLABX_VERSION}/mplab_platform/browser-lib
ENV PATH /opt/microchip/mplabx/v${MPLABX_VERSION}/mplab_platform/bin:$PATH
ENV PATH /opt/microchip/mplabx/v${MPLABX_VERSION}/mplab_platform/mplab_ipe:$PATH
ENV XCLM_PATH /opt/microchip/mplabx/v${MPLABX_VERSION}/mplab_platform/bin/xclm

ENV TOOLCHAIN xc32
ENV TOOLCHAIN_VERSION 4.00

# Download and install toolchain
RUN curl -fSL -A "Mozilla/4.0" -o /tmp/${TOOLCHAIN}.run \
    "https://ww1.microchip.com/downloads/en/DeviceDoc/${TOOLCHAIN}-v${TOOLCHAIN_VERSION}-full-install-linux-installer.run" \
 && chmod a+x /tmp/${TOOLCHAIN}.run \
 && /tmp/${TOOLCHAIN}.run --mode unattended --unattendedmodeui none \
    --netservername localhost --LicenseType NetworkMode \
 && rm /tmp/${TOOLCHAIN}.run
ENV PATH /opt/microchip/${TOOLCHAIN}/v${TOOLCHAIN_VERSION}/bin:$PATH

# DFPs needed for default configuration

# Download and install Microchip.PIC32MZ-W_DFP.1.5.203
RUN curl -fSL -A "Mozilla/4.0" -o /tmp/tmp-pack.atpack \
         "https://packs.download.microchip.com/Microchip.PIC32MZ-W_DFP.1.5.203.atpack" \
 && mkdir -p /opt/microchip/mplabx/v${MPLABX_VERSION}/packs/PIC32MZ-W_DFP/1.5.203 \
 && unzip -o /tmp/tmp-pack.atpack -d /opt/microchip/mplabx/v${MPLABX_VERSION}/packs/PIC32MZ-W_DFP/1.5.203 \
 && rm /tmp/tmp-pack.atpack
ENV BUILD_CONFIGURATION default
Once you build the docker image, you can mount volumes and compile code with the RISCV toolchain.
Note: Before compilation, you need to regenerate the Makefiles to reflect the local paths using the prjMakefilesGenerator command, passing the path to the project Makefile folder. The command path is exported
Alternately, we can include git into the Docker image, clone the repo into the container, and compile it without mounting a volume. This might be useful in the case of some CI systems.
Usecase 3: Using the container with GitHub Actions
The GitHub actions file to use the container we created in the previous use-case will look like this.
name: containerTest
on: push

jobs:
    rvTC-docker:
        runs-on: ubuntu-latest
        container:
            image: vppillai/riscv-toolchain:0.1
        steps:
          - name : gcc version check
            run: riscv32-unknown-linux-gnu-gcc -v
The execution result shows that the compiler is useable in the Action.
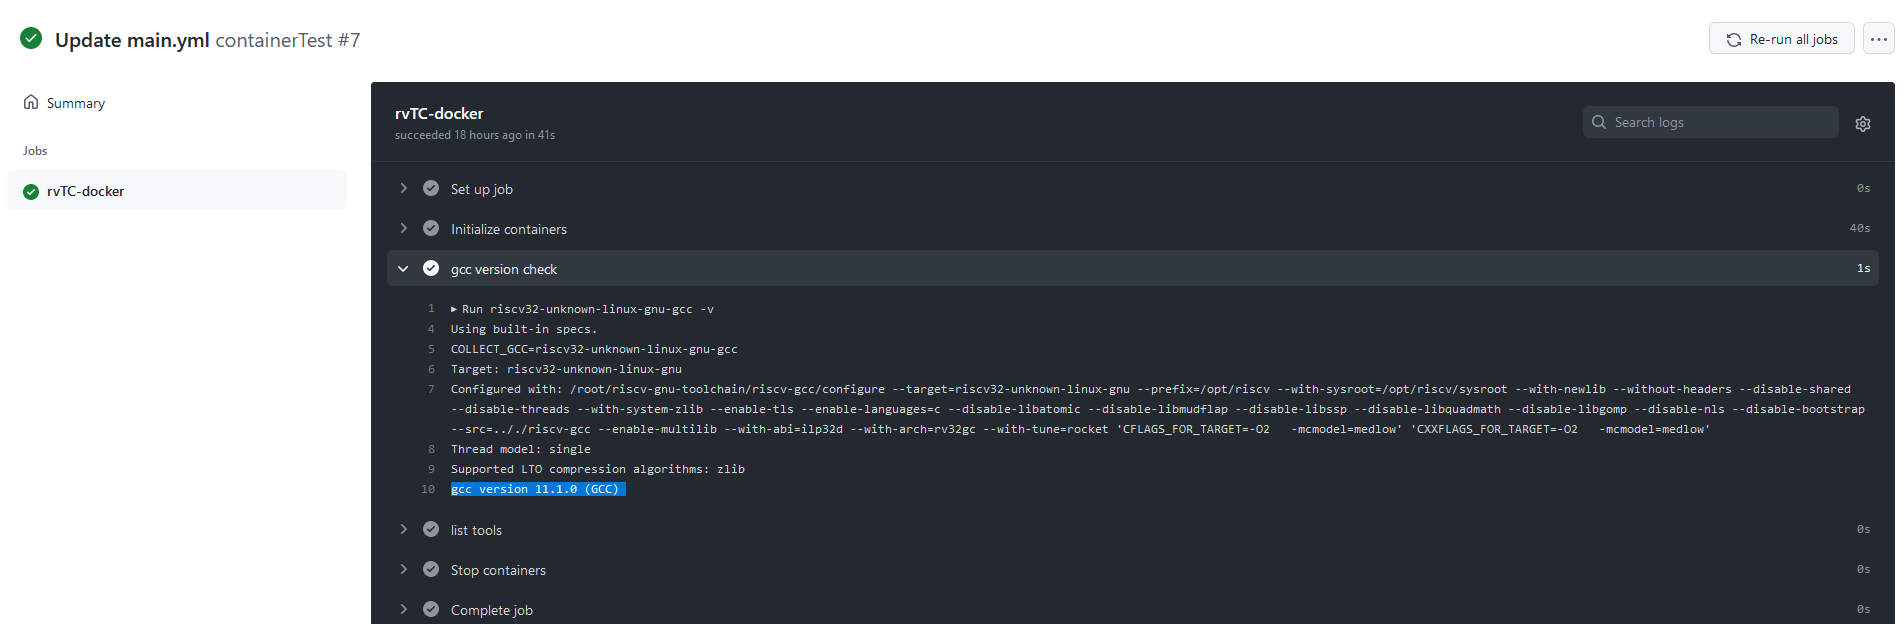
Github Actions result
Though this file simply lists the tool version, we can use additional run commands to clone your code, compile it, and run tests.
Appendix A : Performance analysis results from pyperfromance
Click to open the pyperformance analysis comparison
docker.json
===========

Performance version: 1.0.2
Report on Linux-5.11.0-46-generic-x86_64-with-glibc2.29
Number of logical CPUs: 8
Start date: 2022-01-14 06:51:08.203980
End date: 2022-01-14 07:09:17.066526

native.json
===========

Performance version: 1.0.2
Report on Linux-5.11.0-46-generic-x86_64-with-glibc2.29
Number of logical CPUs: 8
Start date: 2022-01-14 11:56:55.840045
End date: 2022-01-14 12:15:11.153045

### 2to3 ###
Mean +- std dev: 309 ms +- 11 ms -> 302 ms +- 6 ms: 1.02x faster
Significant (t=4.81)

### chameleon ###
Mean +- std dev: 8.29 ms +- 0.49 ms -> 7.96 ms +- 0.26 ms: 1.04x faster
Significant (t=4.66)

### chaos ###
Mean +- std dev: 96.1 ms +- 3.0 ms -> 95.9 ms +- 2.5 ms: 1.00x faster
Not significant

### crypto_pyaes ###
Mean +- std dev: 92.6 ms +- 2.2 ms -> 93.8 ms +- 5.6 ms: 1.01x slower
Not significant

### deltablue ###
Mean +- std dev: 5.97 ms +- 0.14 ms -> 6.02 ms +- 0.21 ms: 1.01x slower
Not significant

### django_template ###
Mean +- std dev: 45.6 ms +- 1.0 ms -> 45.6 ms +- 1.2 ms: 1.00x slower
Not significant

### dulwich_log ###
Mean +- std dev: 86.2 ms +- 3.4 ms -> 86.5 ms +- 2.1 ms: 1.00x slower
Not significant

### fannkuch ###
Mean +- std dev: 406 ms +- 10 ms -> 402 ms +- 5 ms: 1.01x faster
Not significant

### float ###
Mean +- std dev: 99.4 ms +- 2.4 ms -> 97.7 ms +- 1.7 ms: 1.02x faster
Not significant

### go ###
Mean +- std dev: 212 ms +- 4 ms -> 227 ms +- 43 ms: 1.07x slower
Significant (t=-2.68)

### hexiom ###
Mean +- std dev: 8.09 ms +- 0.17 ms -> 9.05 ms +- 2.74 ms: 1.12x slower
Significant (t=-2.70)

### json_dumps ###
Mean +- std dev: 10.9 ms +- 0.3 ms -> 11.3 ms +- 0.4 ms: 1.04x slower
Significant (t=-6.52)

### json_loads ###
Mean +- std dev: 21.6 us +- 0.8 us -> 23.2 us +- 2.4 us: 1.07x slower
Significant (t=-4.64)

### logging_format ###
Mean +- std dev: 9.37 us +- 0.18 us -> 9.19 us +- 0.20 us: 1.02x faster
Not significant

### logging_silent ###
Mean +- std dev: 161 ns +- 9 ns -> 156 ns +- 7 ns: 1.03x faster
Significant (t=3.26)

### logging_simple ###
Mean +- std dev: 8.13 us +- 0.23 us -> 8.13 us +- 0.14 us: 1.00x faster
Not significant

### mako ###
Mean +- std dev: 13.0 ms +- 0.3 ms -> 13.0 ms +- 0.2 ms: 1.00x faster
Not significant

### meteor_contest ###
Mean +- std dev: 89.9 ms +- 2.3 ms -> 90.4 ms +- 1.4 ms: 1.01x slower
Not significant

### nbody ###
Mean +- std dev: 109 ms +- 2 ms -> 108 ms +- 2 ms: 1.01x faster
Not significant

### nqueens ###
Mean +- std dev: 79.6 ms +- 1.8 ms -> 79.9 ms +- 1.3 ms: 1.00x slower
Not significant

### pathlib ###
Mean +- std dev: 21.0 ms +- 0.7 ms -> 17.8 ms +- 0.5 ms: 1.18x faster
Significant (t=27.16)

### pickle ###
Mean +- std dev: 8.14 us +- 0.16 us -> 8.25 us +- 0.24 us: 1.01x slower
Not significant

### pickle_dict ###
Mean +- std dev: 18.4 us +- 0.2 us -> 18.4 us +- 0.4 us: 1.00x faster
Not significant

### pickle_list ###
Mean +- std dev: 2.29 us +- 0.04 us -> 2.32 us +- 0.04 us: 1.02x slower
Not significant

### pickle_pure_python ###
Mean +- std dev: 385 us +- 7 us -> 393 us +- 17 us: 1.02x slower
Significant (t=-3.31)

### pidigits ###
Mean +- std dev: 157 ms +- 3 ms -> 162 ms +- 7 ms: 1.03x slower
Significant (t=-5.41)

### pyflate ###
Mean +- std dev: 571 ms +- 10 ms -> 580 ms +- 18 ms: 1.02x slower
Not significant

### python_startup ###
Mean +- std dev: 9.94 ms +- 0.18 ms -> 9.59 ms +- 0.15 ms: 1.04x faster
Significant (t=21.49)

### python_startup_no_site ###
Mean +- std dev: 6.77 ms +- 0.14 ms -> 6.59 ms +- 0.12 ms: 1.03x faster
Significant (t=14.26)

### raytrace ###
Mean +- std dev: 406 ms +- 8 ms -> 399 ms +- 5 ms: 1.02x faster
Not significant

### regex_compile ###
Mean +- std dev: 152 ms +- 3 ms -> 150 ms +- 2 ms: 1.02x faster
Not significant

### regex_dna ###
Mean +- std dev: 144 ms +- 3 ms -> 141 ms +- 2 ms: 1.02x faster
Significant (t=6.85)

### regex_effbot ###
Mean +- std dev: 2.44 ms +- 0.15 ms -> 2.30 ms +- 0.03 ms: 1.06x faster
Significant (t=7.41)

### regex_v8 ###
Mean +- std dev: 18.6 ms +- 0.5 ms -> 18.3 ms +- 0.4 ms: 1.01x faster
Not significant

### richards ###
Mean +- std dev: 56.1 ms +- 1.0 ms -> 56.8 ms +- 1.7 ms: 1.01x slower
Not significant

### scimark_fft ###
Mean +- std dev: 289 ms +- 6 ms -> 286 ms +- 2 ms: 1.01x faster
Not significant

### scimark_lu ###
Mean +- std dev: 121 ms +- 4 ms -> 120 ms +- 3 ms: 1.00x faster
Not significant

### scimark_monte_carlo ###
Mean +- std dev: 86.2 ms +- 1.8 ms -> 84.6 ms +- 1.5 ms: 1.02x faster
Not significant

### scimark_sor ###
Mean +- std dev: 166 ms +- 4 ms -> 165 ms +- 4 ms: 1.01x faster
Not significant

### scimark_sparse_mat_mult ###
Mean +- std dev: 3.48 ms +- 0.07 ms -> 3.41 ms +- 0.06 ms: 1.02x faster
Significant (t=6.18)

### spectral_norm ###
Mean +- std dev: 110 ms +- 2 ms -> 109 ms +- 1 ms: 1.01x faster
Not significant

### sqlalchemy_declarative ###
Mean +- std dev: 152 ms +- 10 ms -> 150 ms +- 3 ms: 1.01x faster
Not significant

### sqlalchemy_imperative ###
Mean +- std dev: 24.0 ms +- 0.8 ms -> 23.6 ms +- 0.7 ms: 1.02x faster
Not significant

### sqlite_synth ###
Mean +- std dev: 2.68 us +- 0.06 us -> 2.60 us +- 0.07 us: 1.03x faster
Significant (t=7.24)

### sympy_expand ###
Mean +- std dev: 485 ms +- 7 ms -> 480 ms +- 7 ms: 1.01x faster
Not significant

### sympy_integrate ###
Mean +- std dev: 21.6 ms +- 0.4 ms -> 21.5 ms +- 0.3 ms: 1.00x faster
Not significant

### sympy_str ###
Mean +- std dev: 297 ms +- 6 ms -> 297 ms +- 5 ms: 1.00x slower
Not significant

### sympy_sum ###
Mean +- std dev: 180 ms +- 3 ms -> 179 ms +- 3 ms: 1.00x faster
Not significant

### telco ###
Mean +- std dev: 5.54 ms +- 0.23 ms -> 5.56 ms +- 0.10 ms: 1.00x slower
Not significant

### tornado_http ###
Mean +- std dev: 178 ms +- 12 ms -> 178 ms +- 10 ms: 1.00x slower
Not significant

### unpack_sequence ###
Mean +- std dev: 47.8 ns +- 1.0 ns -> 47.3 ns +- 0.8 ns: 1.01x faster
Not significant

### unpickle ###
Mean +- std dev: 11.5 us +- 0.4 us -> 11.4 us +- 0.8 us: 1.01x faster
Not significant

### unpickle_list ###
Mean +- std dev: 3.99 us +- 0.08 us -> 3.94 us +- 0.07 us: 1.01x faster
Not significant

### unpickle_pure_python ###
Mean +- std dev: 274 us +- 9 us -> 270 us +- 5 us: 1.02x faster
Not significant

### xml_etree_generate ###
Mean +- std dev: 76.8 ms +- 2.8 ms -> 75.6 ms +- 1.3 ms: 1.02x faster
Not significant

### xml_etree_iterparse ###
Mean +- std dev: 91.3 ms +- 1.6 ms -> 91.0 ms +- 1.9 ms: 1.00x faster
Not significant

### xml_etree_parse ###
Mean +- std dev: 133 ms +- 4 ms -> 133 ms +- 2 ms: 1.00x slower
Not significant

### xml_etree_process ###
Mean +- std dev: 62.2 ms +- 1.3 ms -> 61.5 ms +- 1.1 ms: 1.01x faster
Not significant


Leave a comment