

Setting up a Github Actions based CI system for embedded development using PIC32
Introduction
GitHub Actions is a relatively new workflow automation offering from GitHub. While there are a lot of tutorials out there talking about using GitHub Actions on your web/software project, there are not many on using it for CI/CD workflows for embedded firmware development. In this article, we will go through the steps involved in creating a build test environment for a PIC32 based projects hosted in GitHub. We will create a simple project using MPLABX and Harmony 3 for a PIC32MZ device , commit it to GitHub and create all the framework and backend required to perform a build test on the project each time a change is committed.
While a build test in itself might sound trivial, the steps we follow here will equip you to enhance the setup further to perform advanced tests including Hardware in the loop tests.
Creating your project and repo
This is the relatively trivial part of this project which most of you would already be familiar with. Without going into the details, the outline of steps that needs to be followed are :
- Create a GitHub repo to host your project.
- Push your PIC32 project to the repo.
- Add a
.gitignoreto omit*.o , *.d, *.tmpetc. I typically omit thedistfolder as well.
- Add a
- I have kept the project configuration simple to avoid confusion. It is just a typical
Hello Worldproject with default configs.
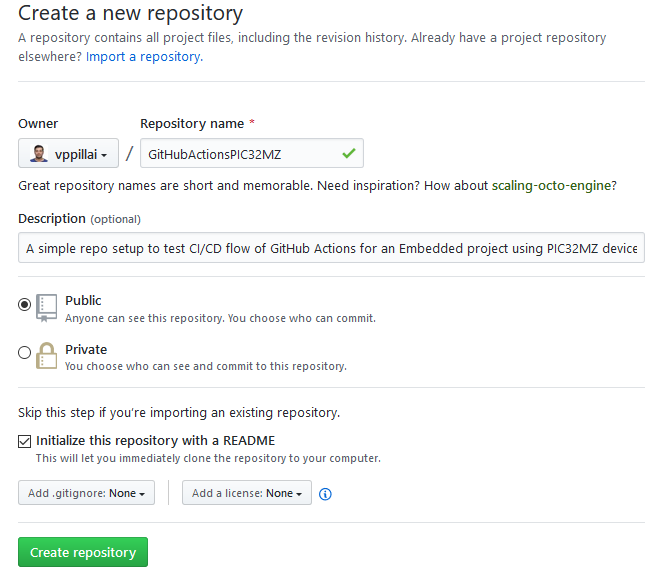
Create a repo to host your project
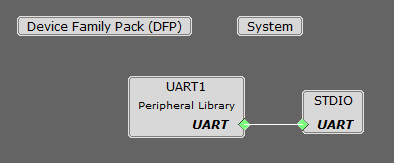
Device project configuration
Setting up the build runner
GitHub Actions essentially runs a bunch of scripts to clone your repo and execute commands that you provide in a .yaml file every time a git action is performed on the repo. For mainstream software project configurations, GitHub provides free “runners”. Runners are essentially sandboxed environments where the commands execute.
In the case of an embedded project, it will be tricky to find a build environment in the standard offering. (Unless you are using a hobbyist platform like Arduino). Even if the environment is available, for serious projects, we would want to have tight control over the toolchain versions and configurations. So, in this case we will build our own runner and register it with GitHub Actions. If you really want to go with a GitHub remote Runner, you can spin up a docker with the required tools installed.
The docker file for this would look like this:
FROM ubuntu:20.04

ENV XC32VER v2.40
ENV MPLABXVER v5.40

MAINTAINER Vysakh P Pillai

# Install dependencies
RUN apt-get update && apt-get install -y --no-install-recommends apt-utils

RUN dpkg --add-architecture i386 \
    && apt-get update -yq \
    && apt-get install -yq --no-install-recommends ca-certificates wget unzip libc6:i386 git \
        libx11-6:i386 libxext6:i386 libstdc++6:i386 libexpat1:i386 \
        libxext6 libxrender1 libxtst6 libgtk2.0-0 make \
    && rm -rf /var/lib/apt/lists/*

# Install MPLAB
RUN wget https://ww1.microchip.com/downloads/en/DeviceDoc/MPLABX-${MPLABXVER}-linux-installer.tar -q --show-progress --progress=bar:force:noscroll -O MPLABX-${MPLABXVER}-linux-installer.tar \
    && tar xf MPLABX-${MPLABXVER}-linux-installer.tar && rm -f MPLABX-${MPLABXVER}-linux-installer.tar \
    && USER=root ./*-installer.sh --nox11 \
    -- --unattendedmodeui none --mode unattended \
    && rm -f MPLABX-${MPLABXVER}-linux-installer.sh

# Install XC32
RUN wget https://ww1.microchip.com/downloads/en/DeviceDoc/xc32-${XC32VER}-full-install-linux-installer.run -q --show-progress --progress=bar:force:noscroll -O xc32-${XC32VER}-full-install-linux-installer.run\
    && chmod a+x xc32-${XC32VER}-full-install-linux-installer.run \
    && ./xc32-${XC32VER}-full-install-linux-installer.run \
    --mode unattended --unattendedmodeui none \
    --netservername localhost --LicenseType FreeMode \
    && rm -f xc32-${XC32VER}-full-install-linux-installer.run

ENV PATH $PATH:/opt/microchip/xc32/${XC32VER}/bin
ENV PATH $PATH:/opt/microchip/mplabx/${MPLABXVER}/mplab_platform/bin
Compiling your MPLAB X (windows) project in a Linux shell
One of the key features of MPLABX that I like the most is its ability to dynamically generate Makefiles for the project in such a way that it can be used in automated build systems with ease. It does take some getting used to. However, once you figure out the bits and pieces, you will realize that there are quiet a few powerful features built into the system. However, one pain point is that the generated Makefiles rely on some IDE utilities which makes IDE installation in the build machine mandatory. It would have been better if we can get away with just installing the Compiler.
Setting up a build VM
I prefer to use a docker or VM to prepare sandboxed environments. To keep it simple for a beginner , we will use some UI tools here. We will use Oracle VitrualBox to setup a Ubuntu VM and install the required build tools into it. Steps follow:
- Install Oracle VirtualBox and create a VM .
- In my workstation, I configured for 2 Processors, 8GB RAM , 30GB Disk Space and Bridged networking
- Download Ubuntu ISO and install the minimal configuration into the VM.
- Issue following commands to download and install the IDE and tools via the commandline.
# install dependencies
sudo dpkg --add-architecture i386
sudo apt-get update -yq && sudo apt-get upgrade -yq
sudo apt-get install build-essential lib32z1 libc6:i386 libx11-6:i386 libxext6:i386 libstdc++6:i386 libexpat1:i386 wget -y

#Download and install IDE
wget http://ww1.microchip.com/downloads/en/DeviceDoc/MPLABX-v5.30-linux-installer.tar -q --show-progress --progress=bar:force:noscroll -O MPLABX-v5.30-linux-installer.tar
tar xf MPLABX-v5.20-linux-installer.tar
rm -f MPLABX-v5.20-linux-installer.tar
sudo ./MPLABX-v5.30-linux-installer.sh --nox11 -- --unattendedmodeui none --mode unattended
rm -f MPLABX-v5.20-linux-installer.sh

# Download and install Compiler
wget http://ww1.microchip.com/downloads/en/DeviceDoc/xc32-v2.30-full-install-linux-installer.run -q --show-progress --progress=bar:force:noscroll -O xc32-v2.30-full-install-linux-installer.run
chmod a+x xc32-v2.30-full-install-linux-installer.run
./xc32-v2.30-full-install-linux-installer.run --mode unattended --unattendedmodeui none --netservername localhost --LicenseType FreeMode && rm -f xc32-v2.20-full-install-linux-installer.run
Testing the setup with a build test
To test the installation and setup, clone the repo into the new VM, navigate to the project location (were the Makefile resides ) and issue the following command. This command overrides the local tool location variables in the project with the settings of the VM we just setup.
make \
SHELL=bash \
MKDIR="mkdir -p" \
PATH_TO_IDE_BIN="/opt/microchip/mplabx/v5.35/mplab_platform/platform/../mplab_ide/modules/../../bin/" \
PATH:="/opt/microchip/mplabx/v5.30/mplab_platform/platform/../mplab_ide/modules/../../bin/":$PATH \
OS_CURRENT="$(uname -s)" \
MP_JAVA_PATH="/opt/microchip/mplabx/v5.30/sys/java/jre1.8.0_181/bin/" \
MP_CC="/opt/microchip/xc32/v2.30/bin/xc32-gcc" \
MP_CPPC="/opt/microchip/xc32/v2.30/bin/xc32-g++" \
MP_AS="/opt/microchip/xc32/v2.30/bin/xc32-as" \
MP_LD="/opt/microchip/xc32/v2.30/bin/xc32-ld" \
MP_AR="/opt/microchip/xc32/v2.30/bin/xc32-ar" \
DEP_GEN="${MP_JAVA_PATH}java -jar /opt/microchip/mplabx/v5.30/mplab_platform/platform/../mplab_ide/modules/../../bin/extractobjectdependencies.jar" \
MP_CC_DIR="/opt/microchip/xc32/v2.30/bin/" \
MP_CPPC_DIR="/opt/microchip/xc32/v2.30/bin/" \
MP_AS_DIR="/opt/microchip/xc32/v2.30/bin/" \
MP_LD_DIR="/opt/microchip/xc32/v2.30/bin/" \
MP_AR_DIR="/opt/microchip/xc32/v2.30/bin/" \
DFP_DIR="/opt/microchip/mplabx/v5.30/packs/Microchip/PIC32MZ-EF_DFP/1.1.45" -j4
This will compile your project using the newly installed toolchain. If you don’t want to do this step manually, the easiest is to execute the tool in the following path. This will re-generate all the Makefiles for you just as if you opened the project in the IDE.
/opt/microchip/mplabx/v5.30/mplab_platform/bin/prjMakefilesGenerator.sh <proj.X>
Attaching the build runner to your repo
Navigate to the GitHub repo settings and click on “Actions”>”Add Runner”. The pop-up will provide a bunch of steps to add the actions runner package into your VM. Essentially, this is a script that listens to invocations from GitHub Actions and execute some steps. In the case of the image below, I have attached 2 runners to the repo. This means 2 workflows can be triggered in parallel.
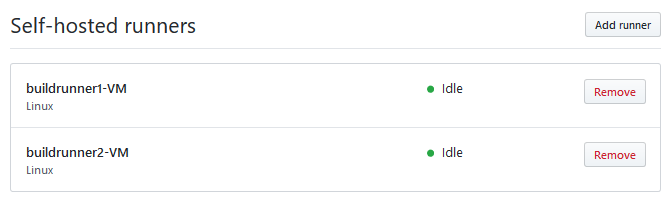
Adding self hosted runner.
It is recommended to install the runner as a service into your VM so that it starts seamlessly every time. To do this, issue the following command.
sudo ./svc.sh install
Once the runner is executing in the background, you can check its status using sudo ./svc.sh status
Creating a build test workflow
Now that we have attached a runner to the repo, we need to create a workflow. A workflow is essentially the set of steps and execution conditions that are given to GitHub actions. When the condition is met, the steps in the workflow will be executed on the runner.
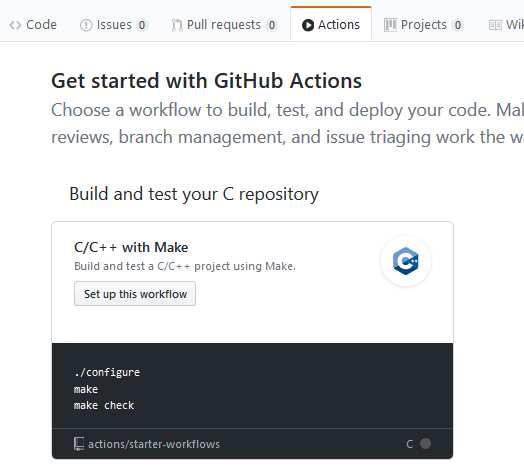
Create a new workflow.
Go to “Actions” in your repo. Github would have already identified that this is a C/C++ project with Makefile based builds. Click on “Set up this workflow”. This will create a new template .yaml script within .github/workflows of your project. A sample .yaml script that compiles the PIC32 project and upload the artifact back to the workflow results is given below. Once the contents are pasted, commit the file to your repo. Note that we are specifying self-hosted
name: HelloCIWorld-pic32mz

on: [push]

jobs:
  build:

    runs-on: self-hosted

    steps:
    - uses: actions/checkout@v2
    - name: clean
      run: make SHELL=bash MKDIR="mkdir -p" PATH_TO_IDE_BIN="/opt/microchip/mplabx/v5.35/mplab_platform/platform/../mplab_ide/modules/../../bin/" PATH:="/opt/microchip/mplabx/v5.30/mplab_platform/platform/../mplab_ide/modules/../../bin/":"/opt/microchip/xc32/v2.30/bin/":$PATH OS_CURRENT="$(uname -s)" MP_JAVA_PATH="/opt/microchip/mplabx/v5.30/sys/java/jre1.8.0_181/bin/" MP_CC="/opt/microchip/xc32/v2.30/bin/xc32-gcc" MP_CPPC="/opt/microchip/xc32/v2.30/bin/xc32-g++" MP_AS="/opt/microchip/xc32/v2.30/bin/xc32-as" MP_LD="/opt/microchip/xc32/v2.30/bin/xc32-ld" MP_AR="/opt/microchip/xc32/v2.30/bin/xc32-ar" DEP_GEN="${MP_JAVA_PATH}java -jar /opt/microchip/mplabx/v5.30/mplab_platform/platform/../mplab_ide/modules/../../bin/extractobjectdependencies.jar" MP_CC_DIR="/opt/microchip/xc32/v2.30/bin/" MP_CPPC_DIR="/opt/microchip/xc32/v2.30/bin/" MP_AS_DIR="/opt/microchip/xc32/v2.30/bin/" MP_LD_DIR="/opt/microchip/xc32/v2.30/bin/" MP_AR_DIR="/opt/microchip/xc32/v2.30/bin/" DFP_DIR="/opt/microchip/mplabx/v5.30/packs/Microchip/PIC32MZ-EF_DFP/1.1.45" clean
    - name: make
      run: make SHELL=bash MKDIR="mkdir -p" PATH_TO_IDE_BIN="/opt/microchip/mplabx/v5.35/mplab_platform/platform/../mplab_ide/modules/../../bin/" PATH:="/opt/microchip/mplabx/v5.30/mplab_platform/platform/../mplab_ide/modules/../../bin/":"/opt/microchip/xc32/v2.30/bin/":$PATH OS_CURRENT="$(uname -s)" MP_JAVA_PATH="/opt/microchip/mplabx/v5.30/sys/java/jre1.8.0_181/bin/" MP_CC="/opt/microchip/xc32/v2.30/bin/xc32-gcc" MP_CPPC="/opt/microchip/xc32/v2.30/bin/xc32-g++" MP_AS="/opt/microchip/xc32/v2.30/bin/xc32-as" MP_LD="/opt/microchip/xc32/v2.30/bin/xc32-ld" MP_AR="/opt/microchip/xc32/v2.30/bin/xc32-ar" DEP_GEN="${MP_JAVA_PATH}java -jar /opt/microchip/mplabx/v5.30/mplab_platform/platform/../mplab_ide/modules/../../bin/extractobjectdependencies.jar" MP_CC_DIR="/opt/microchip/xc32/v2.30/bin/" MP_CPPC_DIR="/opt/microchip/xc32/v2.30/bin/" MP_AS_DIR="/opt/microchip/xc32/v2.30/bin/" MP_LD_DIR="/opt/microchip/xc32/v2.30/bin/" MP_AR_DIR="/opt/microchip/xc32/v2.30/bin/" DFP_DIR="/opt/microchip/mplabx/v5.30/packs/Microchip/PIC32MZ-EF_DFP/1.1.45"  -j4 -C HelloCIWorld/firmware/HelloCIWorld.X
    - uses: actions/upload-artifact@v1
      with:
        name: noEthBuild_$.$_$.zip
        path: HelloCIWorld/firmware/HelloCIWorld.X/dist/HelloCIWorld/production
If prjMakefilesGenerator was used, you can just provide the make command.
As soon as the file is committed, you can see that the runner will be executing a build. This is because the script calls for the workflow to be executed as soon as a push is made into the repo.
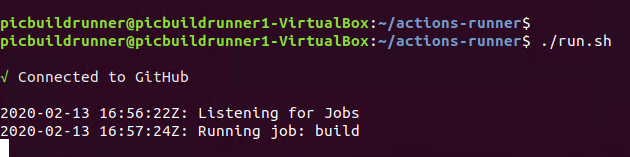
Runner executing.
Results can be observed in the “Actions” tab of GitHub repo by clicking on the specific workflow.
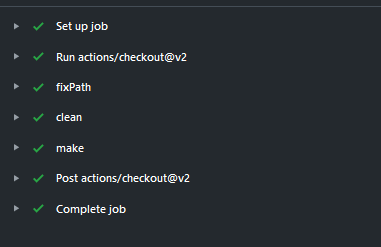
Workflow Results.


Leave a comment